Intech Sol Horizon Cellular Setup
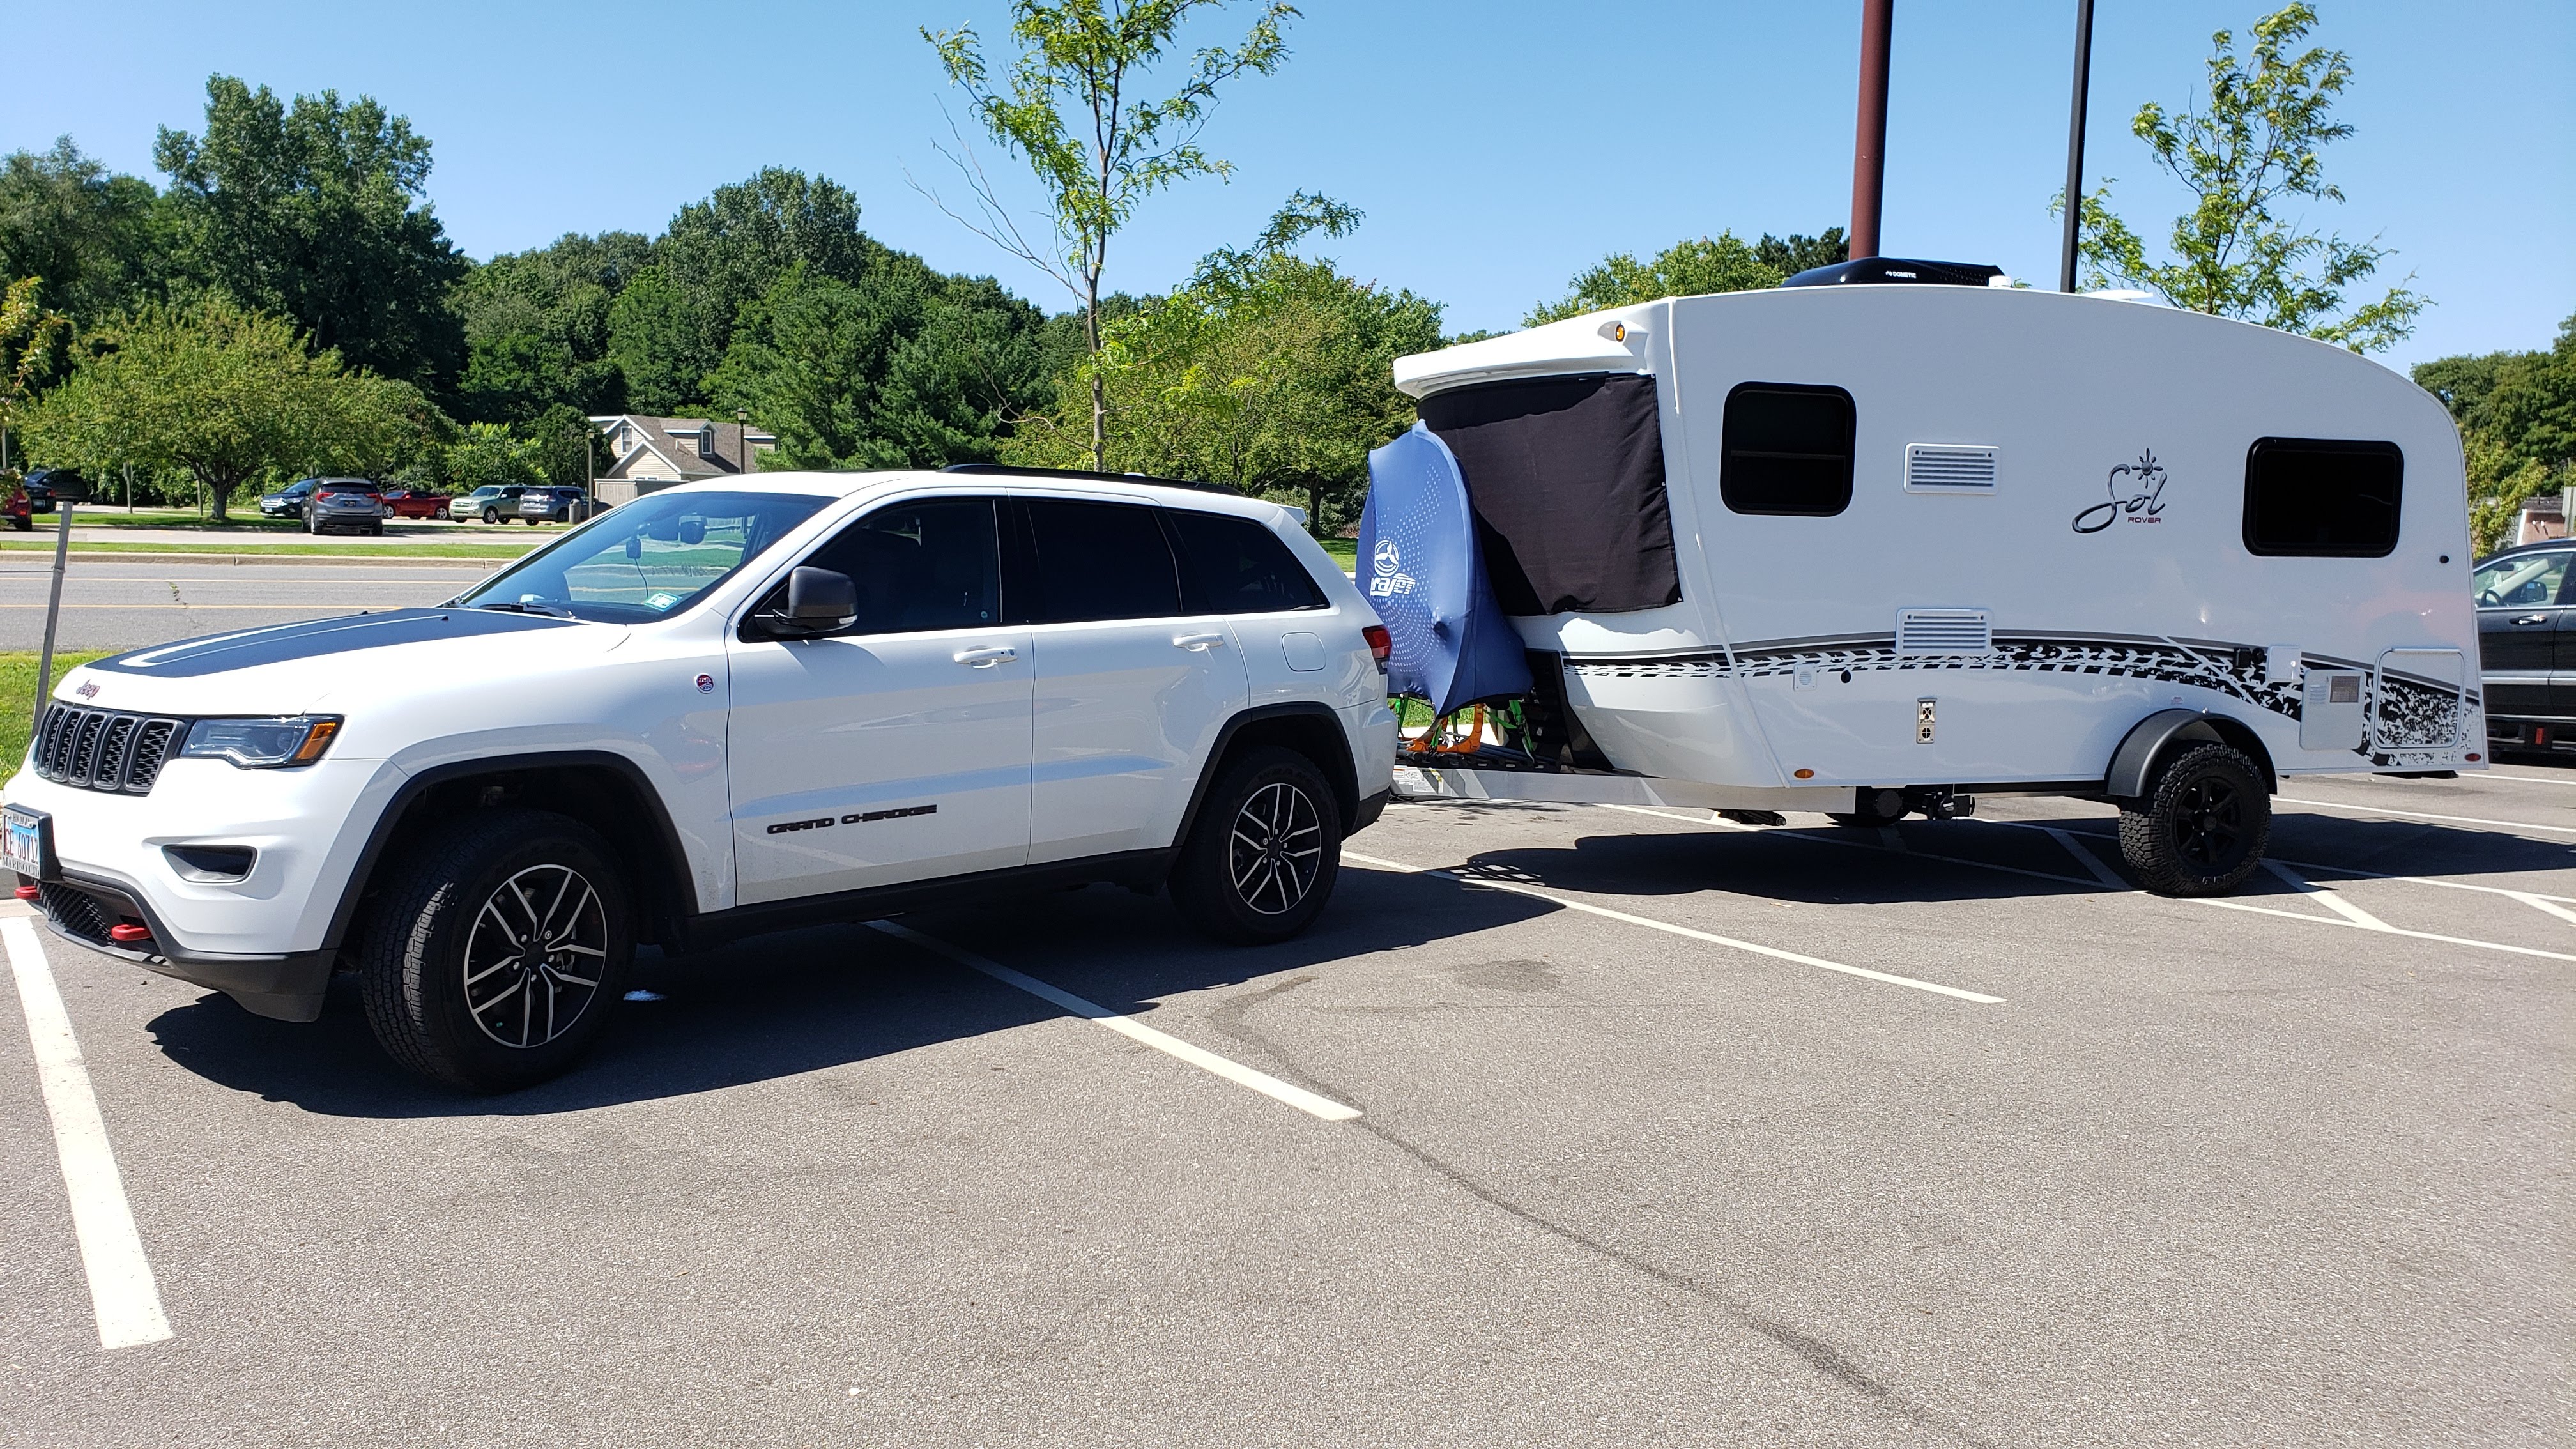
In 2022, I bought myself an Intech Sol Horizon Rover. I had been looking at RVs for a long time and decided on this particular manufacturer because of the excellent build quality and reputation of the manufacturer. The Horizon was a good fit for my needs because it was spacious enough to be comfortable for two adults to live in for long periods of time, and small enough that I could tow it with my Jeep Grand Cherokee. My goal for this RV is to be something that I could work remotely from, which means I needed to get a reliable internet setup. This post will show you my journey with finding the right internet solution, the lessons I learned, and the resources I used to make this a successful build.
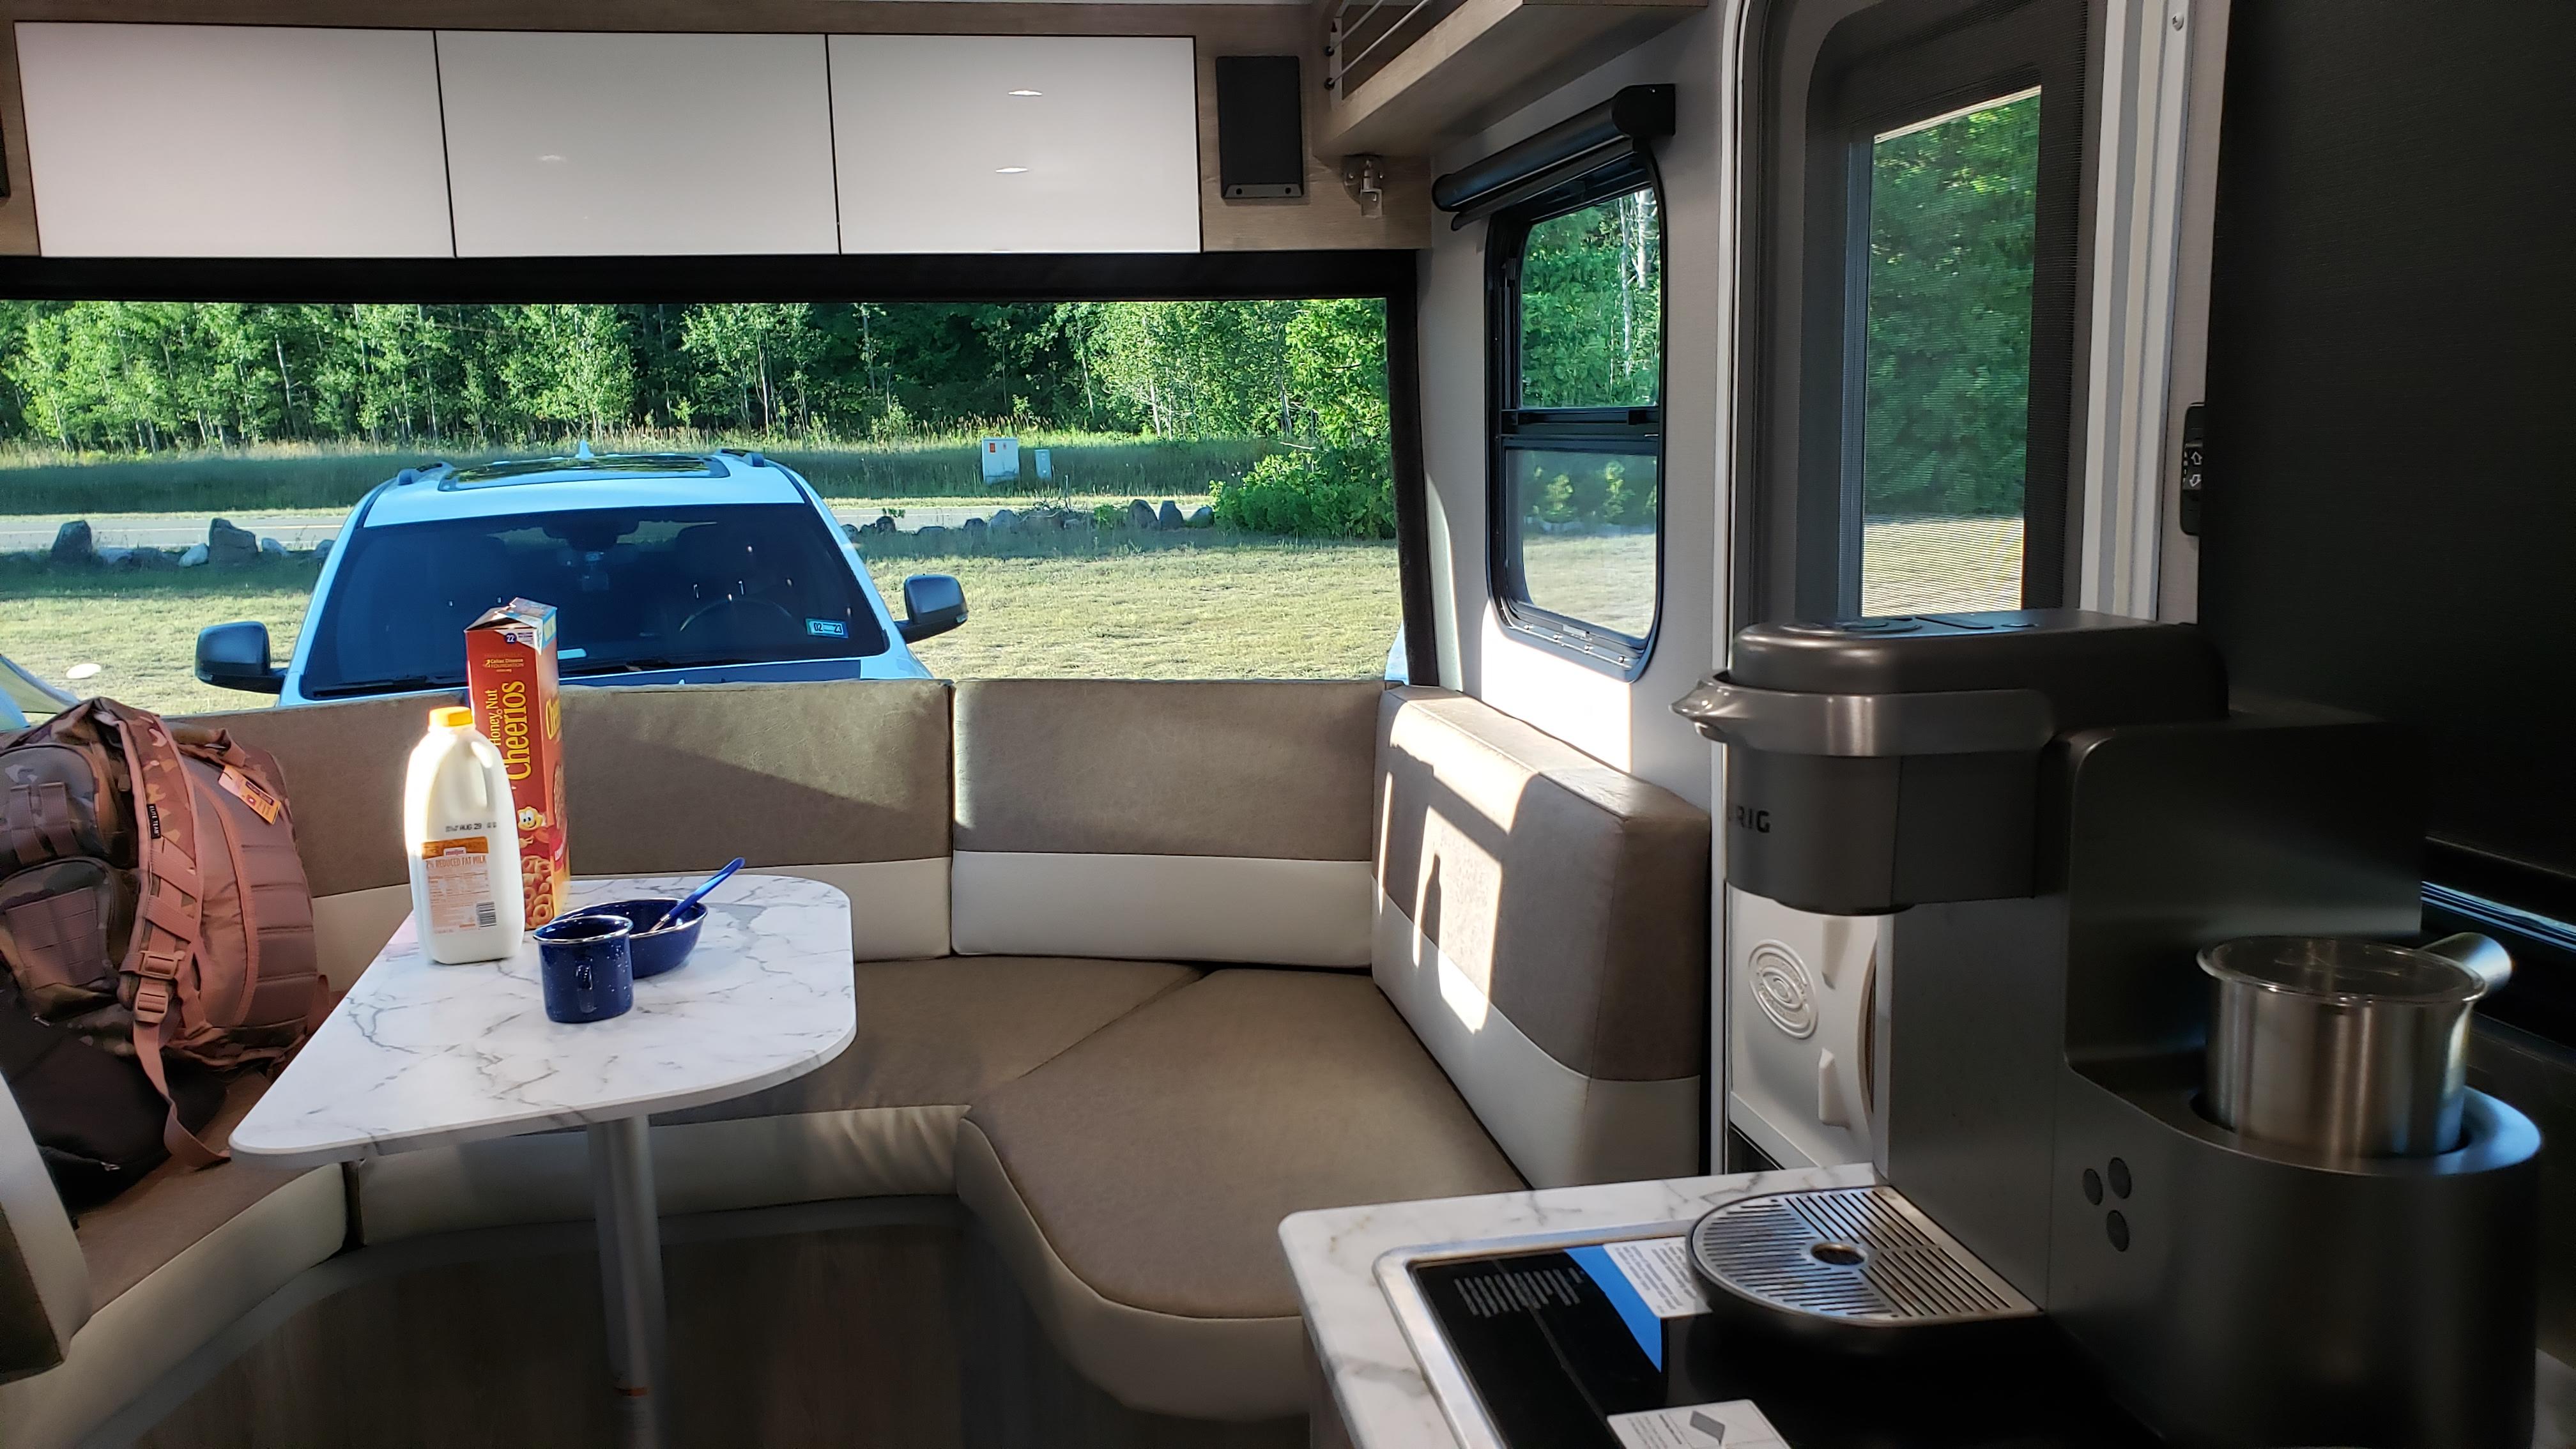
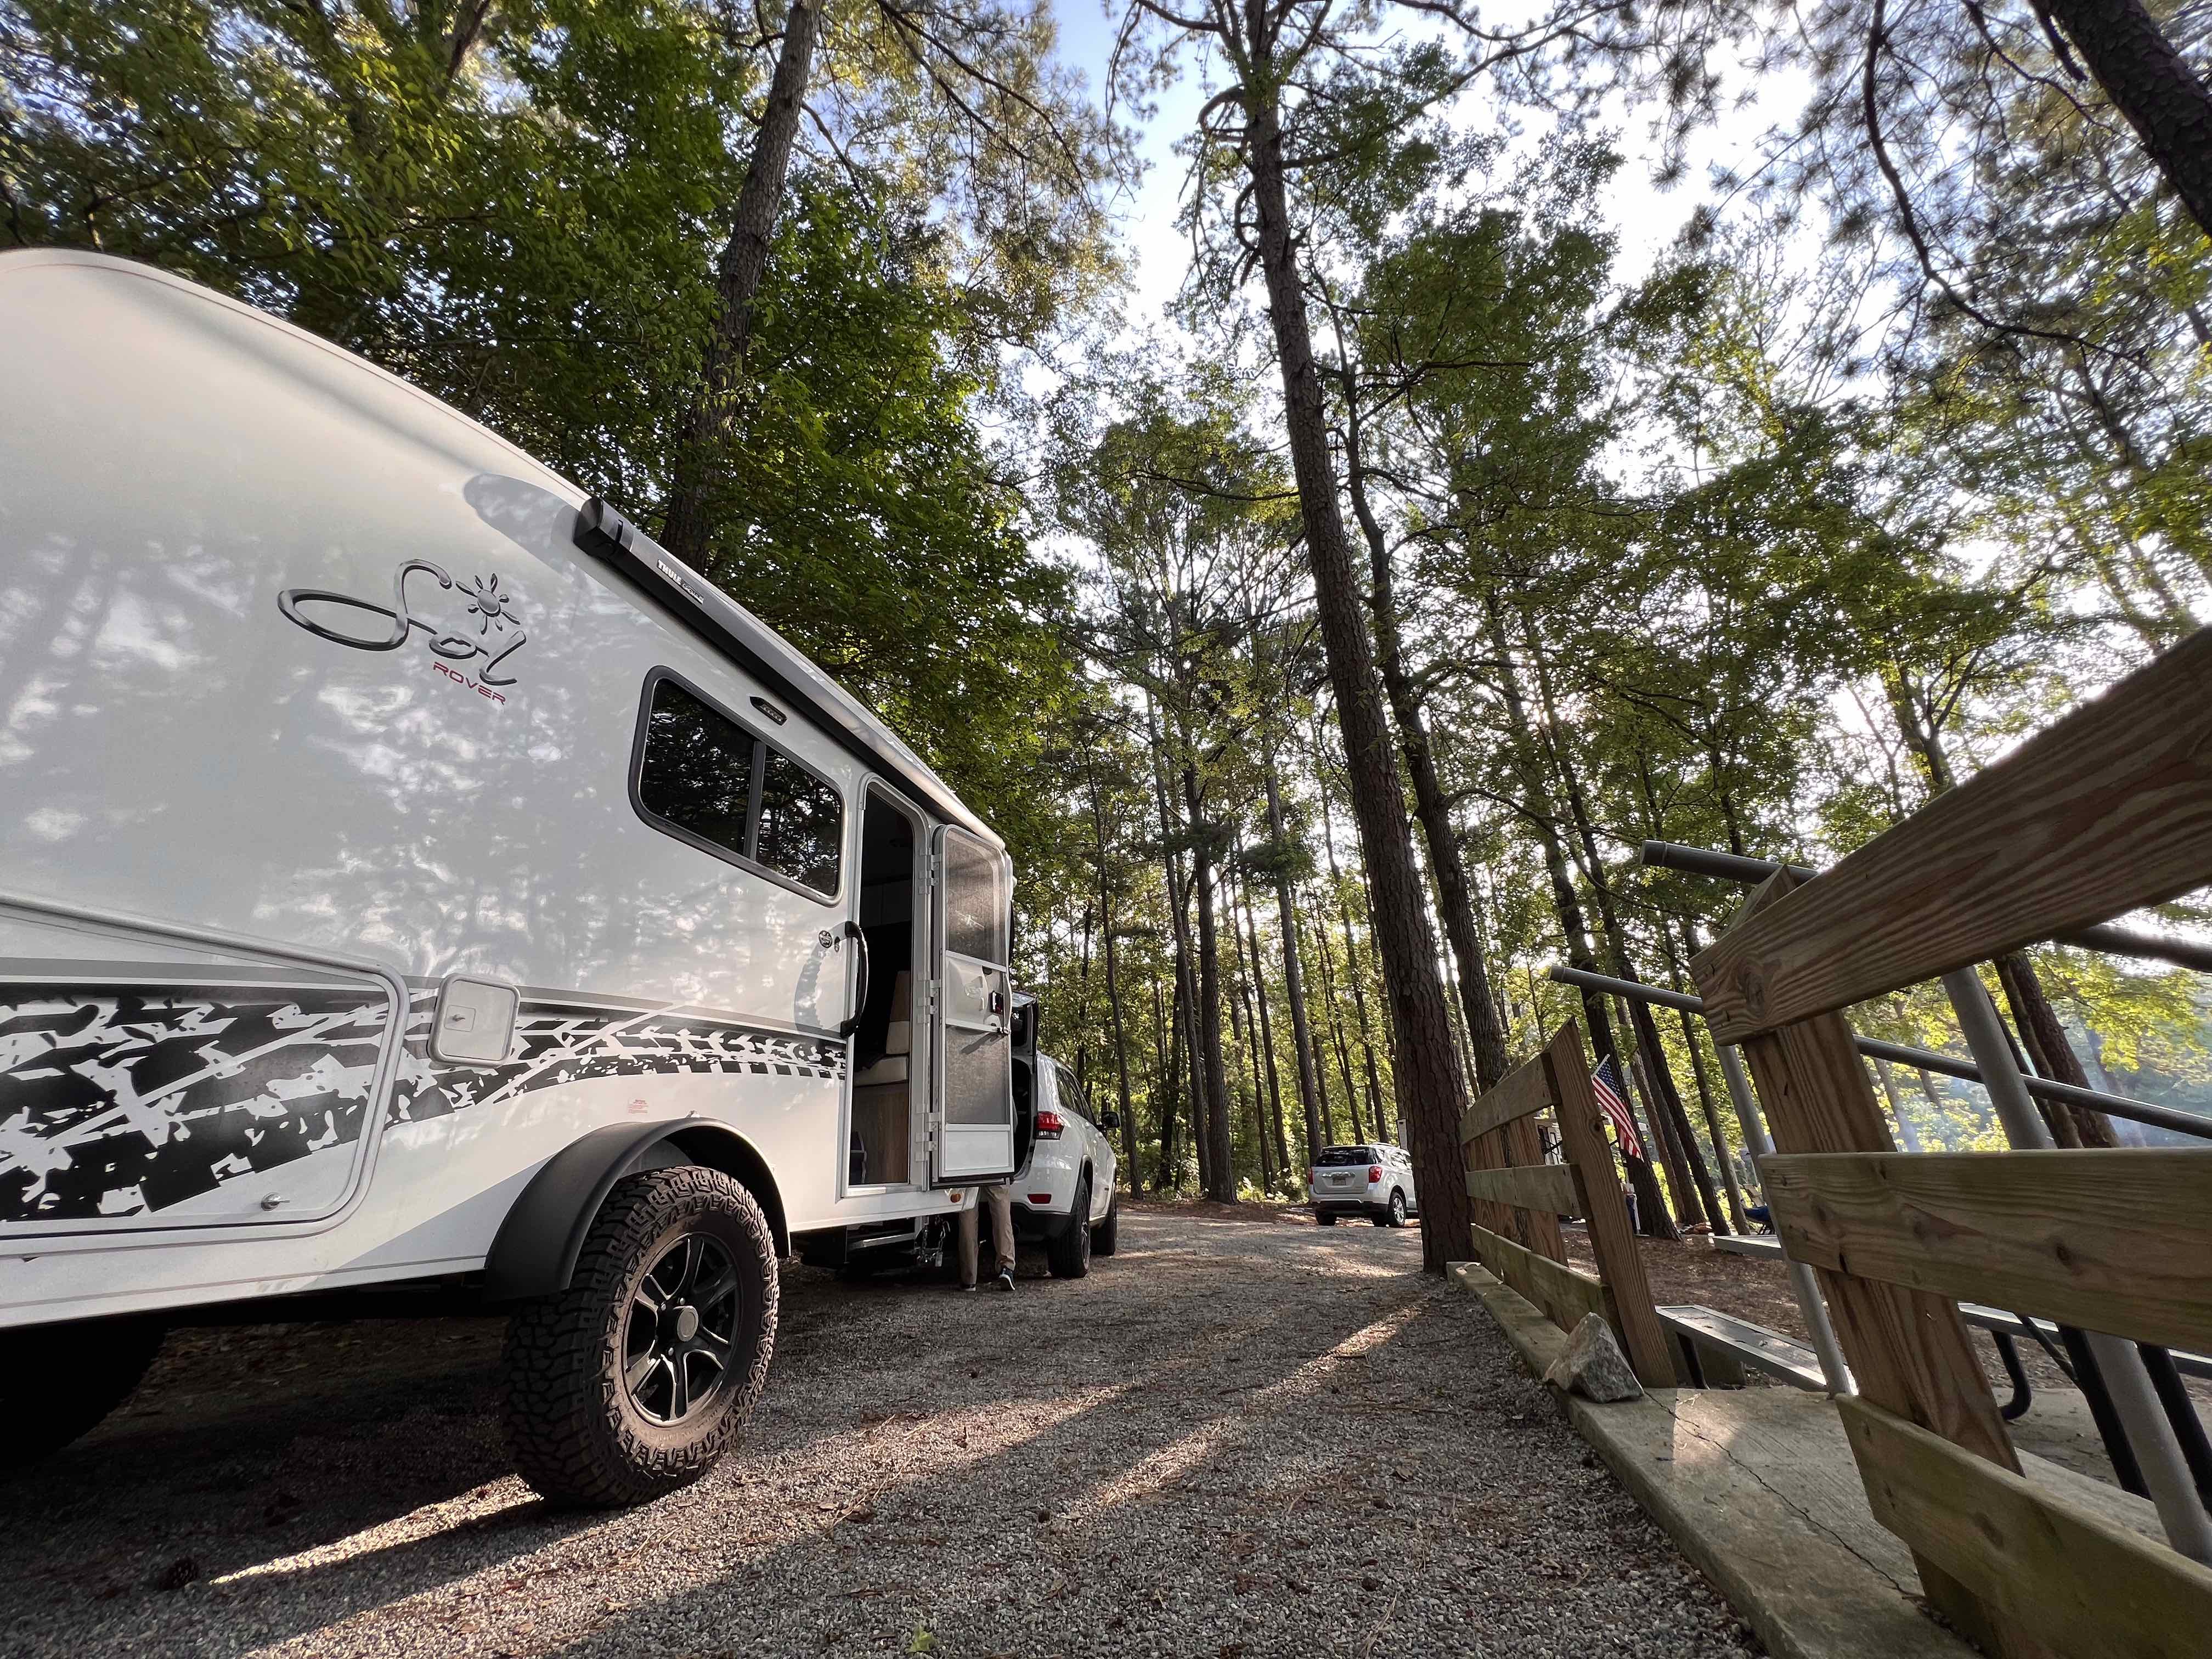
The Rig

Categories of Cellular Installations
After a lot of researching online, I found that there are two main categories of cellular internet installations:
Mobile Hotspots
Mobile hotspots work by receiving a cellular signal and exposing a WiFi access point inside your trailer. Most modern cellphones have a hotspot feature, but you can also buy dedicated hotspot modems like the Verizon Jetpack or the AT&T Nighthawk.
Pros
- Easy to set up. You purchase a pre-packaged plan from the provider and they ship you a device that will work out of the box
- Easy to use. There is minimal wiring that needs to be setup. Usually you'll only need to plug the device into an AC outlet and any external antennas that may be provided.
- Portable. You don't have to confine the device to just your RV. You can take it anywhere you want.
- Heavy duty cellular boosters like the Weboost Destination RV are very easy to setup and can greatly increase the range of the booster with minimal effort.
Cons
- They are not meant for long-term heavy use. There have been reports of the devices overheating due to excessive use if you are full-timing.
- Poor cellular reception. In areas of low-quality cell service, the internal antennas will often be insufficient. Most of the window-mounted antennas are also inadequate. Usage of an external cellular booster like the Weboost Destination RV can help mitigate this.
- You're often tied to one carrier. Some devices can only be used with one carrier (not all of them are like this, but most are in my experience).
Dedicated Cellular Routers
A cellular router is a more robust and permanent platform. A router like the Peplink MAX Transit Duo are powerful devices that are capable of bonding multiple sources of internet into a single WiFi access point. The MAX Transit Duo, for example, is capable of bonding two separate cellular SIM cards and external WiFi signals (like what campgrounds offer) into a single access point. Some of the more advanced Peplink models even allow bonding to a Starlink signal, providing you with quadruple internet redundancy.
Pros
- Carrier-agnostic. You won't be tied to any particular carrier and can independently swap out SIM cards any time you want.
- WAN Bonding. You can bond with any kind of internet signal, like from starlink, to provide multiple redundancy paths.
- Redundancy. Because of the WAN bonding, the multi-SIM Peplink devices will automatically and transparently failover to other internet sources. You also get cellular coverage redundancy, meaning if one carrier doesn't have coverage in a particular area, another carrier might. You would not have to configure anything for the failover to happen, the Peplink device would do it automatically.
- Energy efficient. The peplink devices can be wired directly to your 12V system which means you won't need an inverter to convert the battery DC to AC, and then another wall AC adapter to convert the AC back to DC. This DC->AC->DC conversion wastes lots of energy as heat.
- Options for high quality external antenna mounts. The devices can be plugged directly into a permanently mounted external omnidirectional antenna on your roof that provides large dB gains to your signal. You could also theoretically connect the directional antenna from the Weboost Destination RV into a Peplink router for situations where the omnidirectional antenna doesn't provide enough dB gain.
Cons
- More expensive. Most of the multi-WAN bonding devices start at around $1000 and quickly increase depending on the options you want.
- More complex. Careful consideration has to be taken on the physical installation with antenna placement, wire routing, and drilling. The devices themselves also tend to require manual configuration in order to work with the carriers and bands you need. For the Intech Sol Horizon specifically (as I'll elaborate on later), the antenna itself could not be drilled anywhere near the AC unit which means I had to figure out how to use a magnetic mount on a fiberglass roof.
Weboost Destination RV
My goal for my internet setup was ultimate redundancy. I wanted a setup where I could use my phone's internal hotspot for internet, as well as access to a directional antenna that will be powerful enough to punch through areas with incredibly weak signal. The Weboost Destination RV was a great choice because it required minimal setup and works seamlessly with all cellular devices that have their own internal antennas.
Here is a general diagram of how it works:
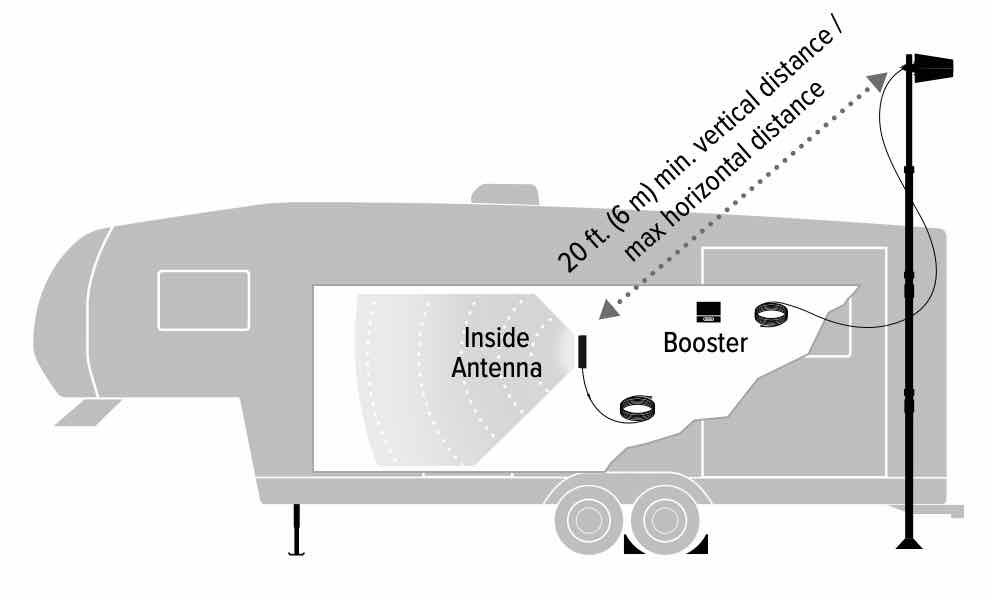
An external antenna is mounted on a telescoping pole that you attach to the side of your RV using 3M tape. The antenna is connected to a signal repeater on the inside of the RV that boosts the signal to a higher dB. The repeater is then connected to a low-gain internal cellular antenna that your devices will interact with.
The Destination RV works great with the Intech Sol Horizon because you can re-use the existing external coaxial port on the left side of the RV for running your cellular signal. This port runs behind the TV over the bed and is meant for routing a satellite antenna to the TV, but works perfectly well for a cellular signal as well.

You can then use simple 3M velcro tape to adhere the internal repeater box behind the TV and connect it to the coax port labelled Satellite. I strongly recommend using velcro 3M tape instead of permanently mounting with nails because you might find you need to readjust the positioning of your equipment. Connect the repeater to the AC plug using the provided AC adapter.
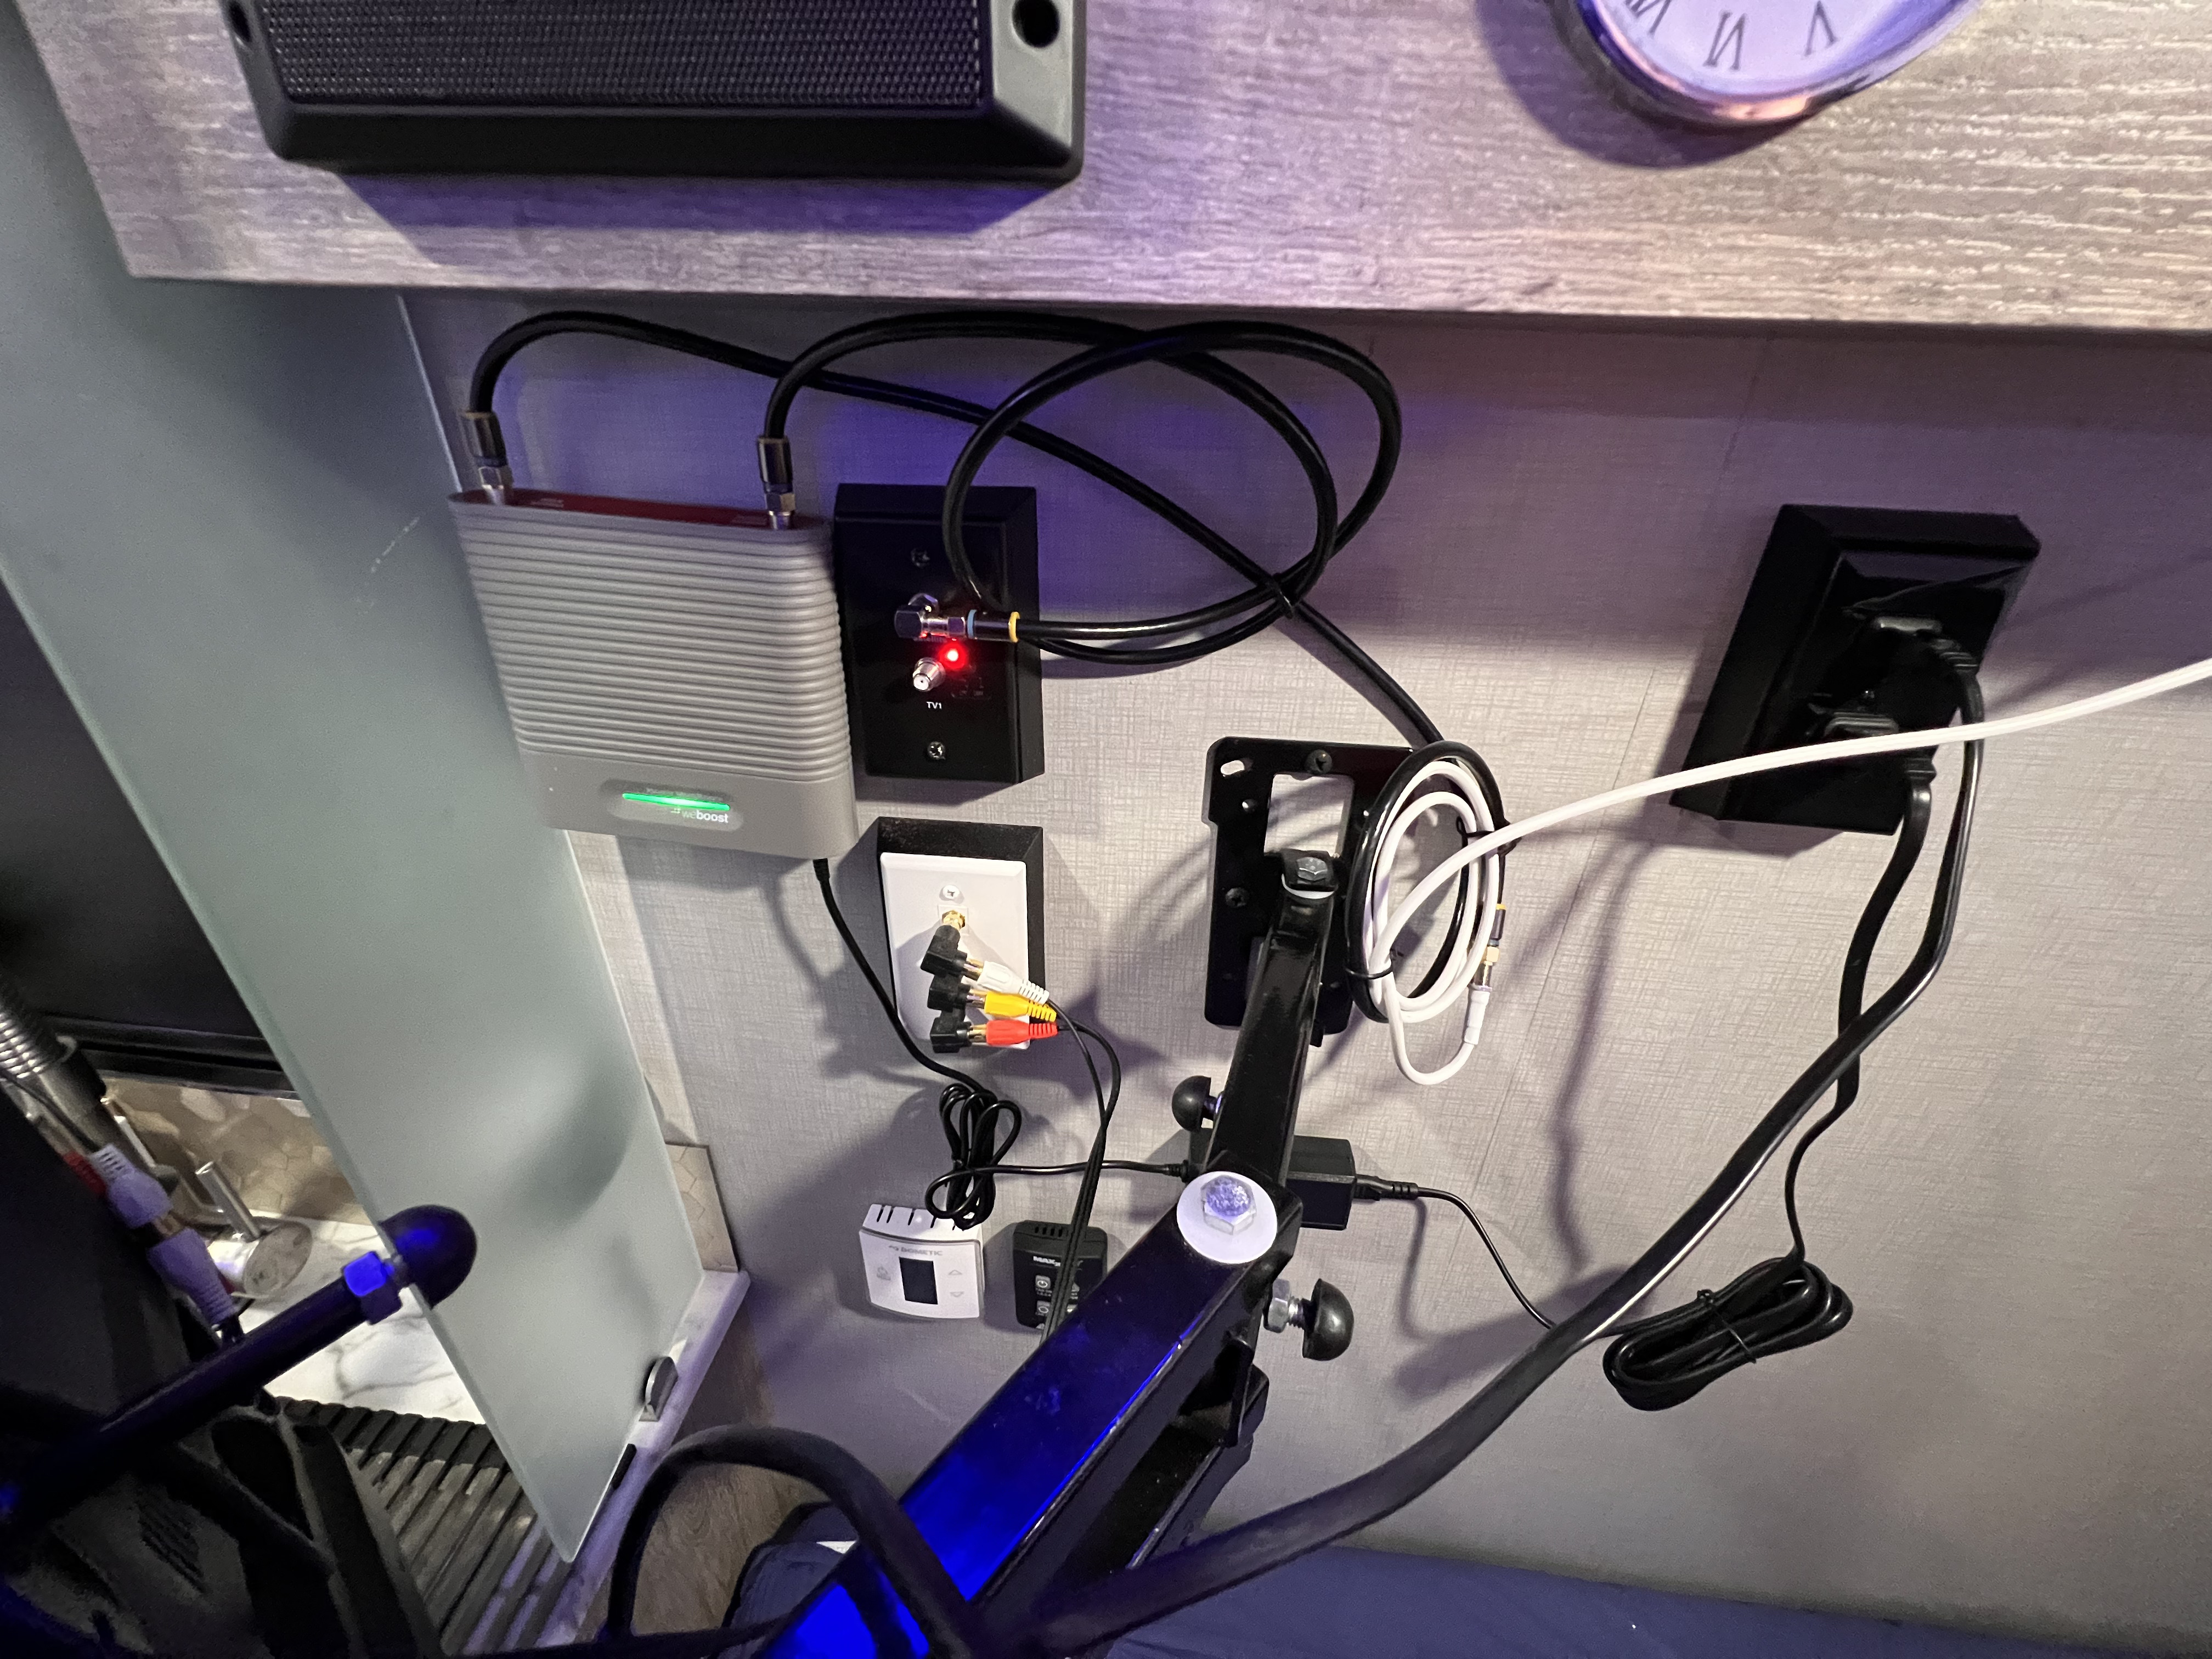
Obviously you'll want to clean up the wires like with a 3M cable hook or a coax staple. Once the repeater has been mounted and connected, you need to find a place to put the internal antenna. Initially, I decided to place the antenna above the bed as seen here:

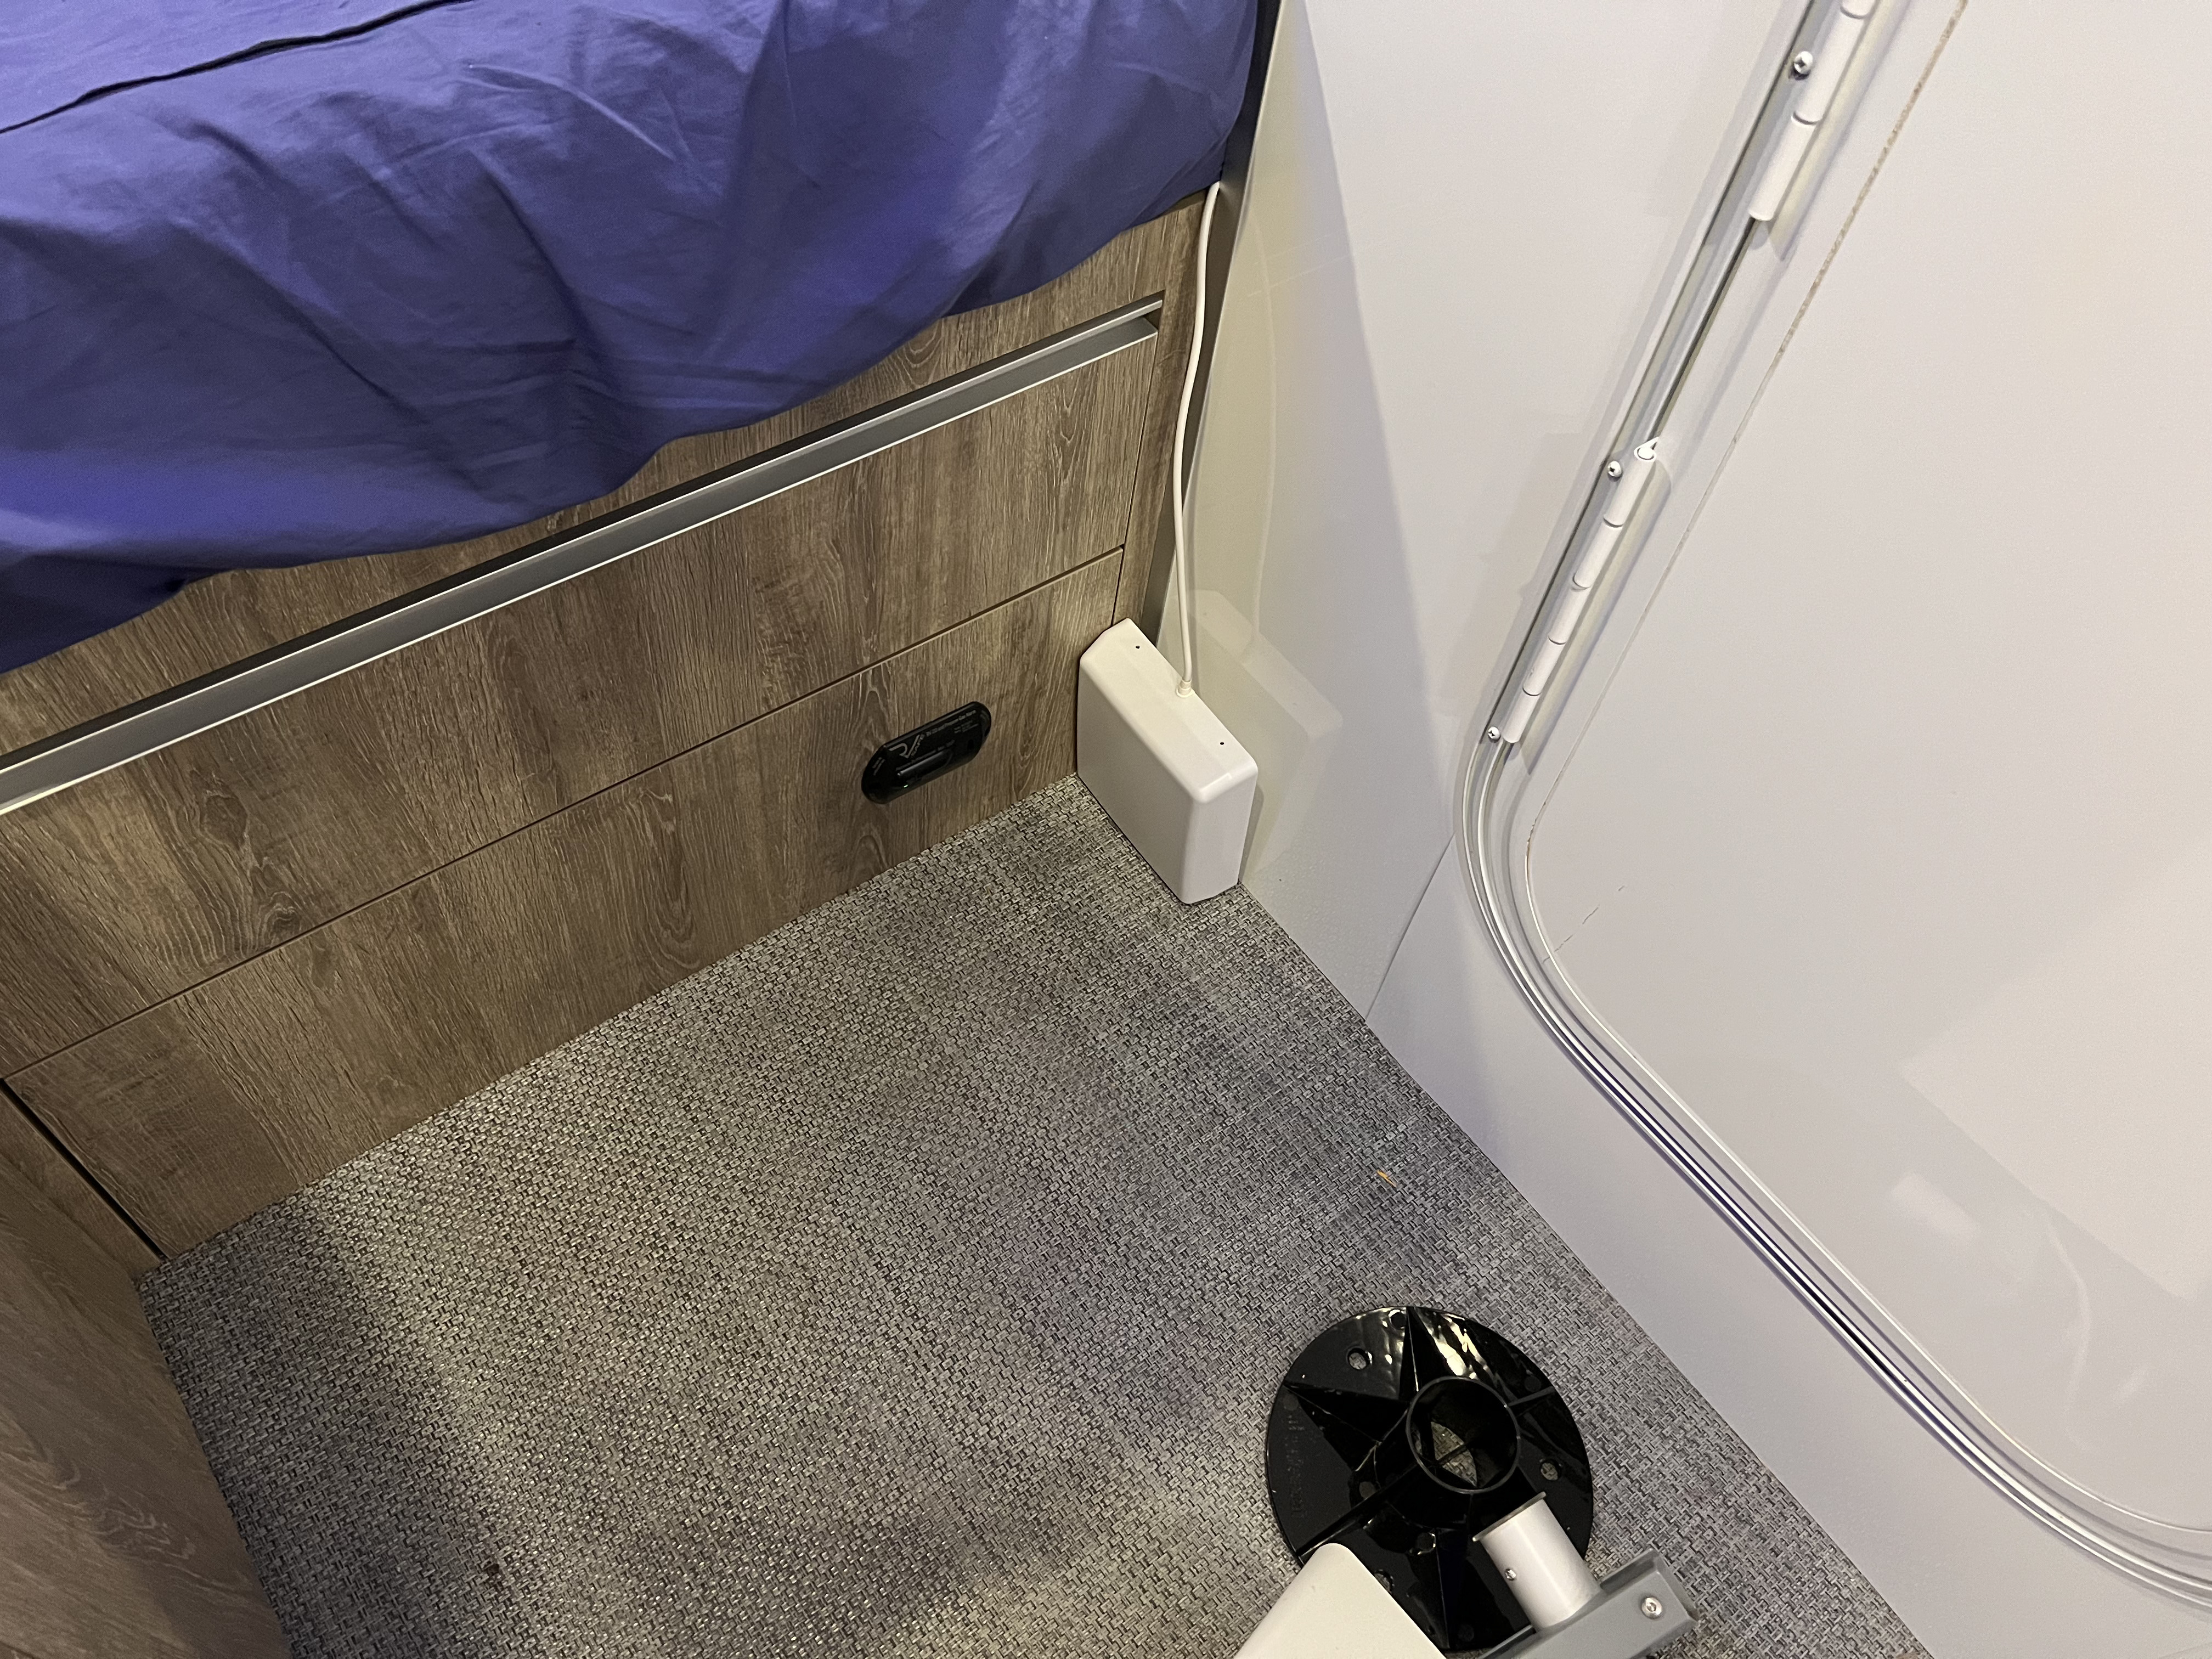
But I found this didn't work because the repeater box was flashing green and red which indicated that the internal and external antenna were getting to a runaway feedback loop condition, which caused the repeater to reduce the output power of the external antenna. This is a bit like putting a microphone up to its speaker. The feedback causes runaway noise and can only be fixed by reducing the volume (which is what happens when the repeater indicates a flashing red/green) or by moving the microphone away.
I found that placing the antenna on the floor next to the bed was an easy option that didn't require any major cable routing. The feedback condition was removed and the signal as reported by my phone did indeed improve.
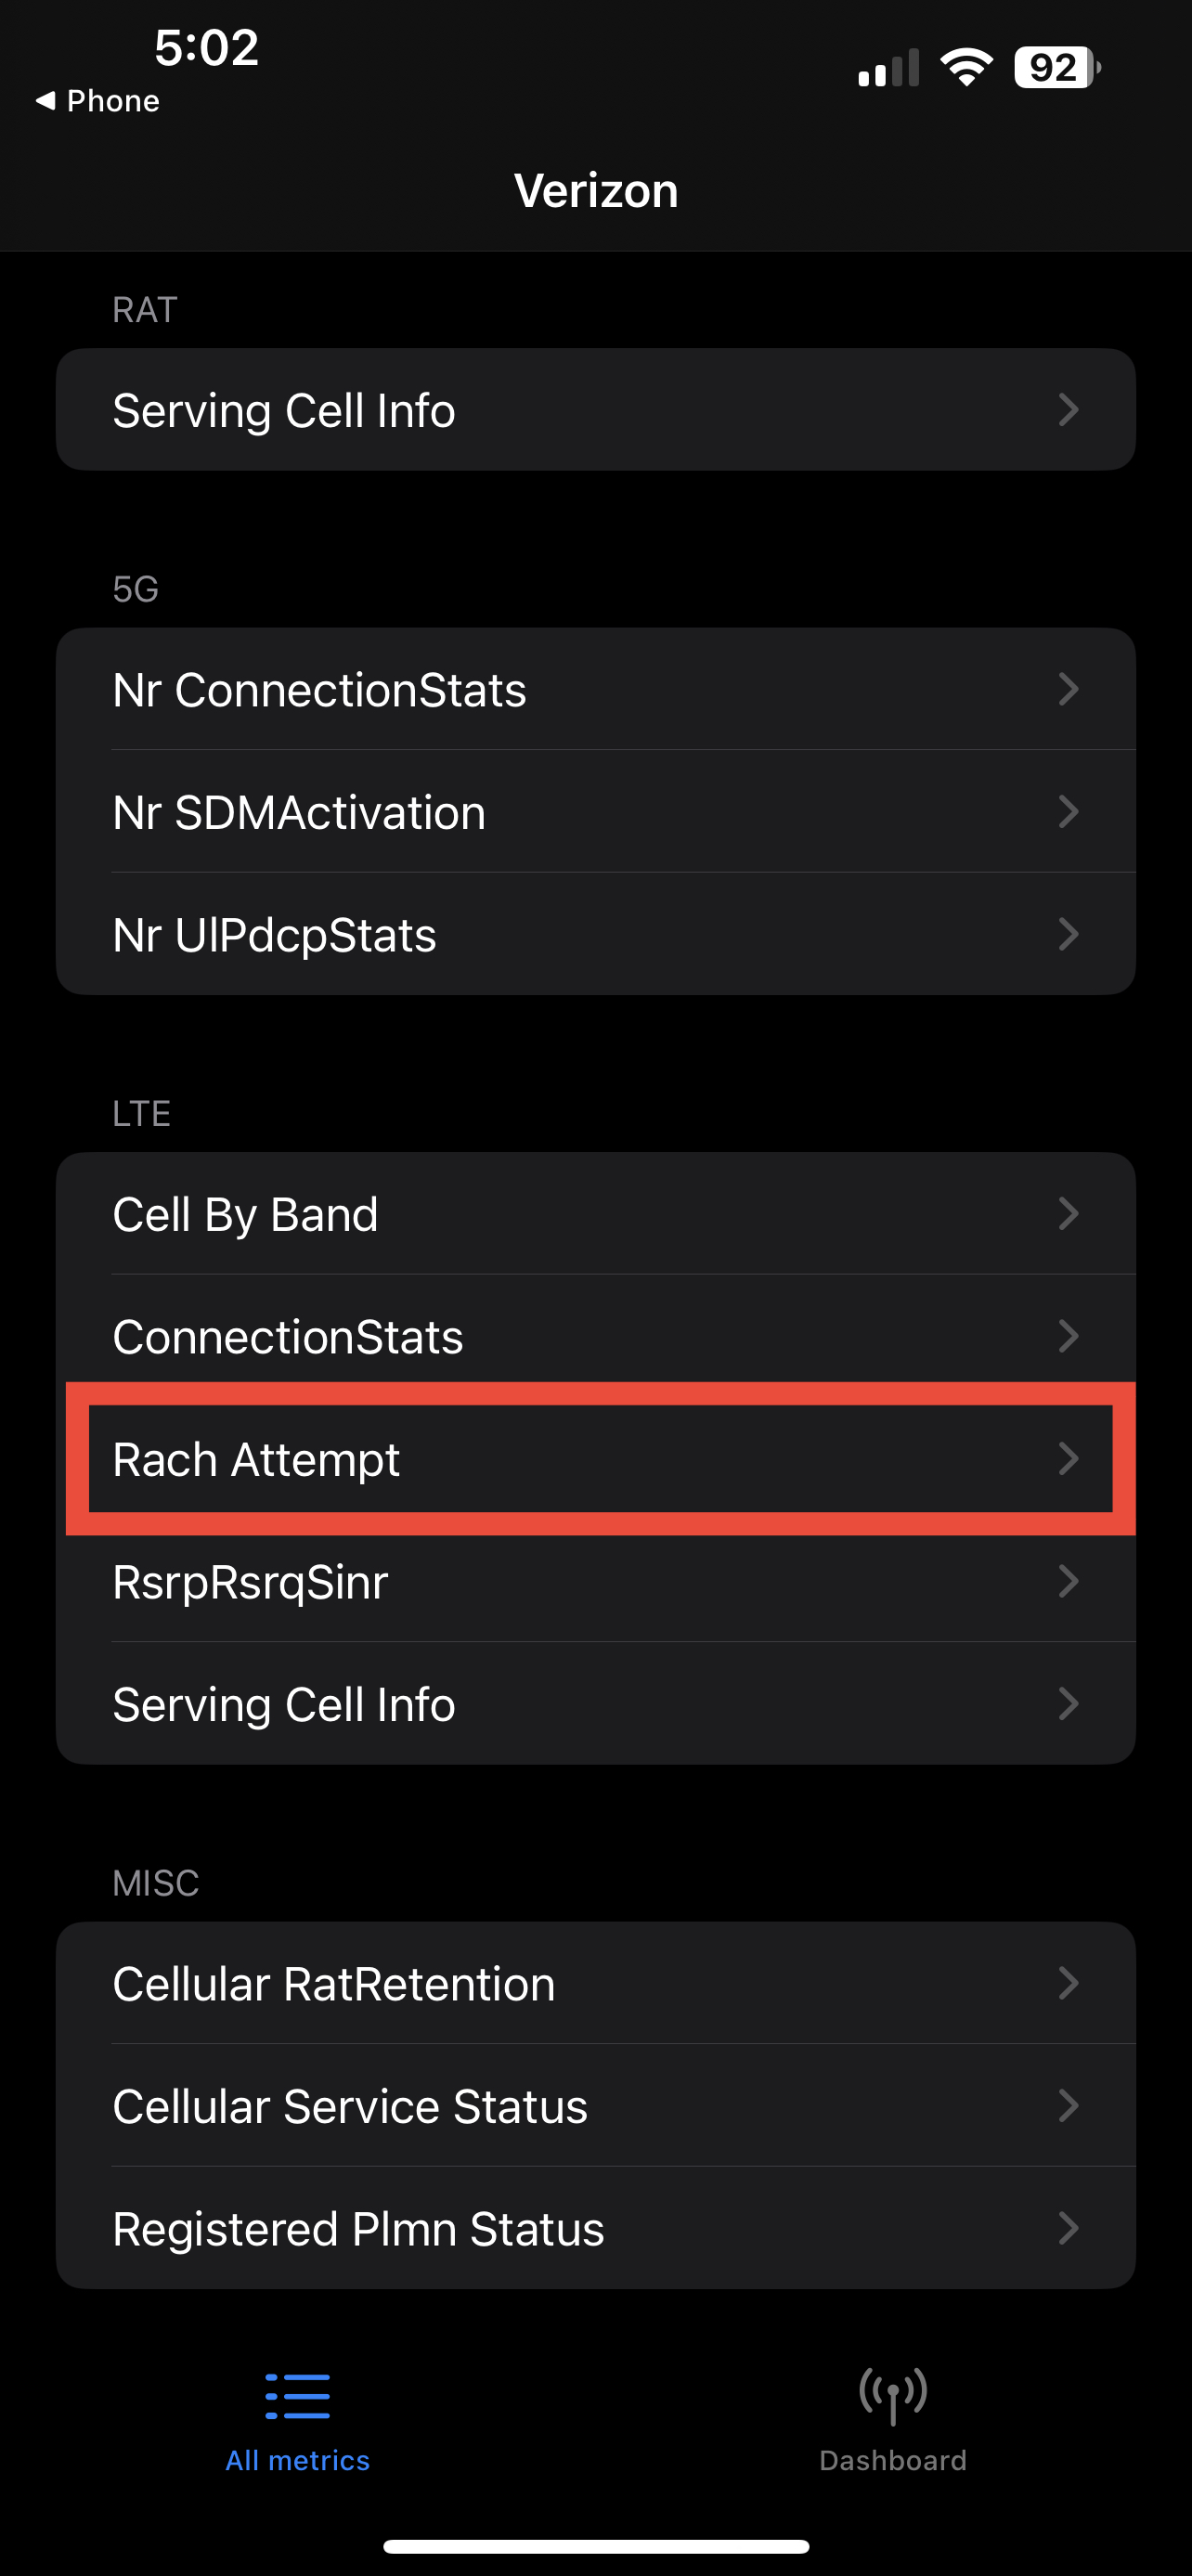
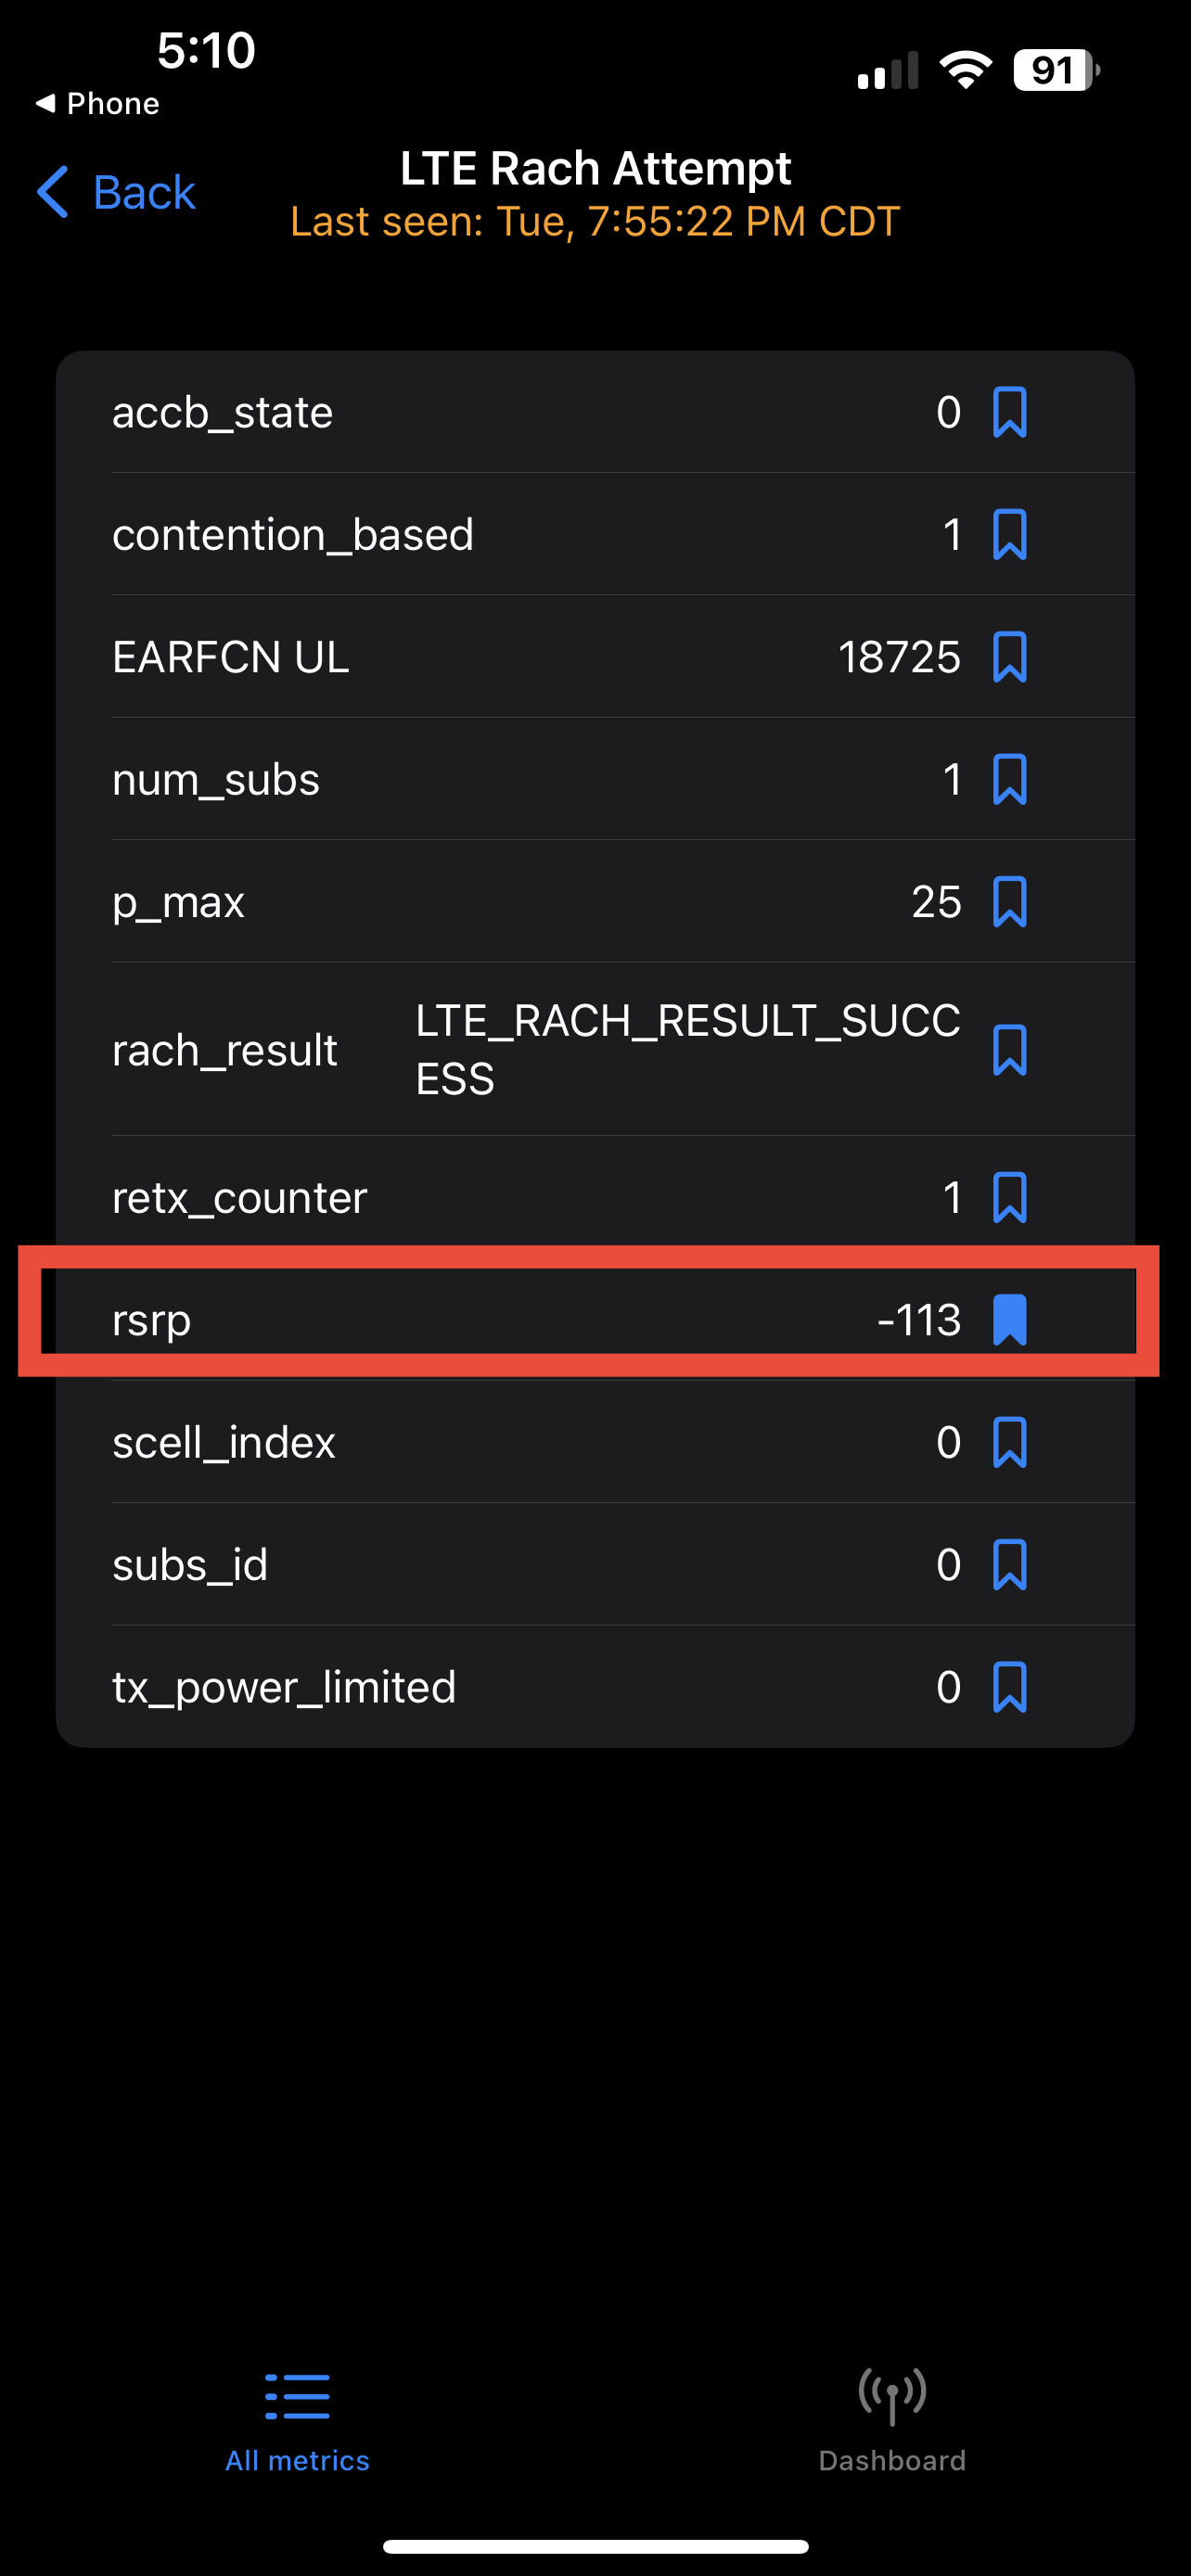
The bundled weBoost app is great for guiding you through the setup of pointing the antenna in the right direction and measuring the signal dB as reported by your phone. You can access the internal cellular metrics of your phone by dialing *3001#12345#*.
Peplink Cellular Router
The next project I tackled was adding a dedicated cellular router. I chose to use a prepackaged bundle from MobileMustHave.com. MobileMustHave is a reseller of cellular components and offers videos, articles, and ticket support to help you install one of their pre-packaged solutions.
Tools and supplies used
| tool | notes |
|---|---|
| electric drill | |
| 1" hole saw bit | The 3/4" cable glands need a 1" hole in the junction box. |
| 3/4" hole saw bit | For all the internal holes you will route the cables through |
| 3/4" cable glands | |
| Dicor self leveling sealant | |
| 24"x36" galvanized steel sheet | |
| Electrical junction box | I did not buy directly, this was installed by the solar installers |
| MobileMustHave Ultimate Road Warrior VR2 w/ Parsec Husky Pro 15ft Magnetic Mount | |
| Crimping Tool | Any crimping tool for standard ~18 AWG power cables will do |
| Ring connector crimps | This is to attach the Peplink router DC cable to your battery terminals |
Prior considerations
Before installing this system, we have to consider a number of factors.
To 5G or not to 5G?
5G is a new standard that operates in both sub-6GHz (called Frequency Range 1, or FR1) and 24.25 GHz to 71.0 GHz (FR2). FR2 is a microwave band that provides significantly faster download speeds, but in my experience the upload speed gains have been unimpressive. I've found through my own un-scientific tests that upload speeds for 5G in general are lackluster, which is an issue for video conferencing.
Because of the somewhat untested and experimental nature of 5G, I decided to go with a 4G solution as it provides plenty of bandwidth for my needs.
Cellular providers
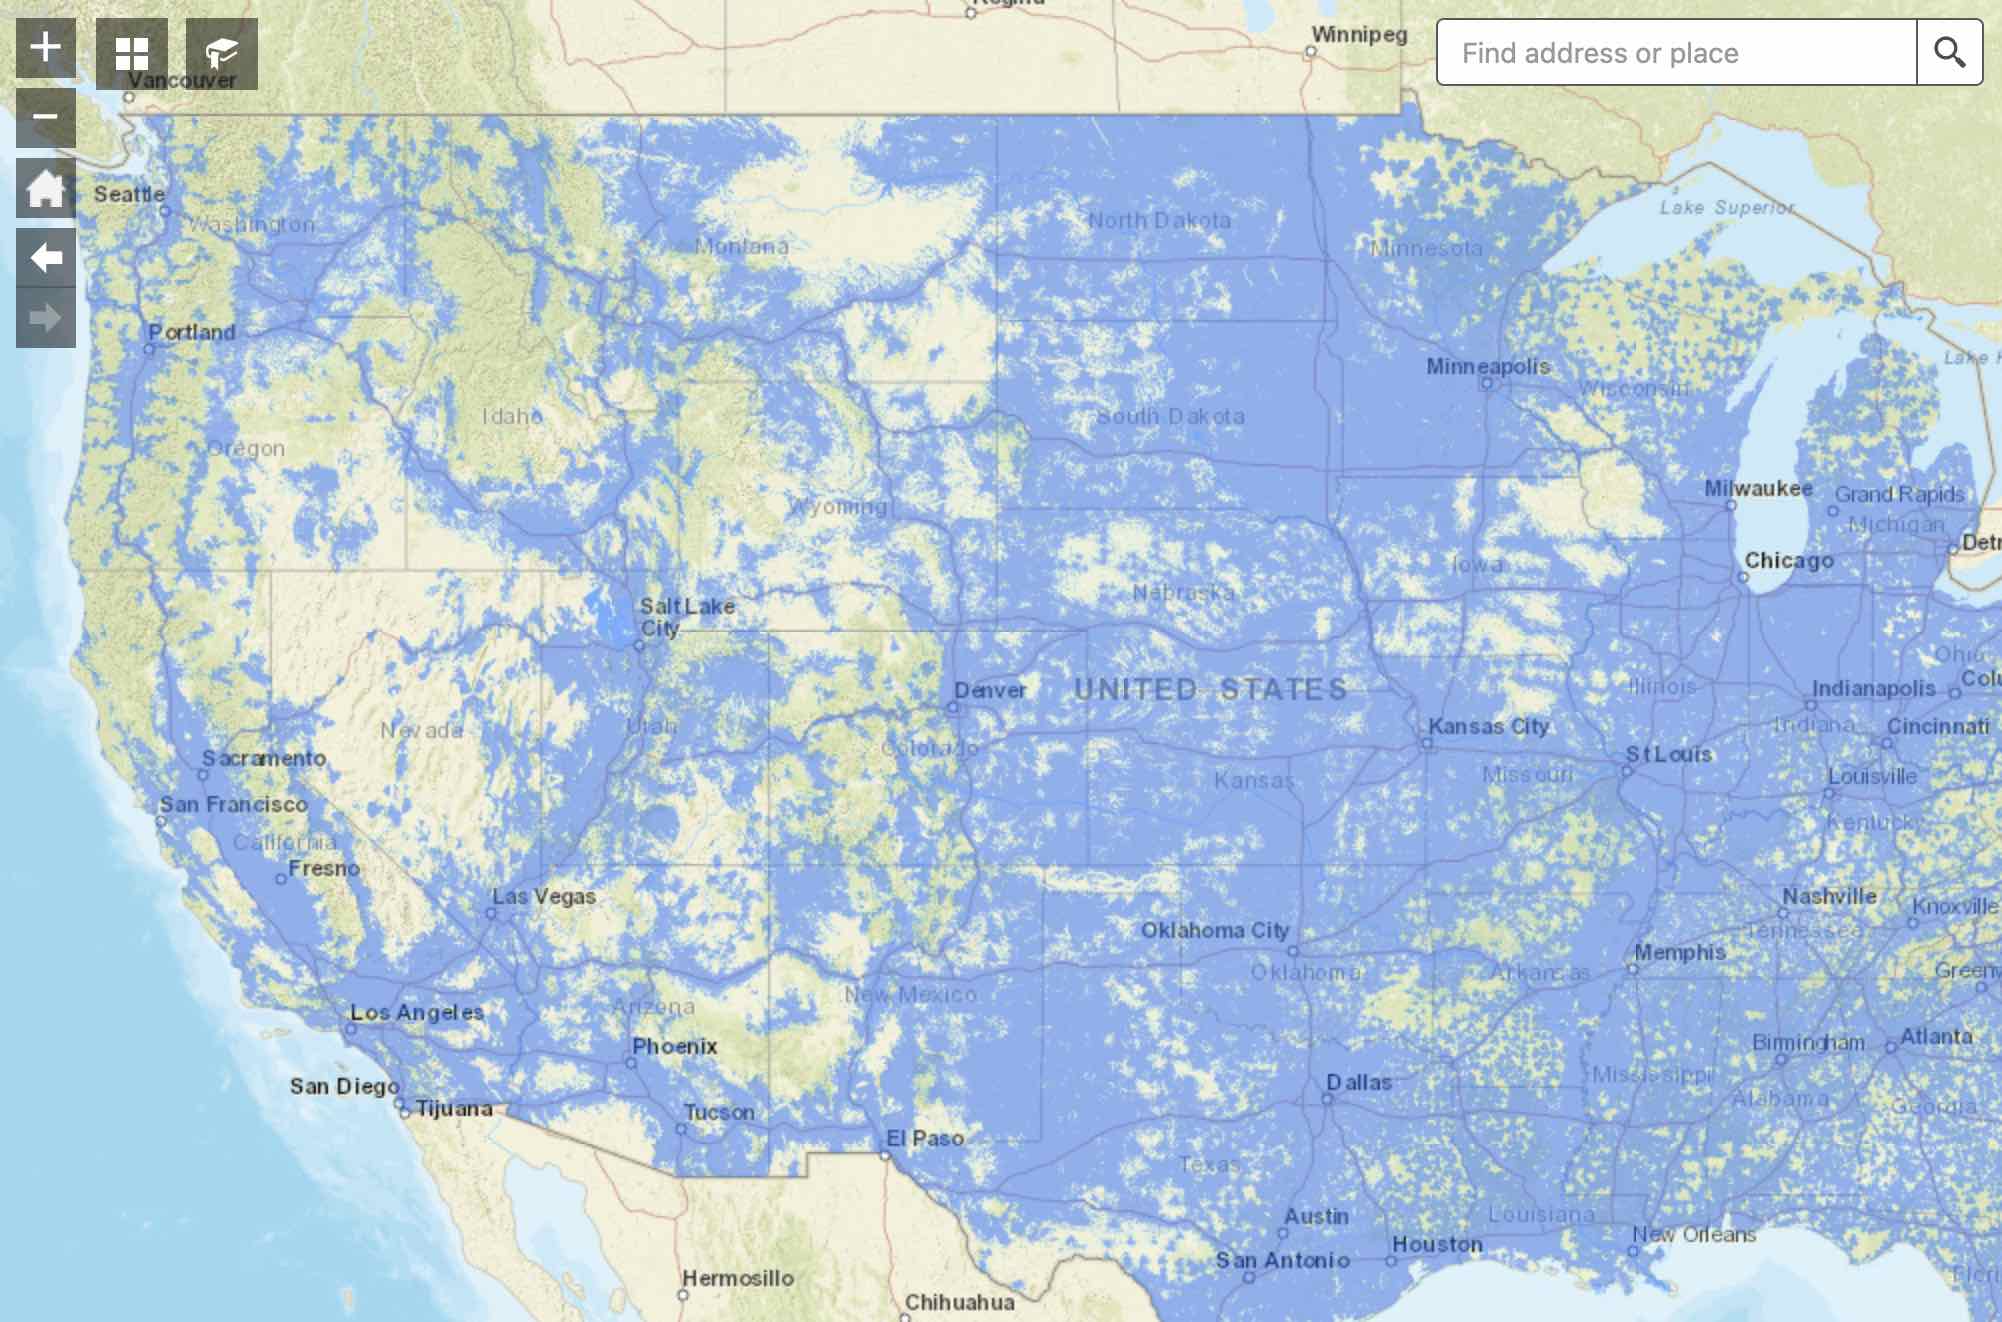
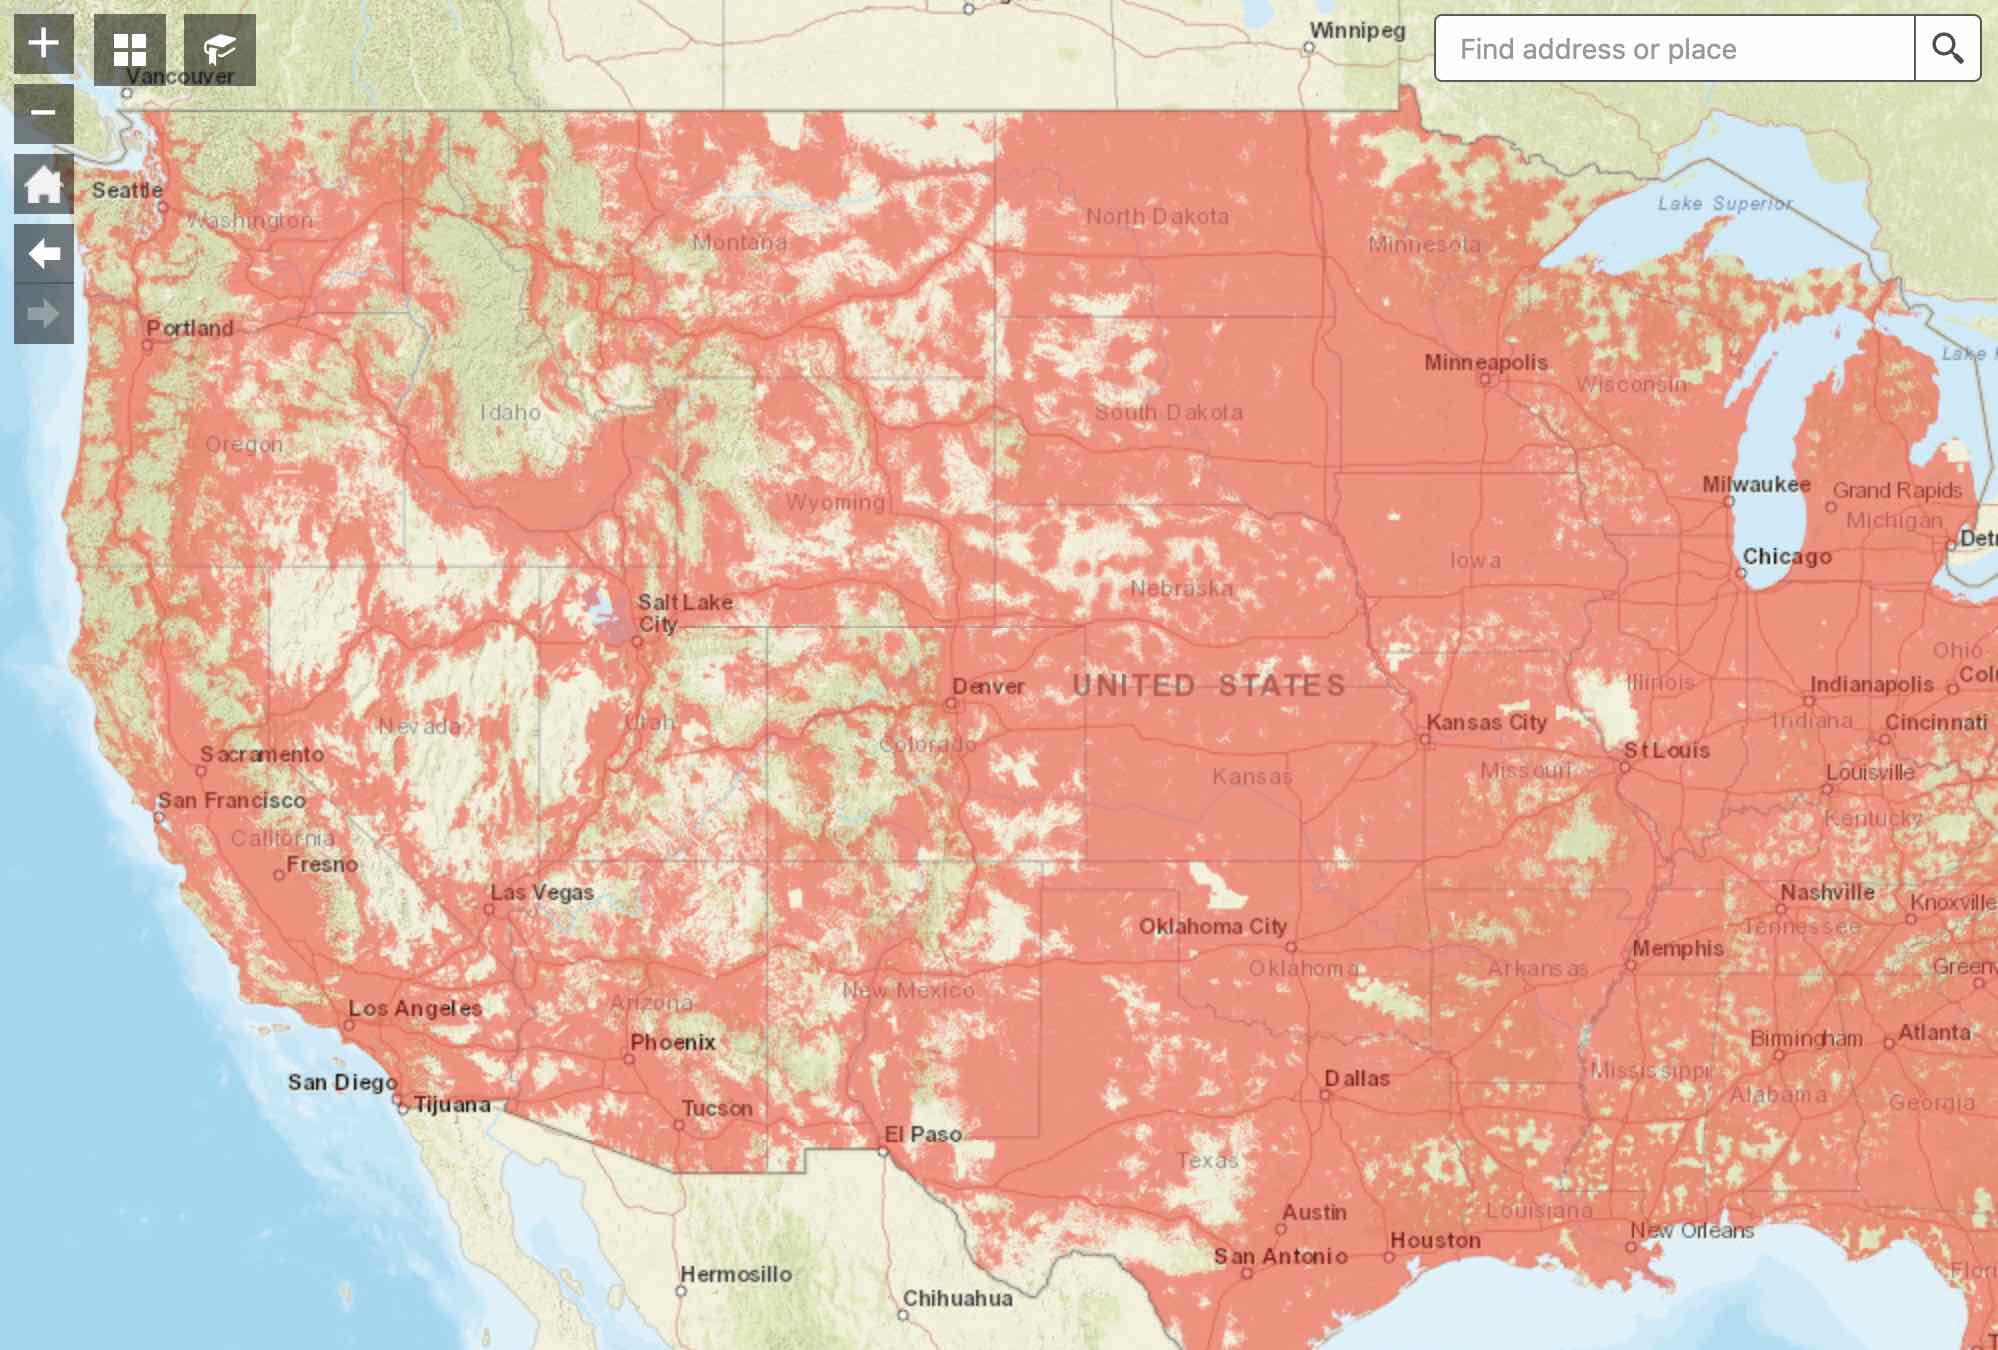
The feature I'm optimising for in my choice of cellular providers is the coverage. The FCC publishes a coverage map for each provider:
https://fcc.maps.arcgis.com/apps/webappviewer/index.html?id=6c1b2e73d9d749cdb7bc88a0d1bdd25b
Here's an image of each coverage map, overlayed with various combinations of providers:
| T-Mobile | Verizon | AT&T | Image |
|---|---|---|---|
 |
|||
 |
|||
 |
|||
 |
You can see that T-Mobile by far offers the worst overall coverage: their towers are concentrated along interstates and highly populated regions, but beyond those areas it becomes pretty sparse. Verizon and AT&T offer fairly similar coverage out west, but there are many areas where only one of them provides coverage.
Using this knowledge, it suggests that the best solution is to acquire data plans for both AT&T and Verizon simultaneously. Using T-Mobile provides no advantage beyond a few select regions in the west.
MobileMustHave bundles
I ended up choosing the Ultimate Road Warrior VR2 bundle. It's a 4G-only solution that allows dual SIM card usage so you can multiplex two carriers at once. MMH also sells their own data plans that come in various flavors. I had to ask them which plan was carried by which provider, as their documentation didn't seem to say.
MobileMustHave Data Plans
| Plan name | Data cap | Speed Cap | 2023 Cost | Carrier |
|---|---|---|---|---|
| P1000 | 1000GB | None | $175 | T-Mobile |
| R300 | 300GB | 25Mbps | $129 | Verizon |
| R300+ | 300GB | 50Mbps | $175 | Verizon |
But I want AT&T 
MMH discontinued their AT&T offerings for reasons unknown, but you can still purchase AT&T sim cards from various online vendors. Many folks have had success on eBay where many companies sell AT&T plans under their own business plan. I bought mine from cellphonex and I have a legitimately unlimited AT&T plan (it does in fact work) for only $100 a month.
I ended up purchasing their R300 plan to have Verizon coverage to use in tandem with my AT&T plan from eBay.
Installation
Roof mount
The Parsec Husky 7-in-1 antenna has an adhesive mounting option and a magnetic mount option. I initially wanted the adhesive mount option but I realized that it comes with a large bolt on the bottom that you have to put directly over a hole. There is no way to have the cables run laterally along the roof, it has to go directly on top of a mounting hole.
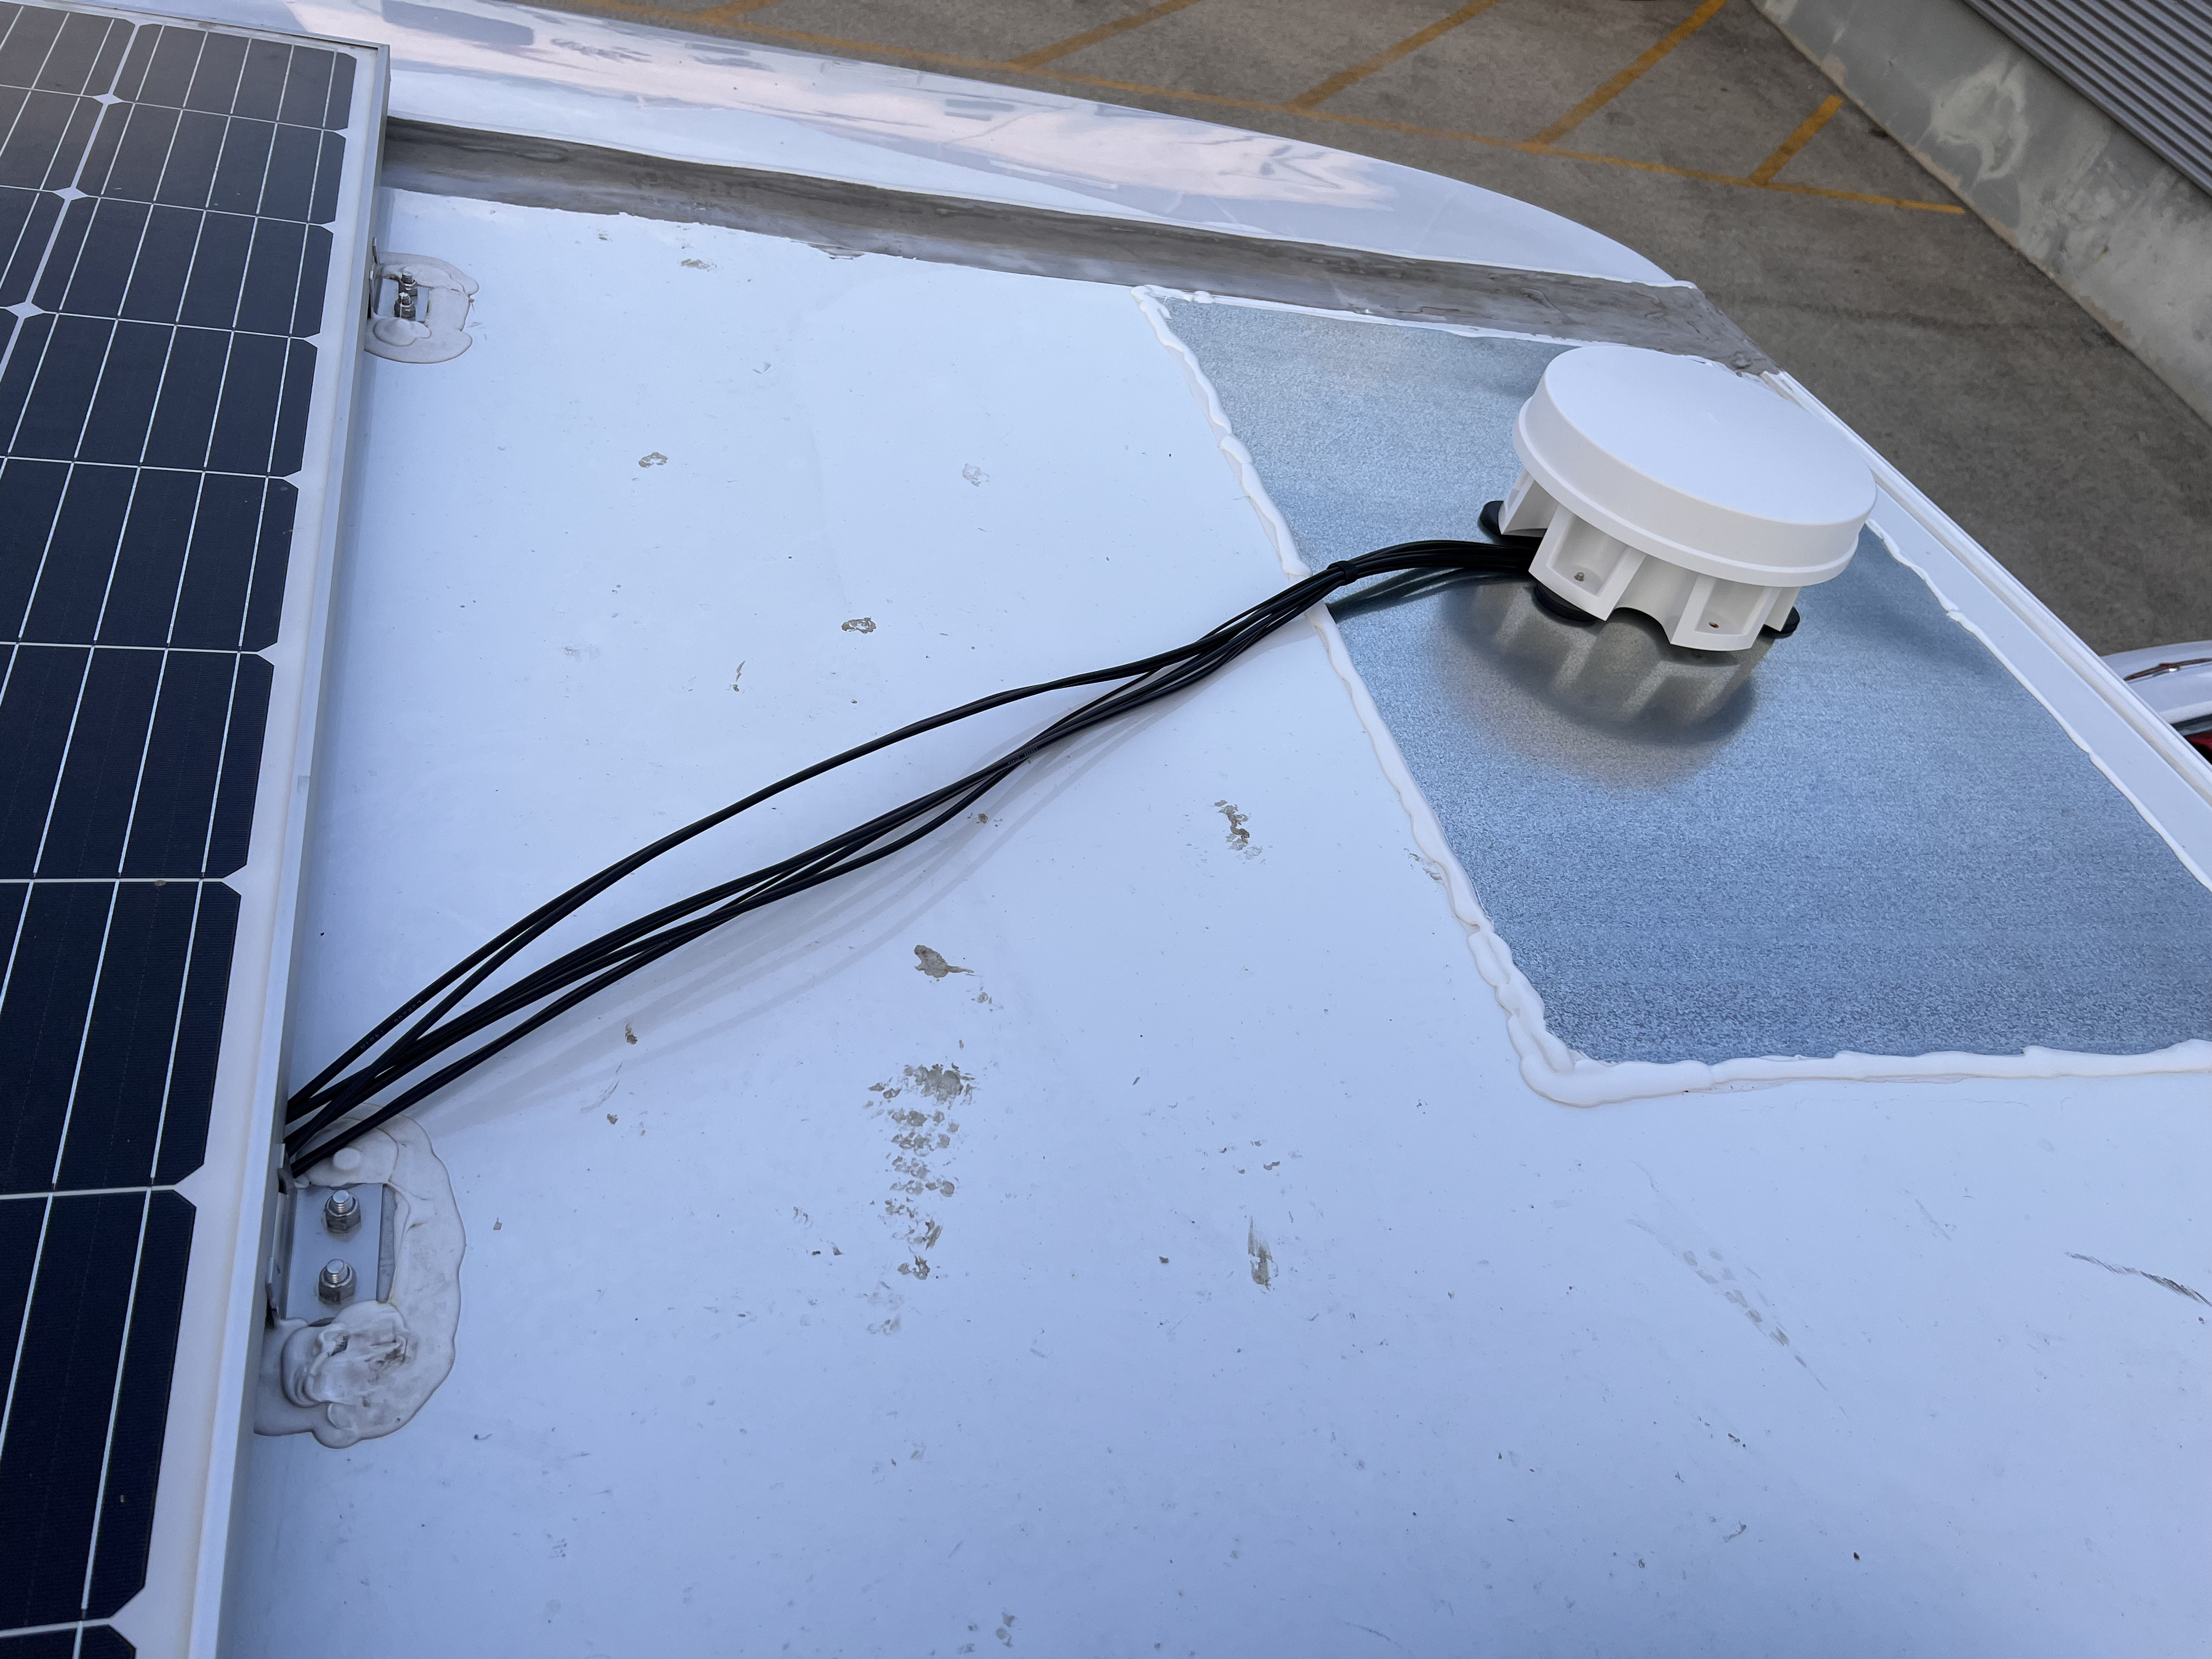
Instead, I went with the magnetic mount option, as the magnetic base gives the cables room to run laterally along the roof. MMH support recommended I adhere a galvanized steel sheet to the roof, which would give the magnetic mount the ferrous base it needs. Galvanized steel is resistant to rust and should last a very long time.

I applied a liberal amount of dicor self leveling sealant to the bottom of the sheet and stuck it to the roof. Dicor is not technically supposed to be used as an adhesive but I thought it should be fine since the sheet itself will not have to resist much upwards force. The better solution is to use 3M VHB but hindsight is 20/20 and all. I applied Dicor along the edges of sheet, ensuring that there were no gaps that water could intrude underneath the plate.
A few months prior, I had solar experts install a solar panel system on the RV and they had pre-drilled a junction box to the roof. This enters into the microwave cavity and routes the power cables along a somewhat complicated path behind the fridge. All I need to do is route the antenna cables to this junction box and follow a similar path to the router.
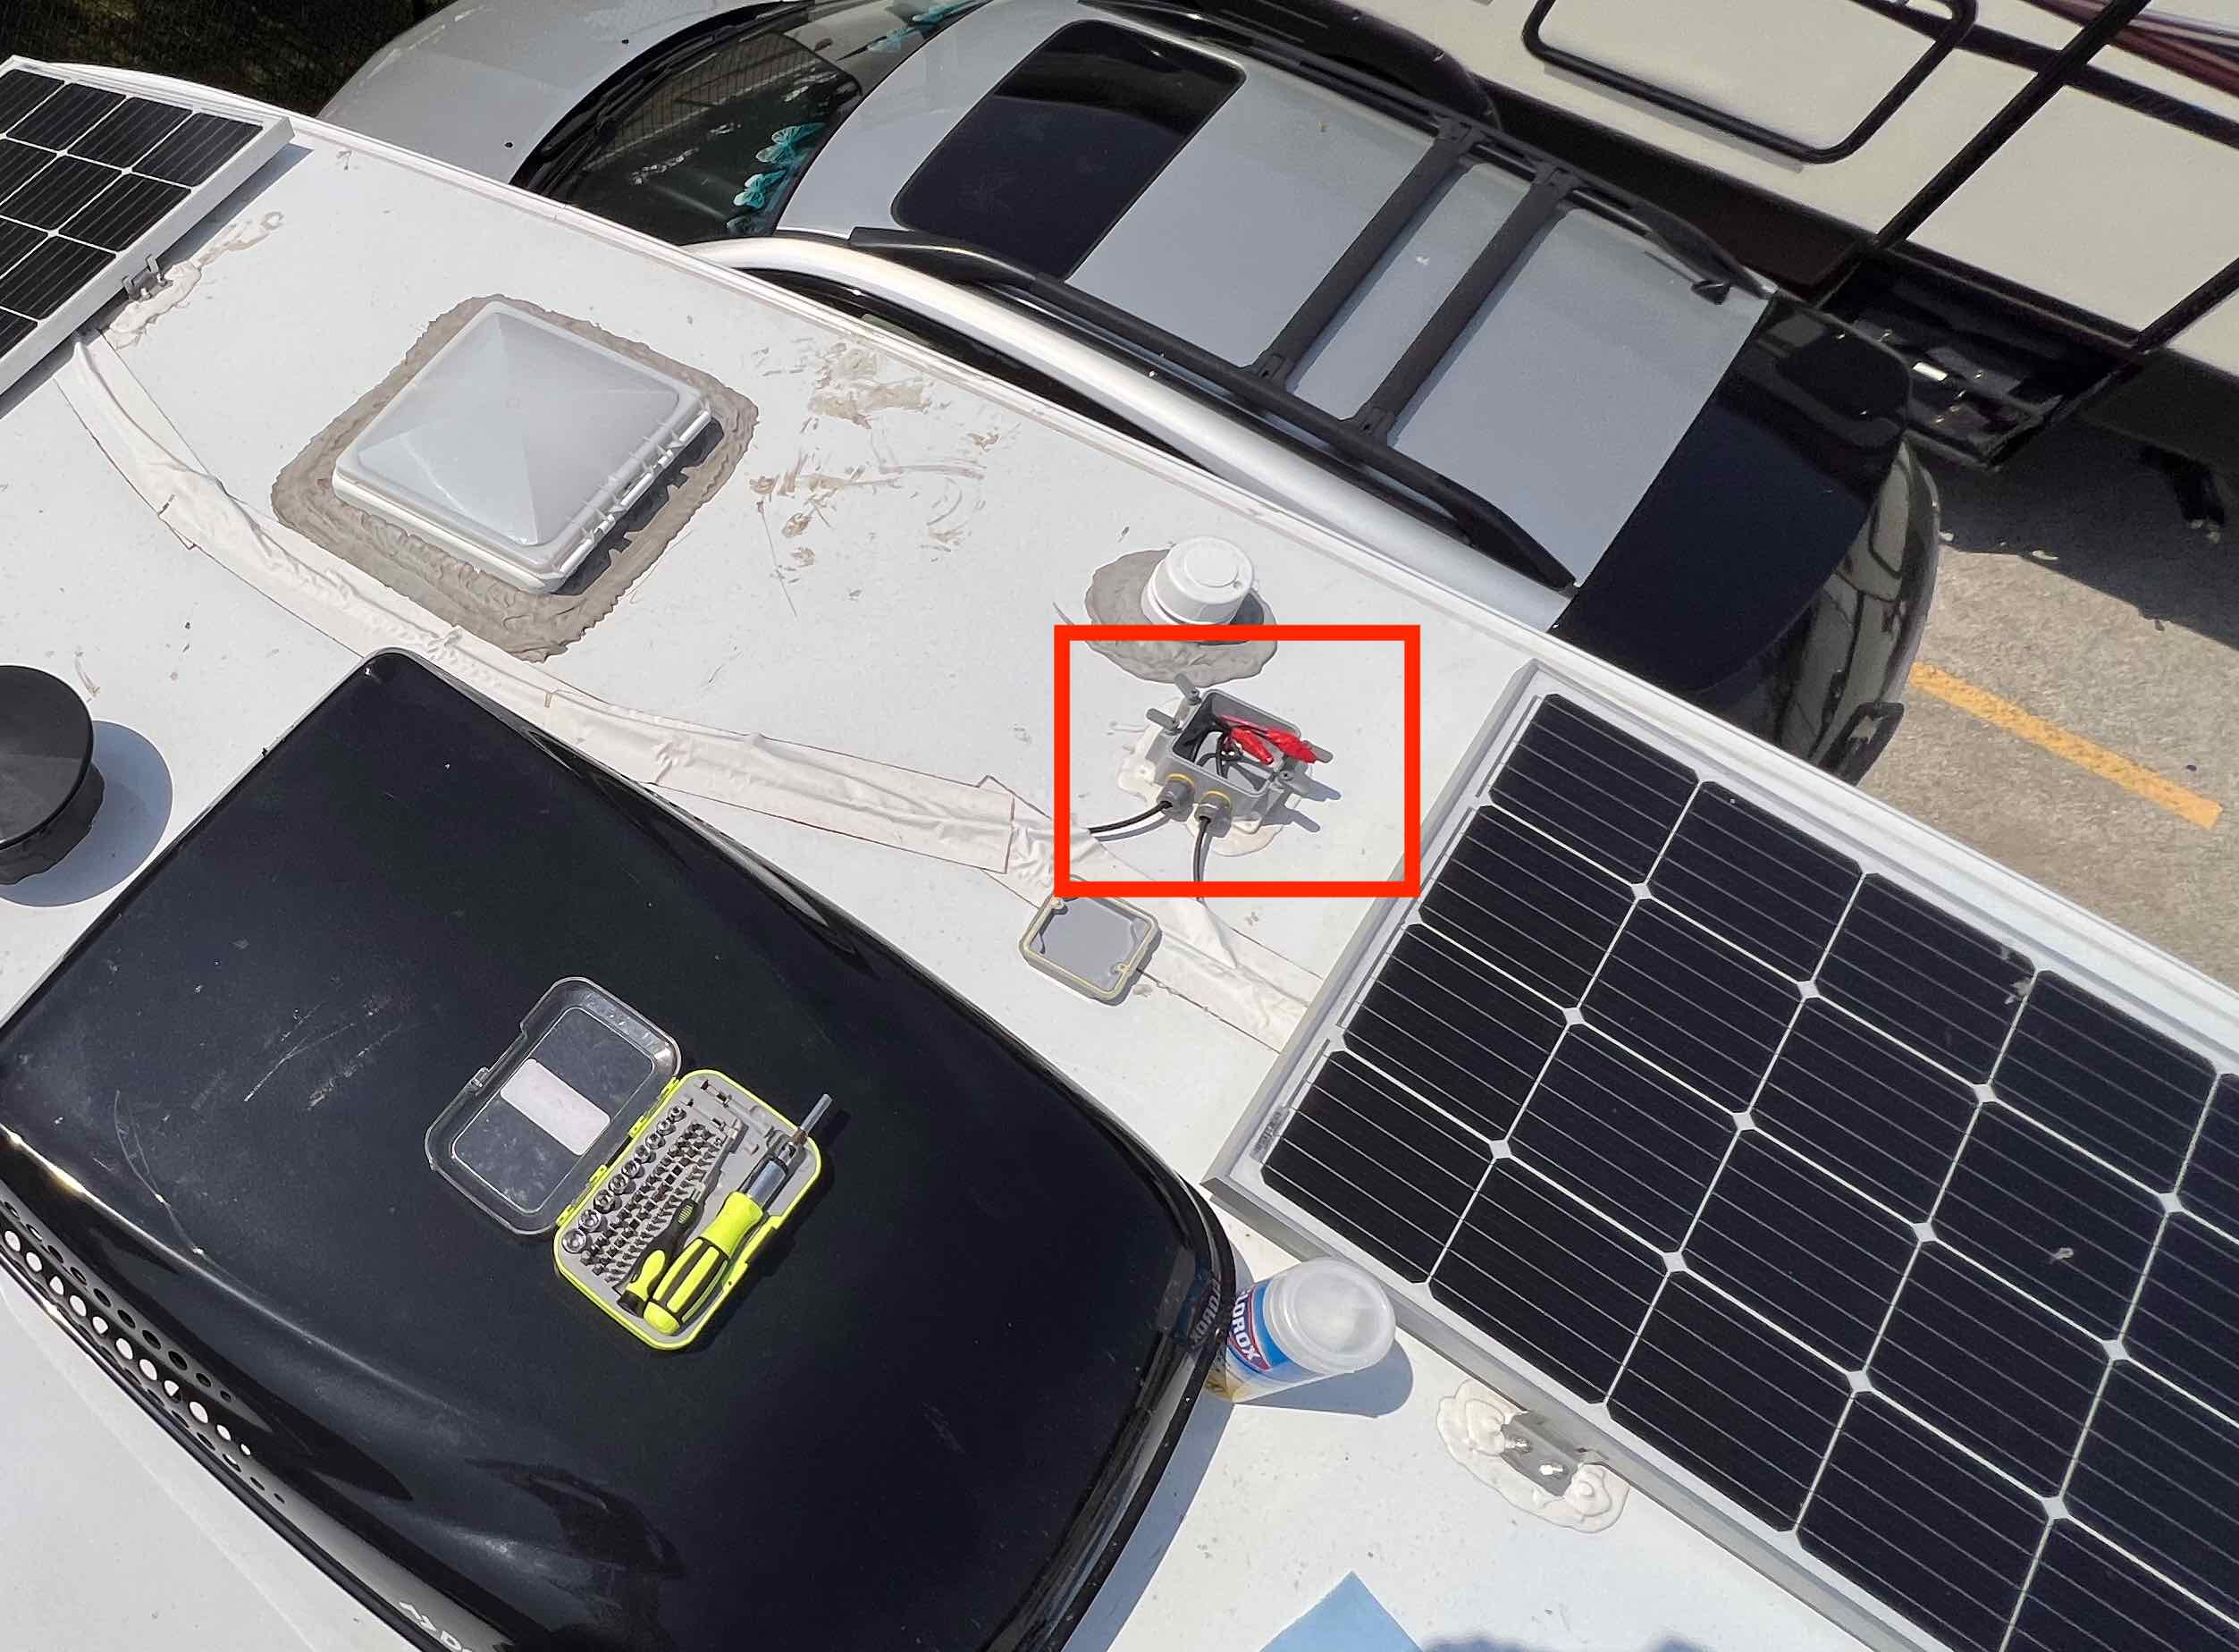

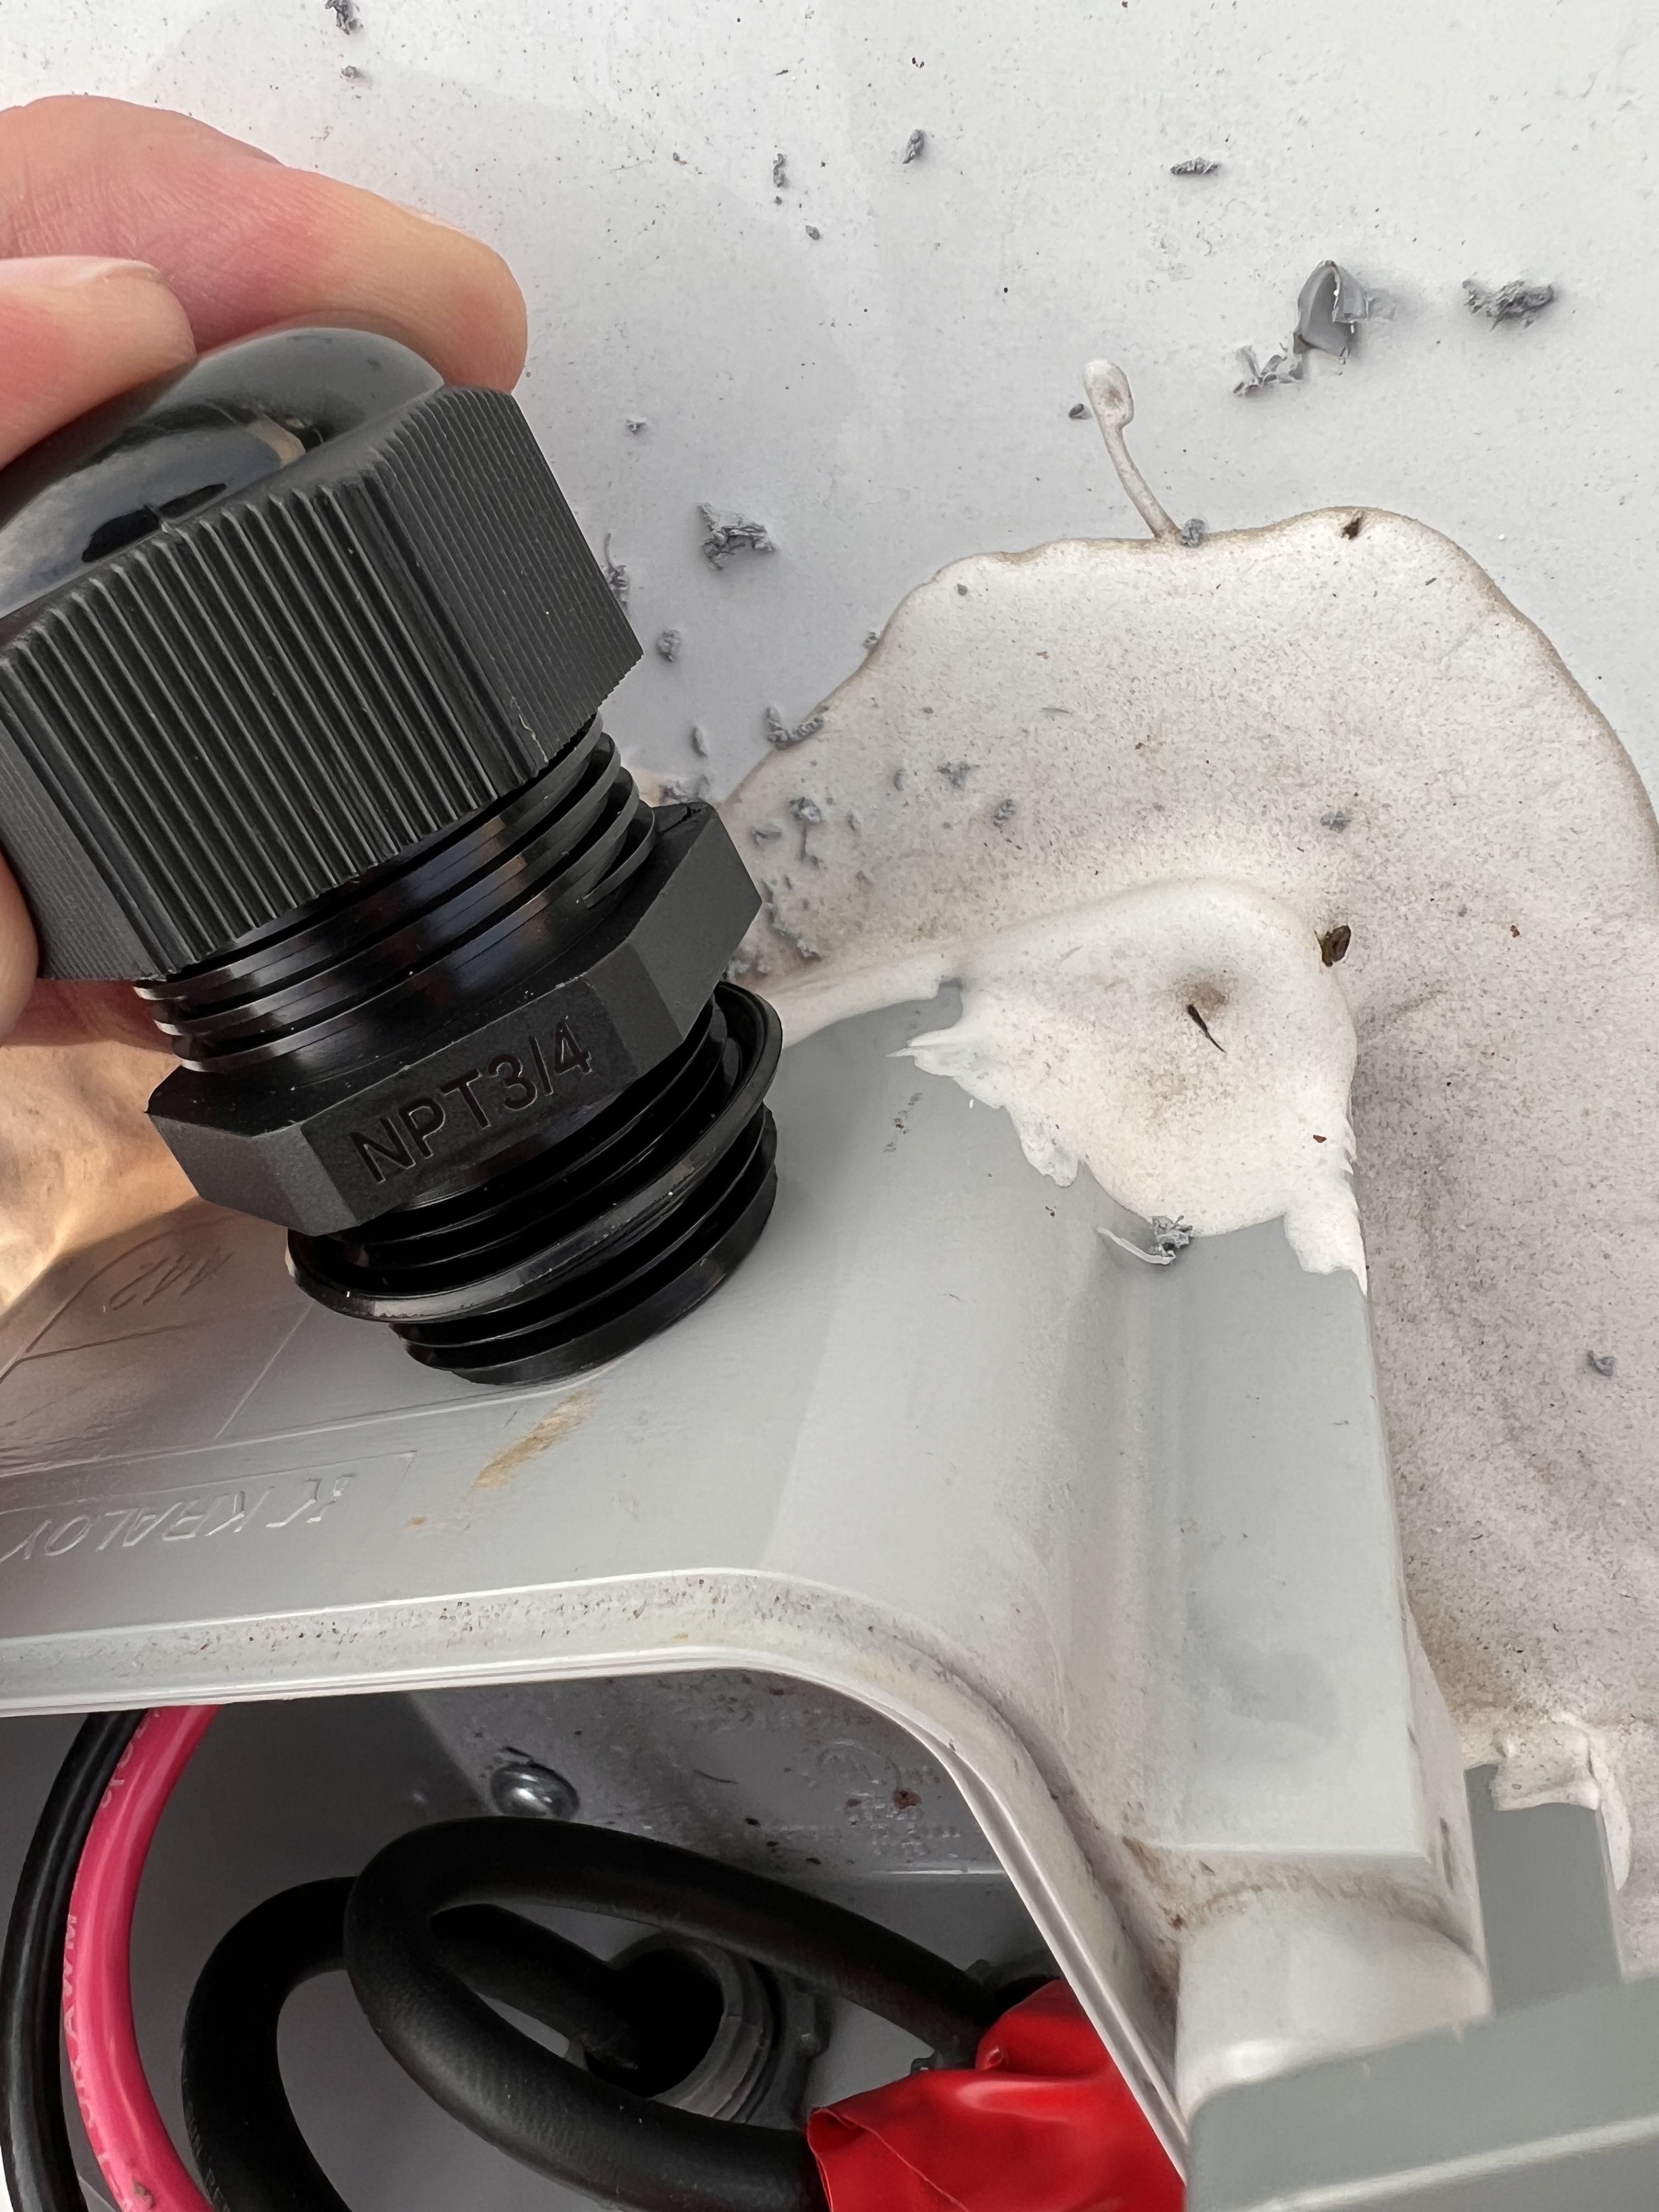
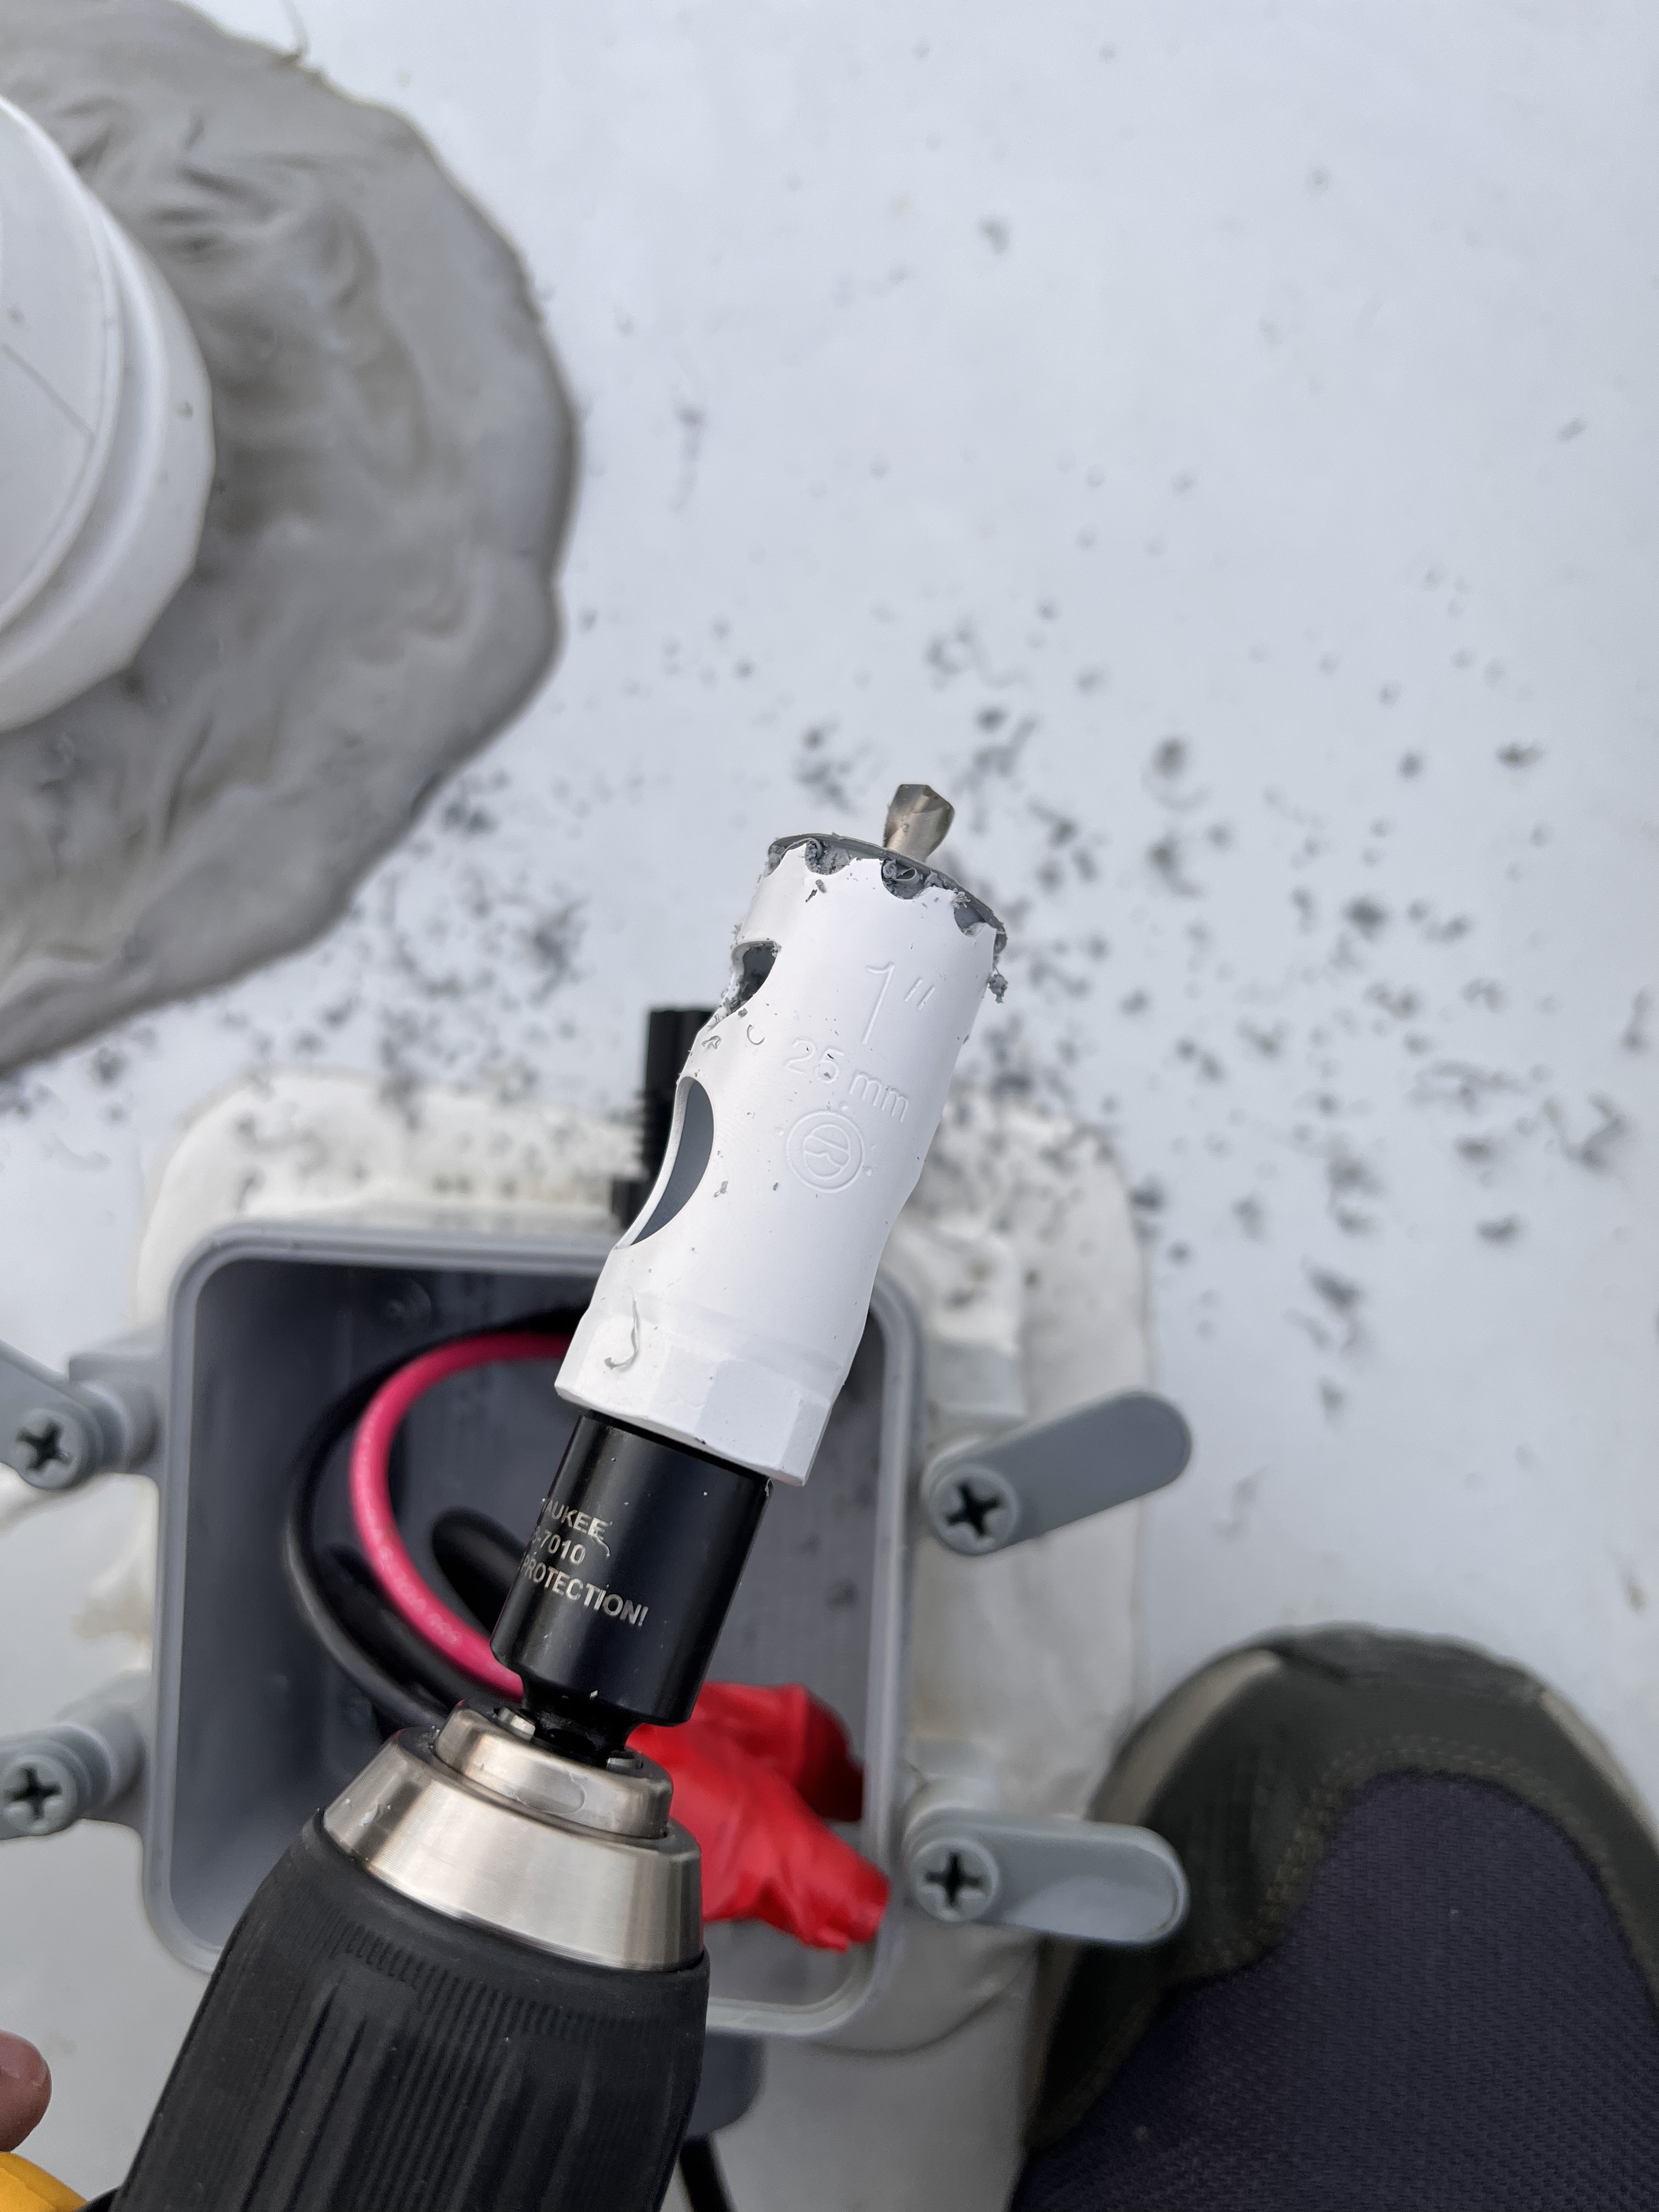
I used a 1" hole saw to drill a hole into the junction box. I installed a 3/4" cable glands that would serve as a water resistent entry point for the cables.
Warning
Cable glands are typically meant to only have a single cable passed through. Having multiple cables passing through weakens the water resistence of the hand-tightened seal. You might want to consider adding a small bit of expanding foam inside of the gland to make it truly watertight. I opted not to add the foam (yet), but I will be monitoring the box for any water intrusion during heavy rain. I will add expanding foam if I notice water intruding into the box.


Cable routing
Originally, I wanted to route the antenna cables across the dinette and into the righthand storage compartment like this:
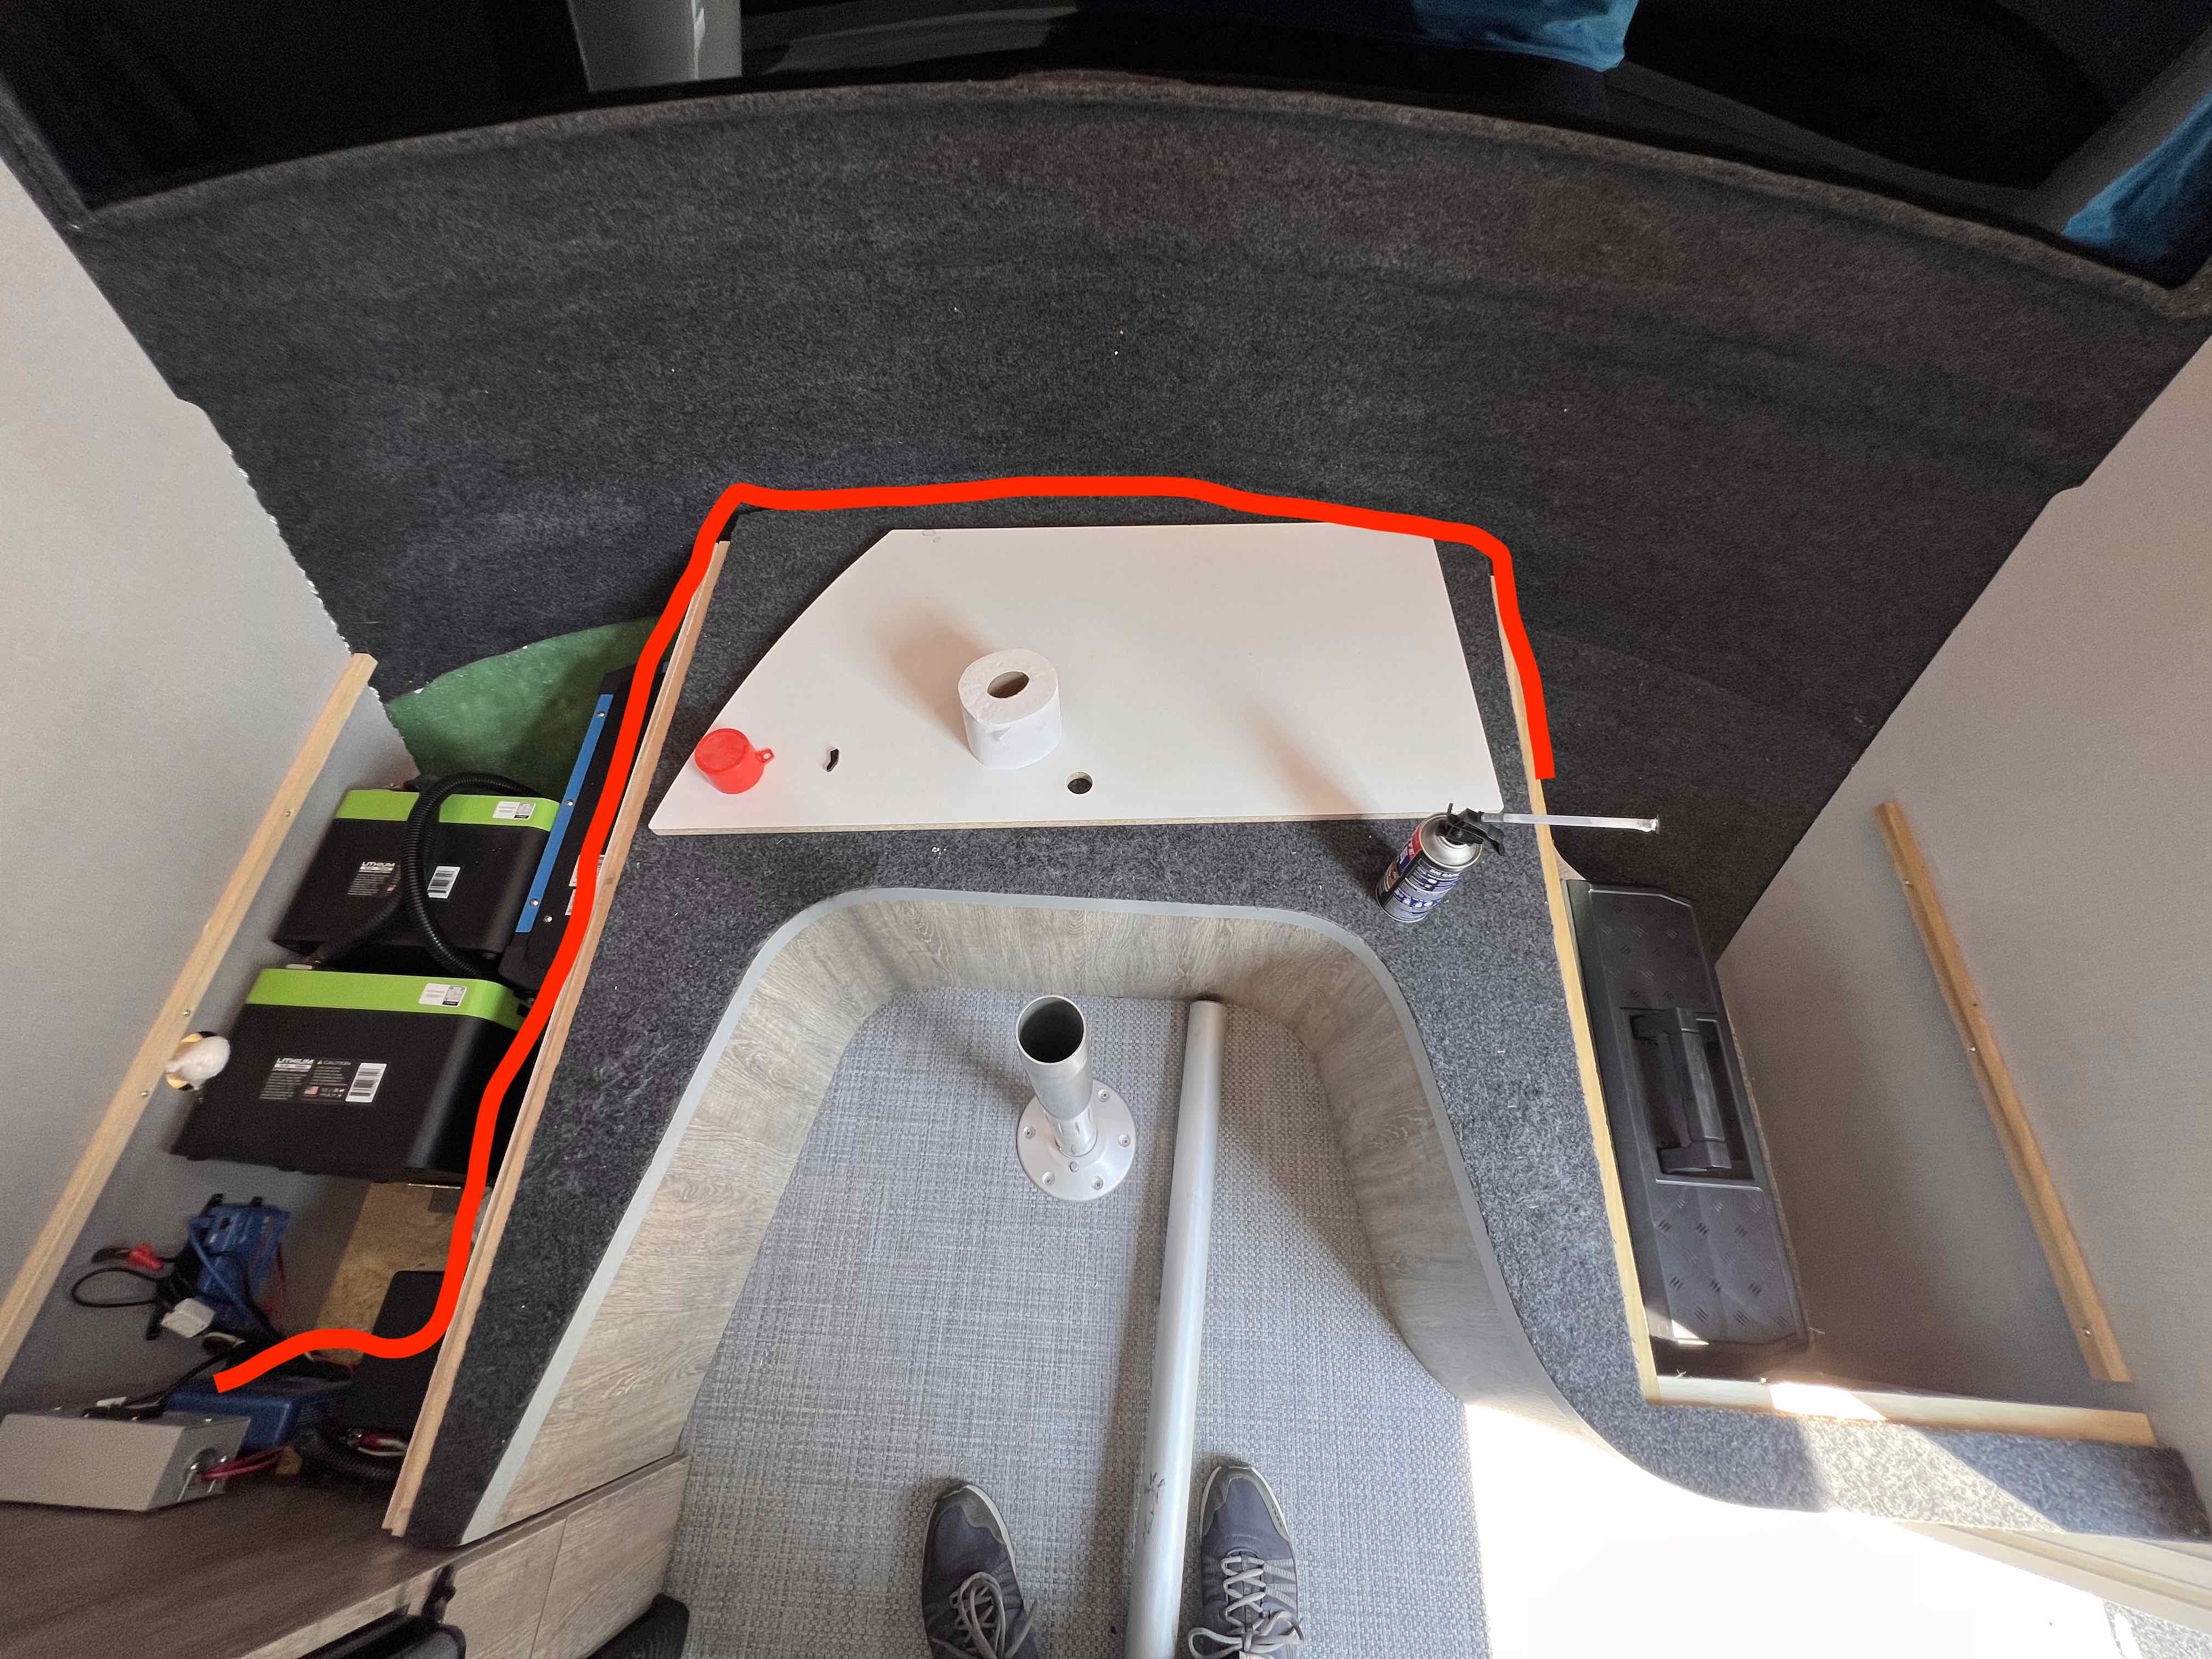
However even with the longest cable option of the Parsec Husky antenna, there's not enough length to do this. So instead I decided I would mount the router next to the fuse box.
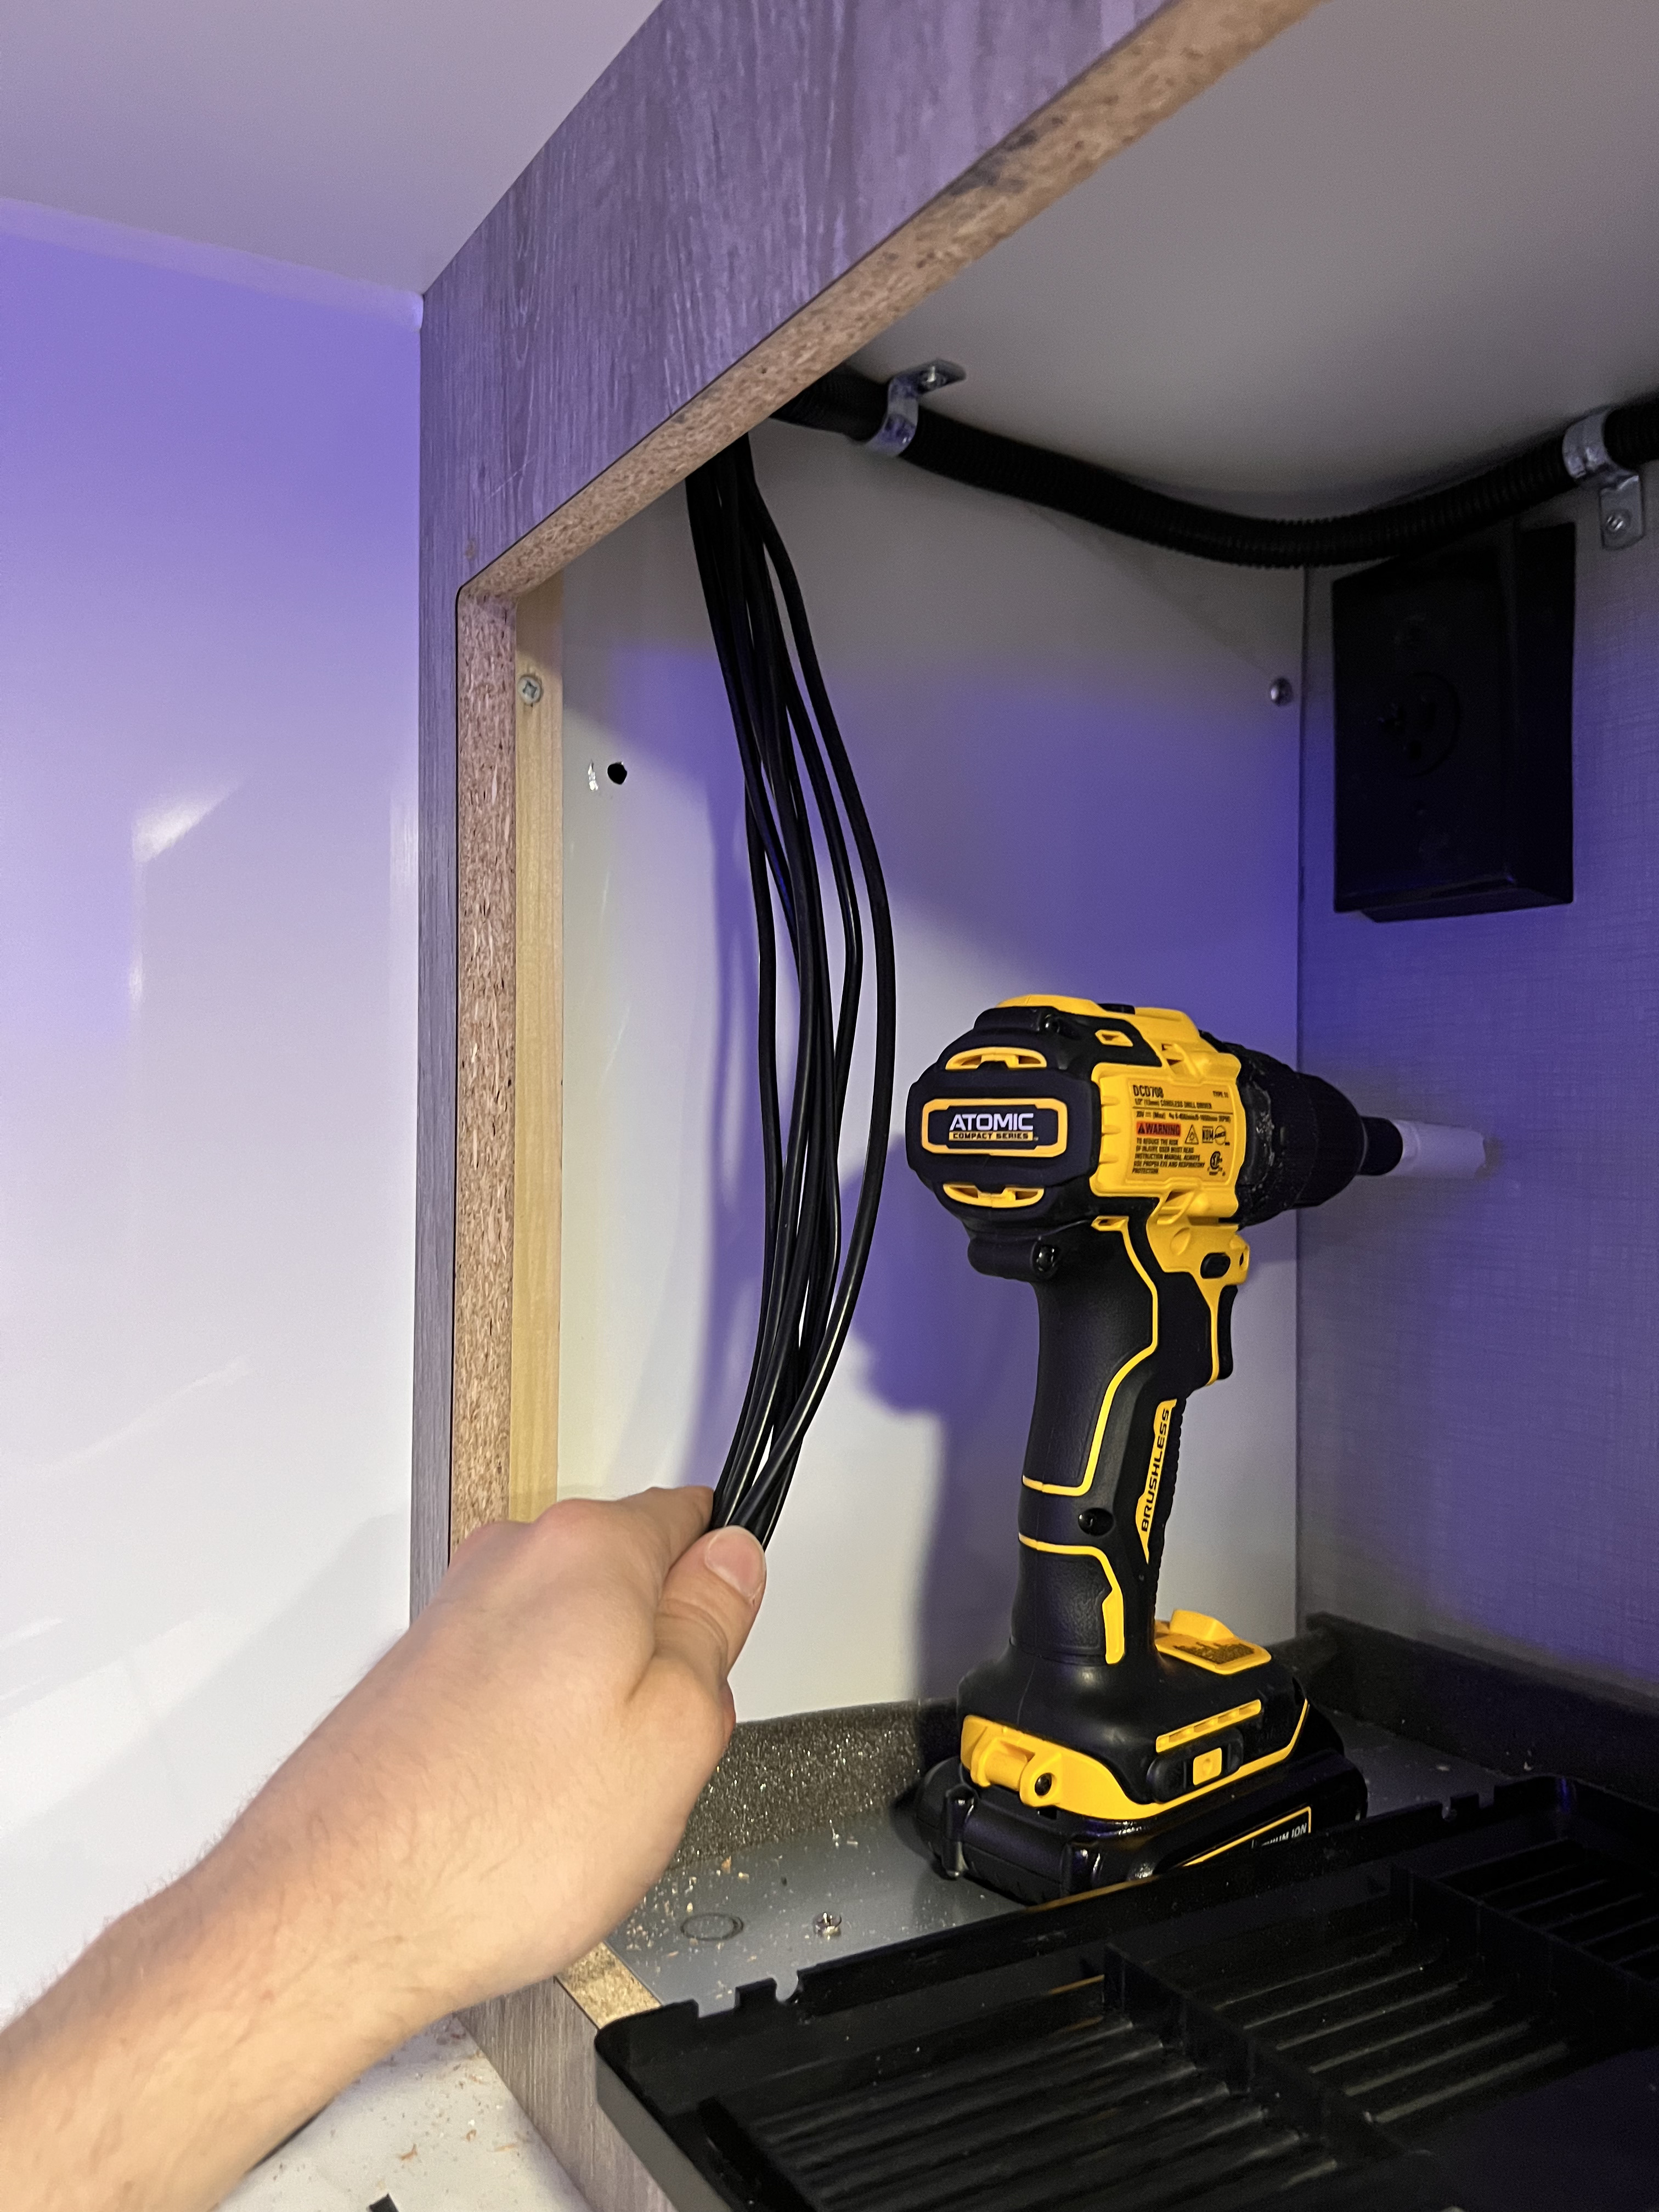
Now that the cables were inside, the question now became how to route the cables from the microwave compartment into the electronic compartment just below. I asked the Intech Sol Horizon Facebook group about how they've previously done this. The best suggestion was that you can drill into the exterior shell of the shower surrounds. there is a fairly large gap between the interior shower surrounds fiberglass and the exterior, which is mainly where a lot of plumbing and electrical systems are routed through. If you take off the radio, you can see this more clearly:


The factory-cut hole in the radio comparment is large enough that you can fit your whole arm in it, which should make it easy to fish the antenna cables through. I cut a 3/4" hole and put the cables through that hole, then fished them into the radio compartment.


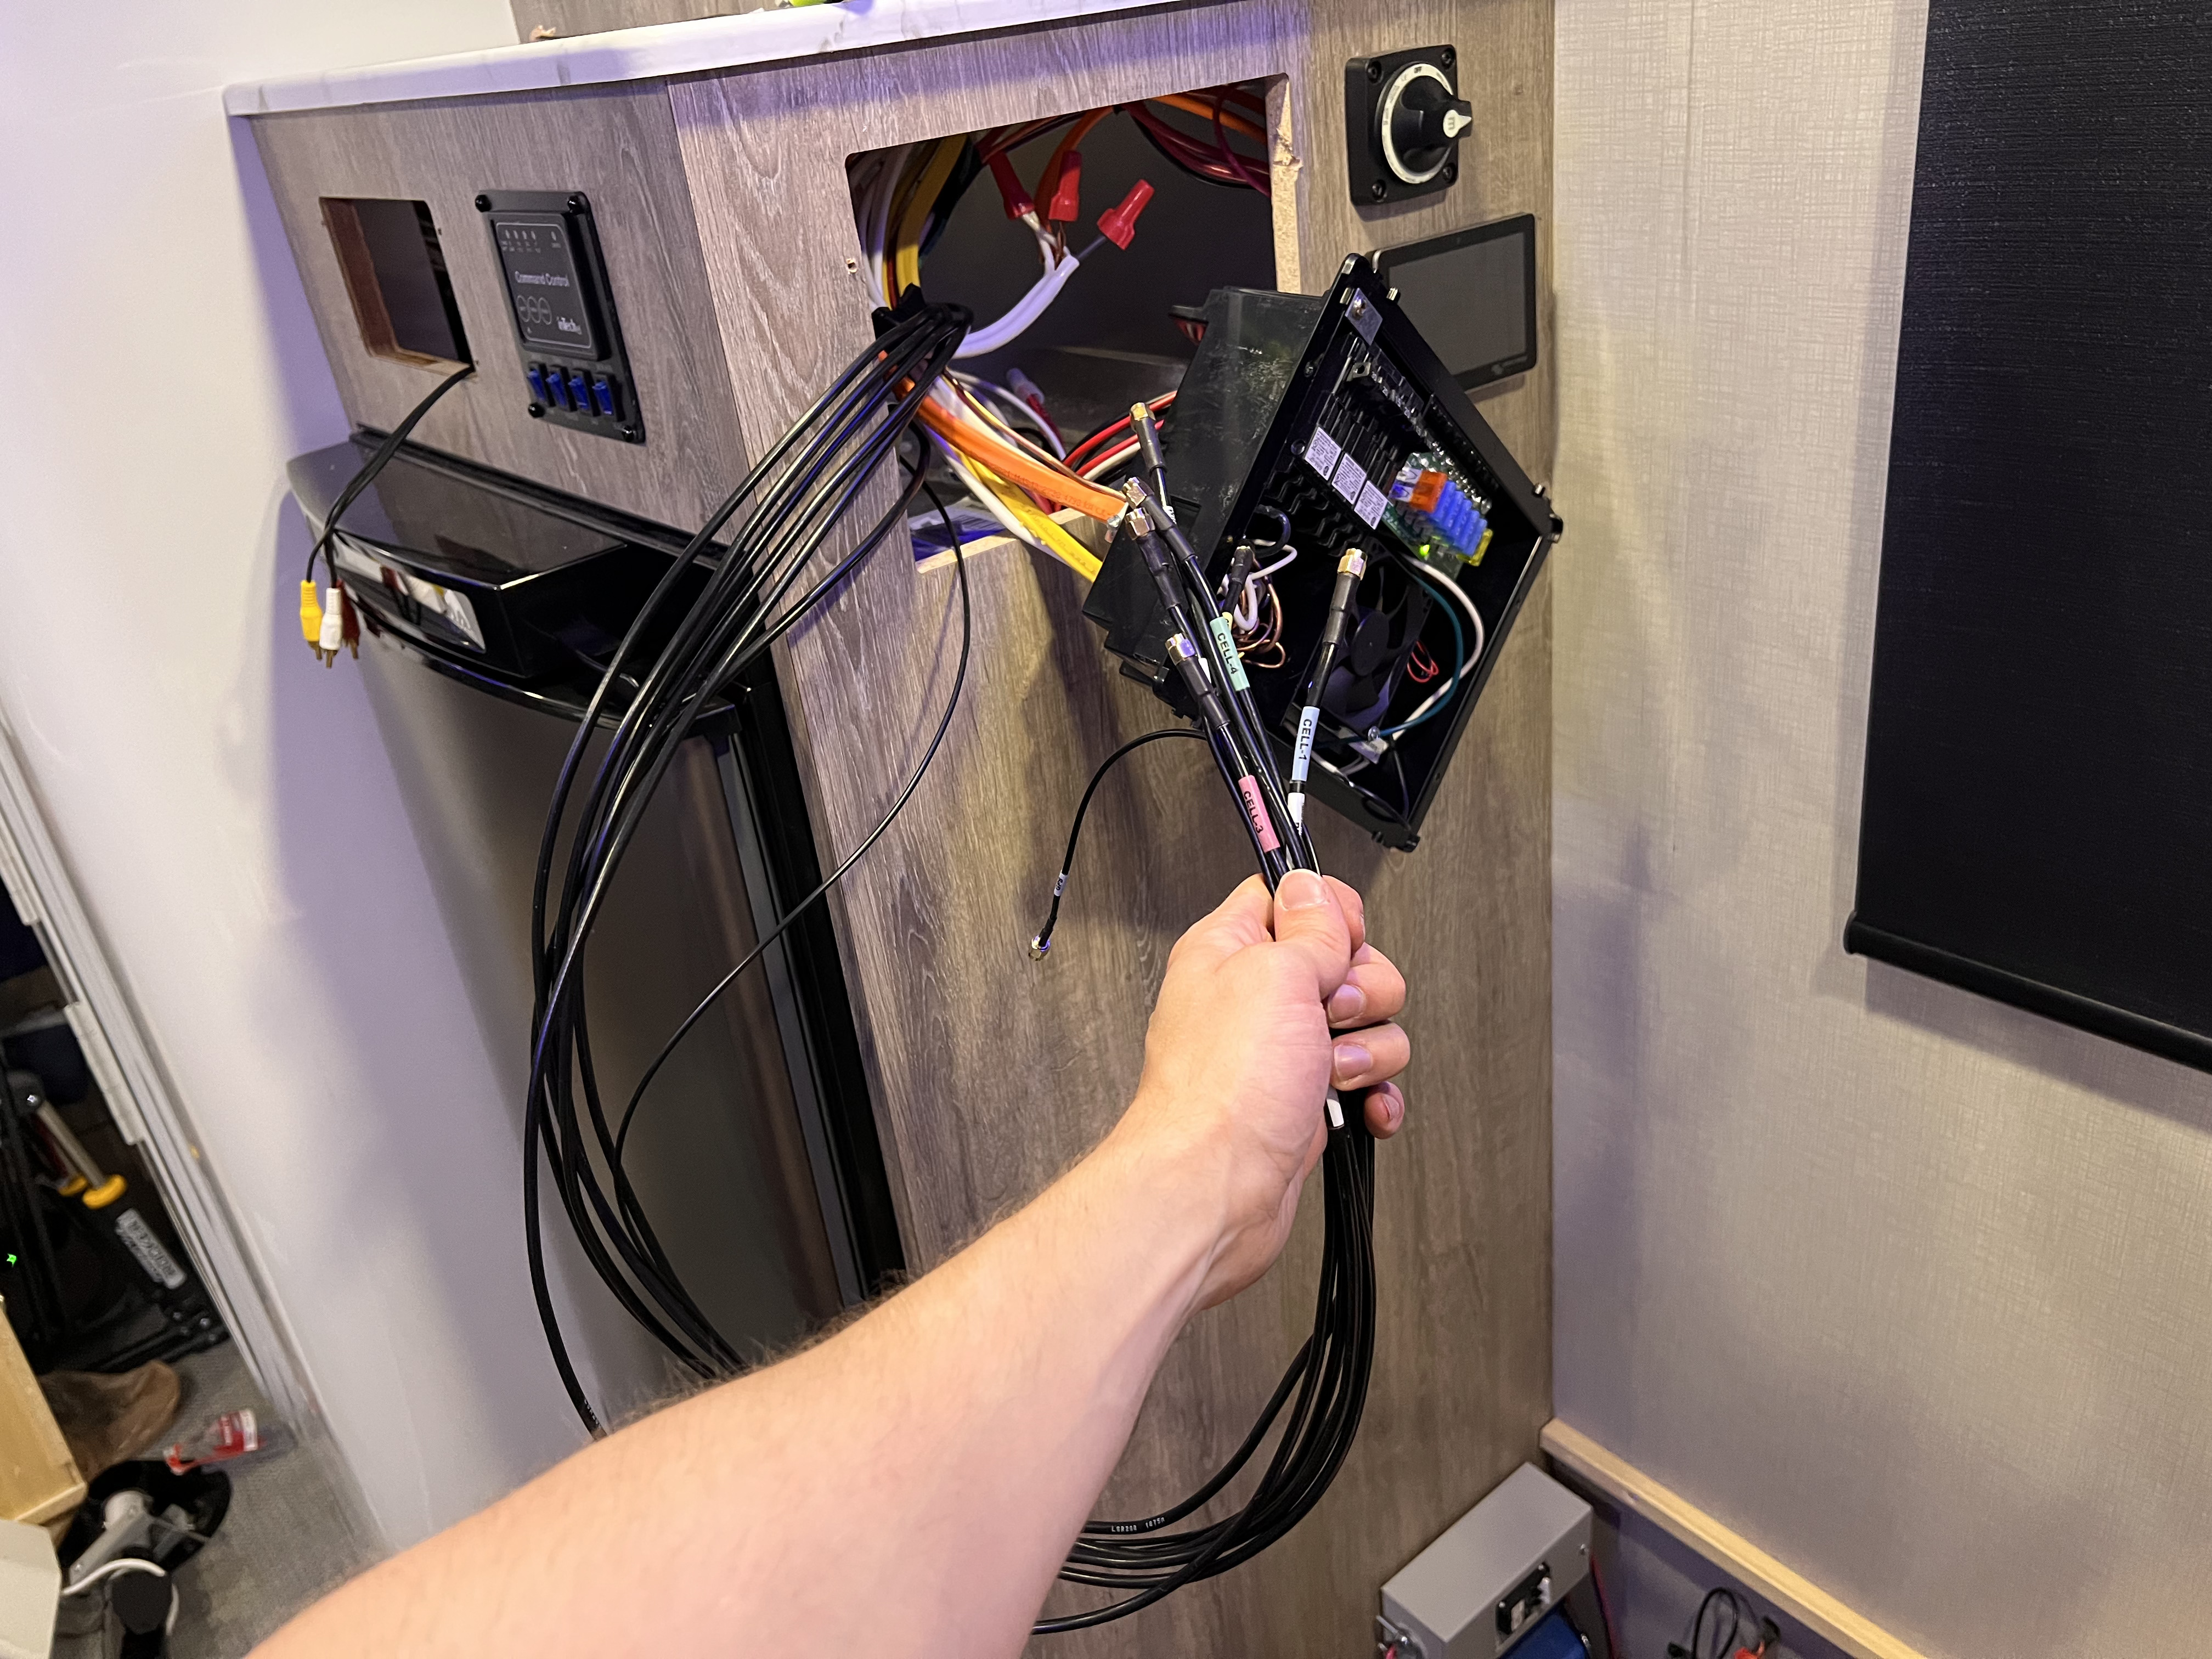
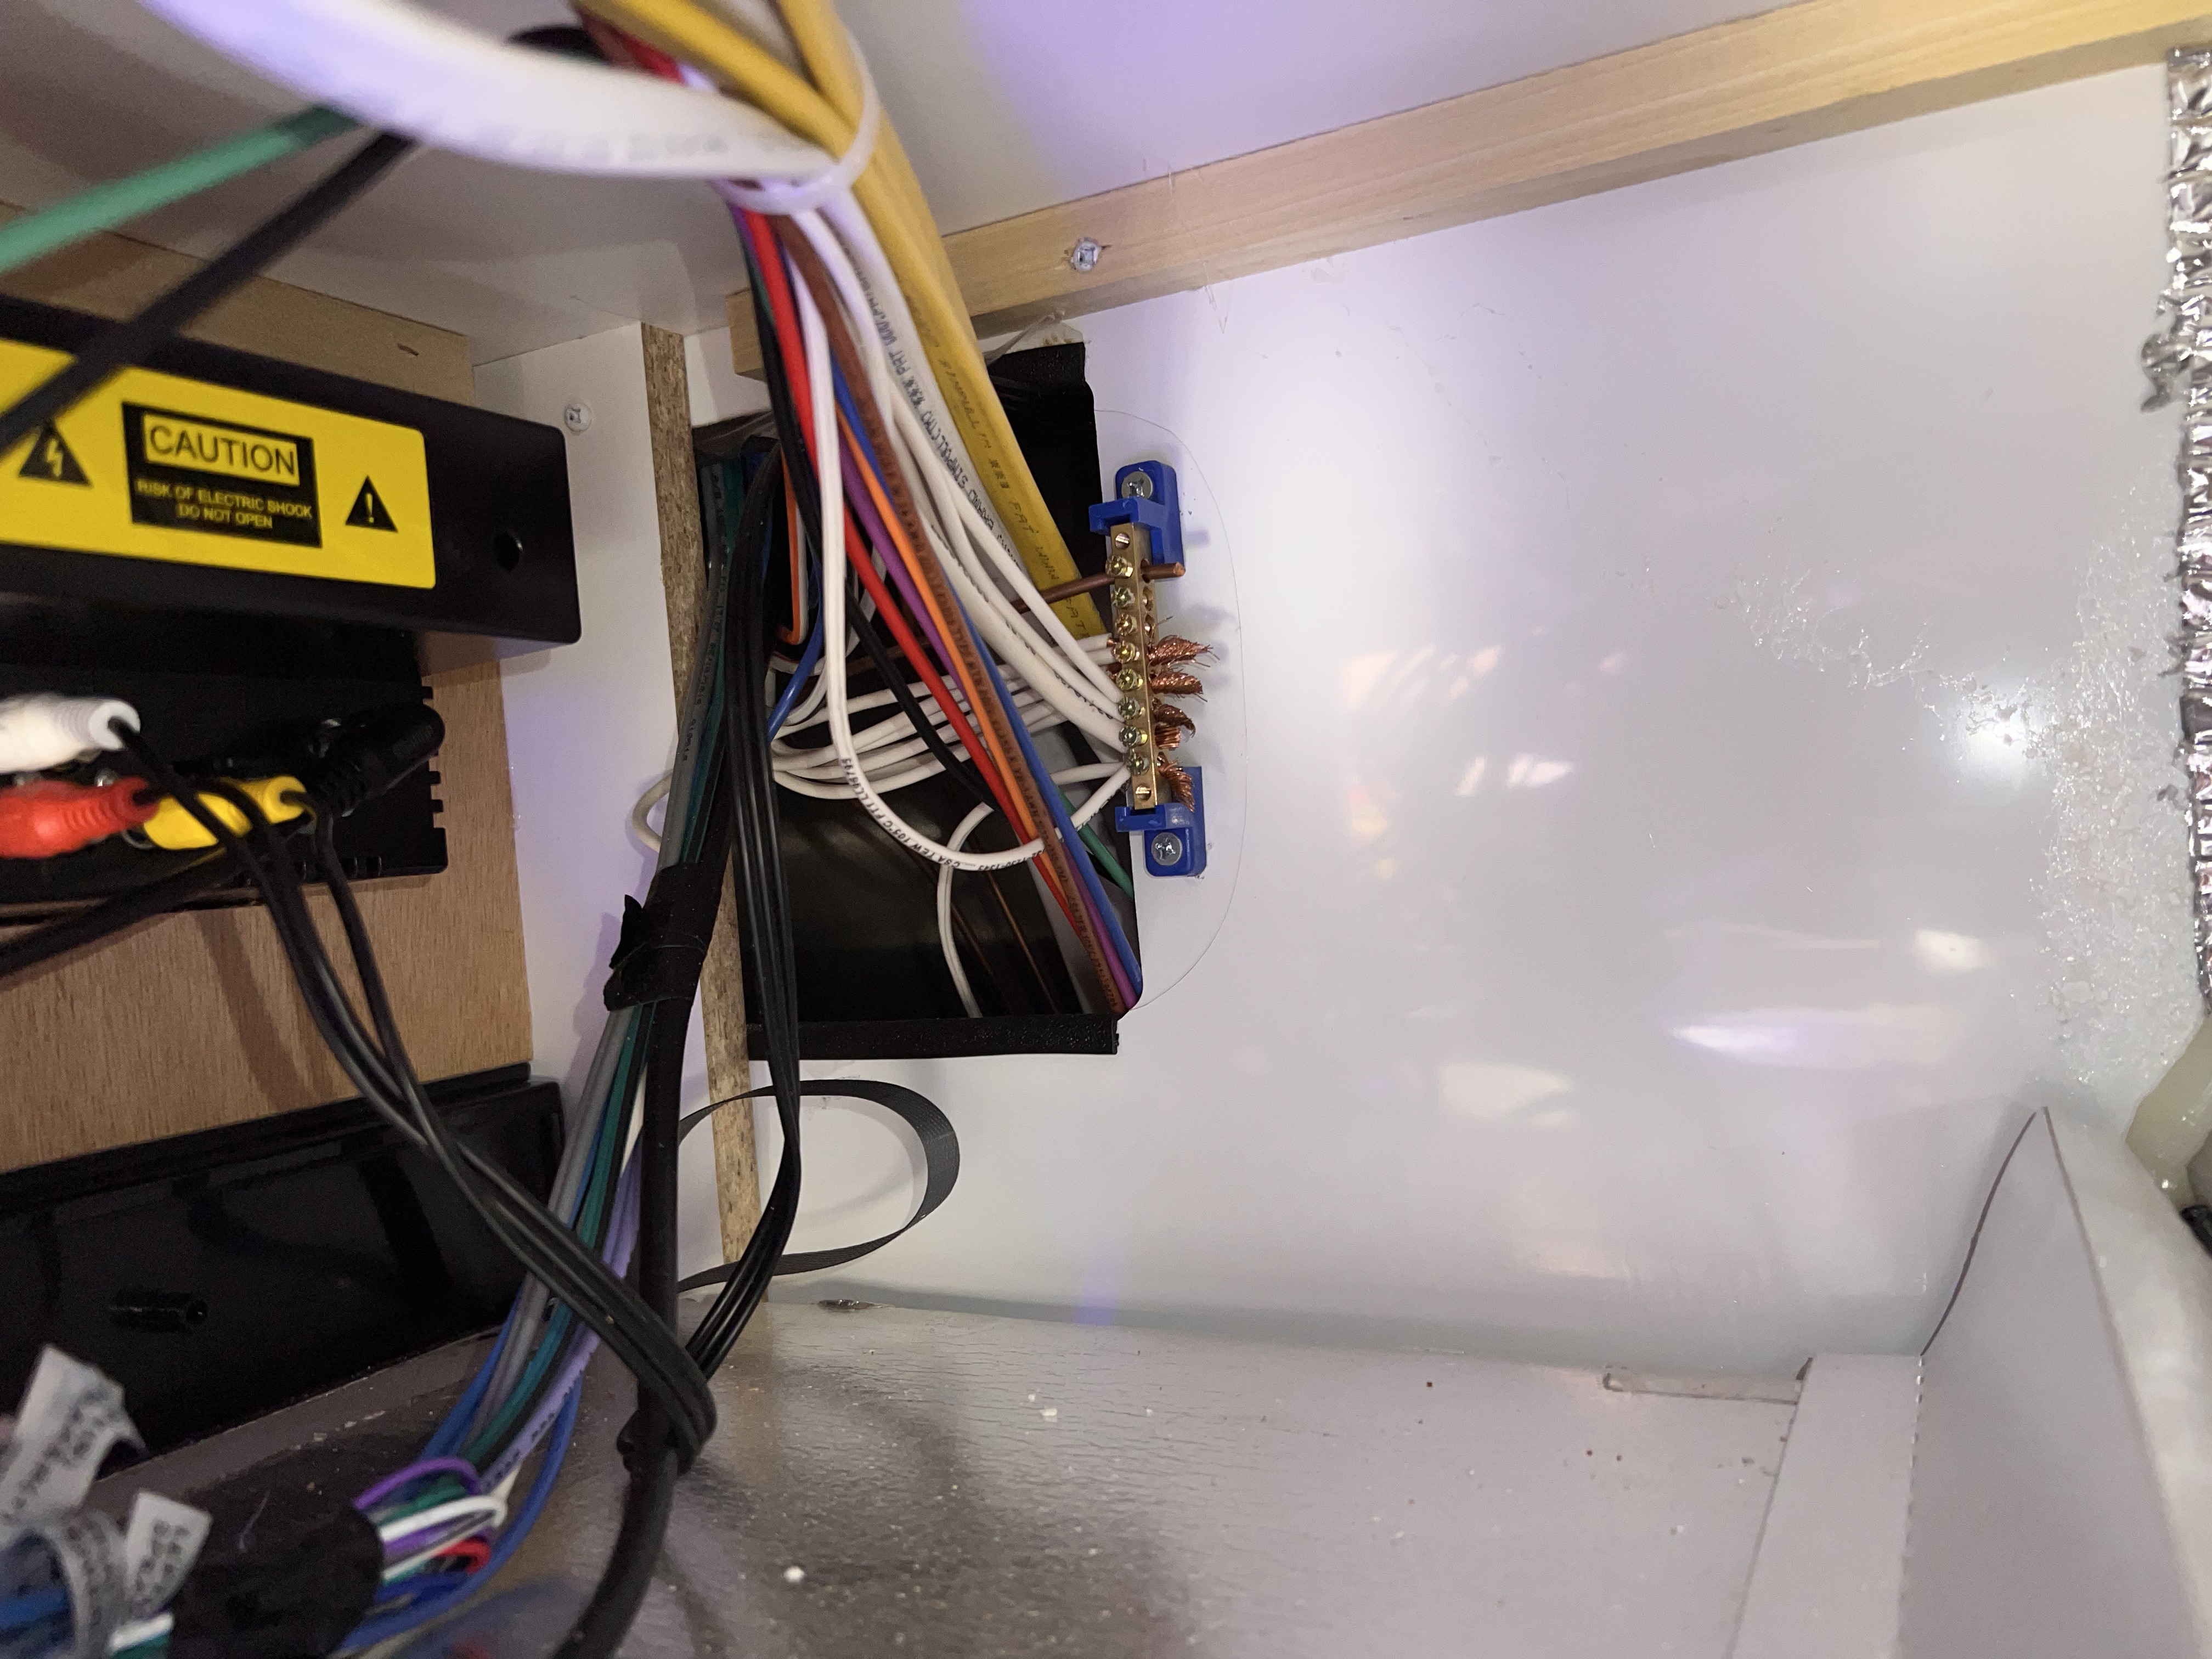
I toyed around with how to place the router on the wall. I wanted it to be as close to the fuse box as possible to save space and eventually found the best place to drill another 3/4" hole for the cables. After that, it's pretty easy to connect the cables to the router. Just make sure you follow MMH's directions on where to plug each cable.

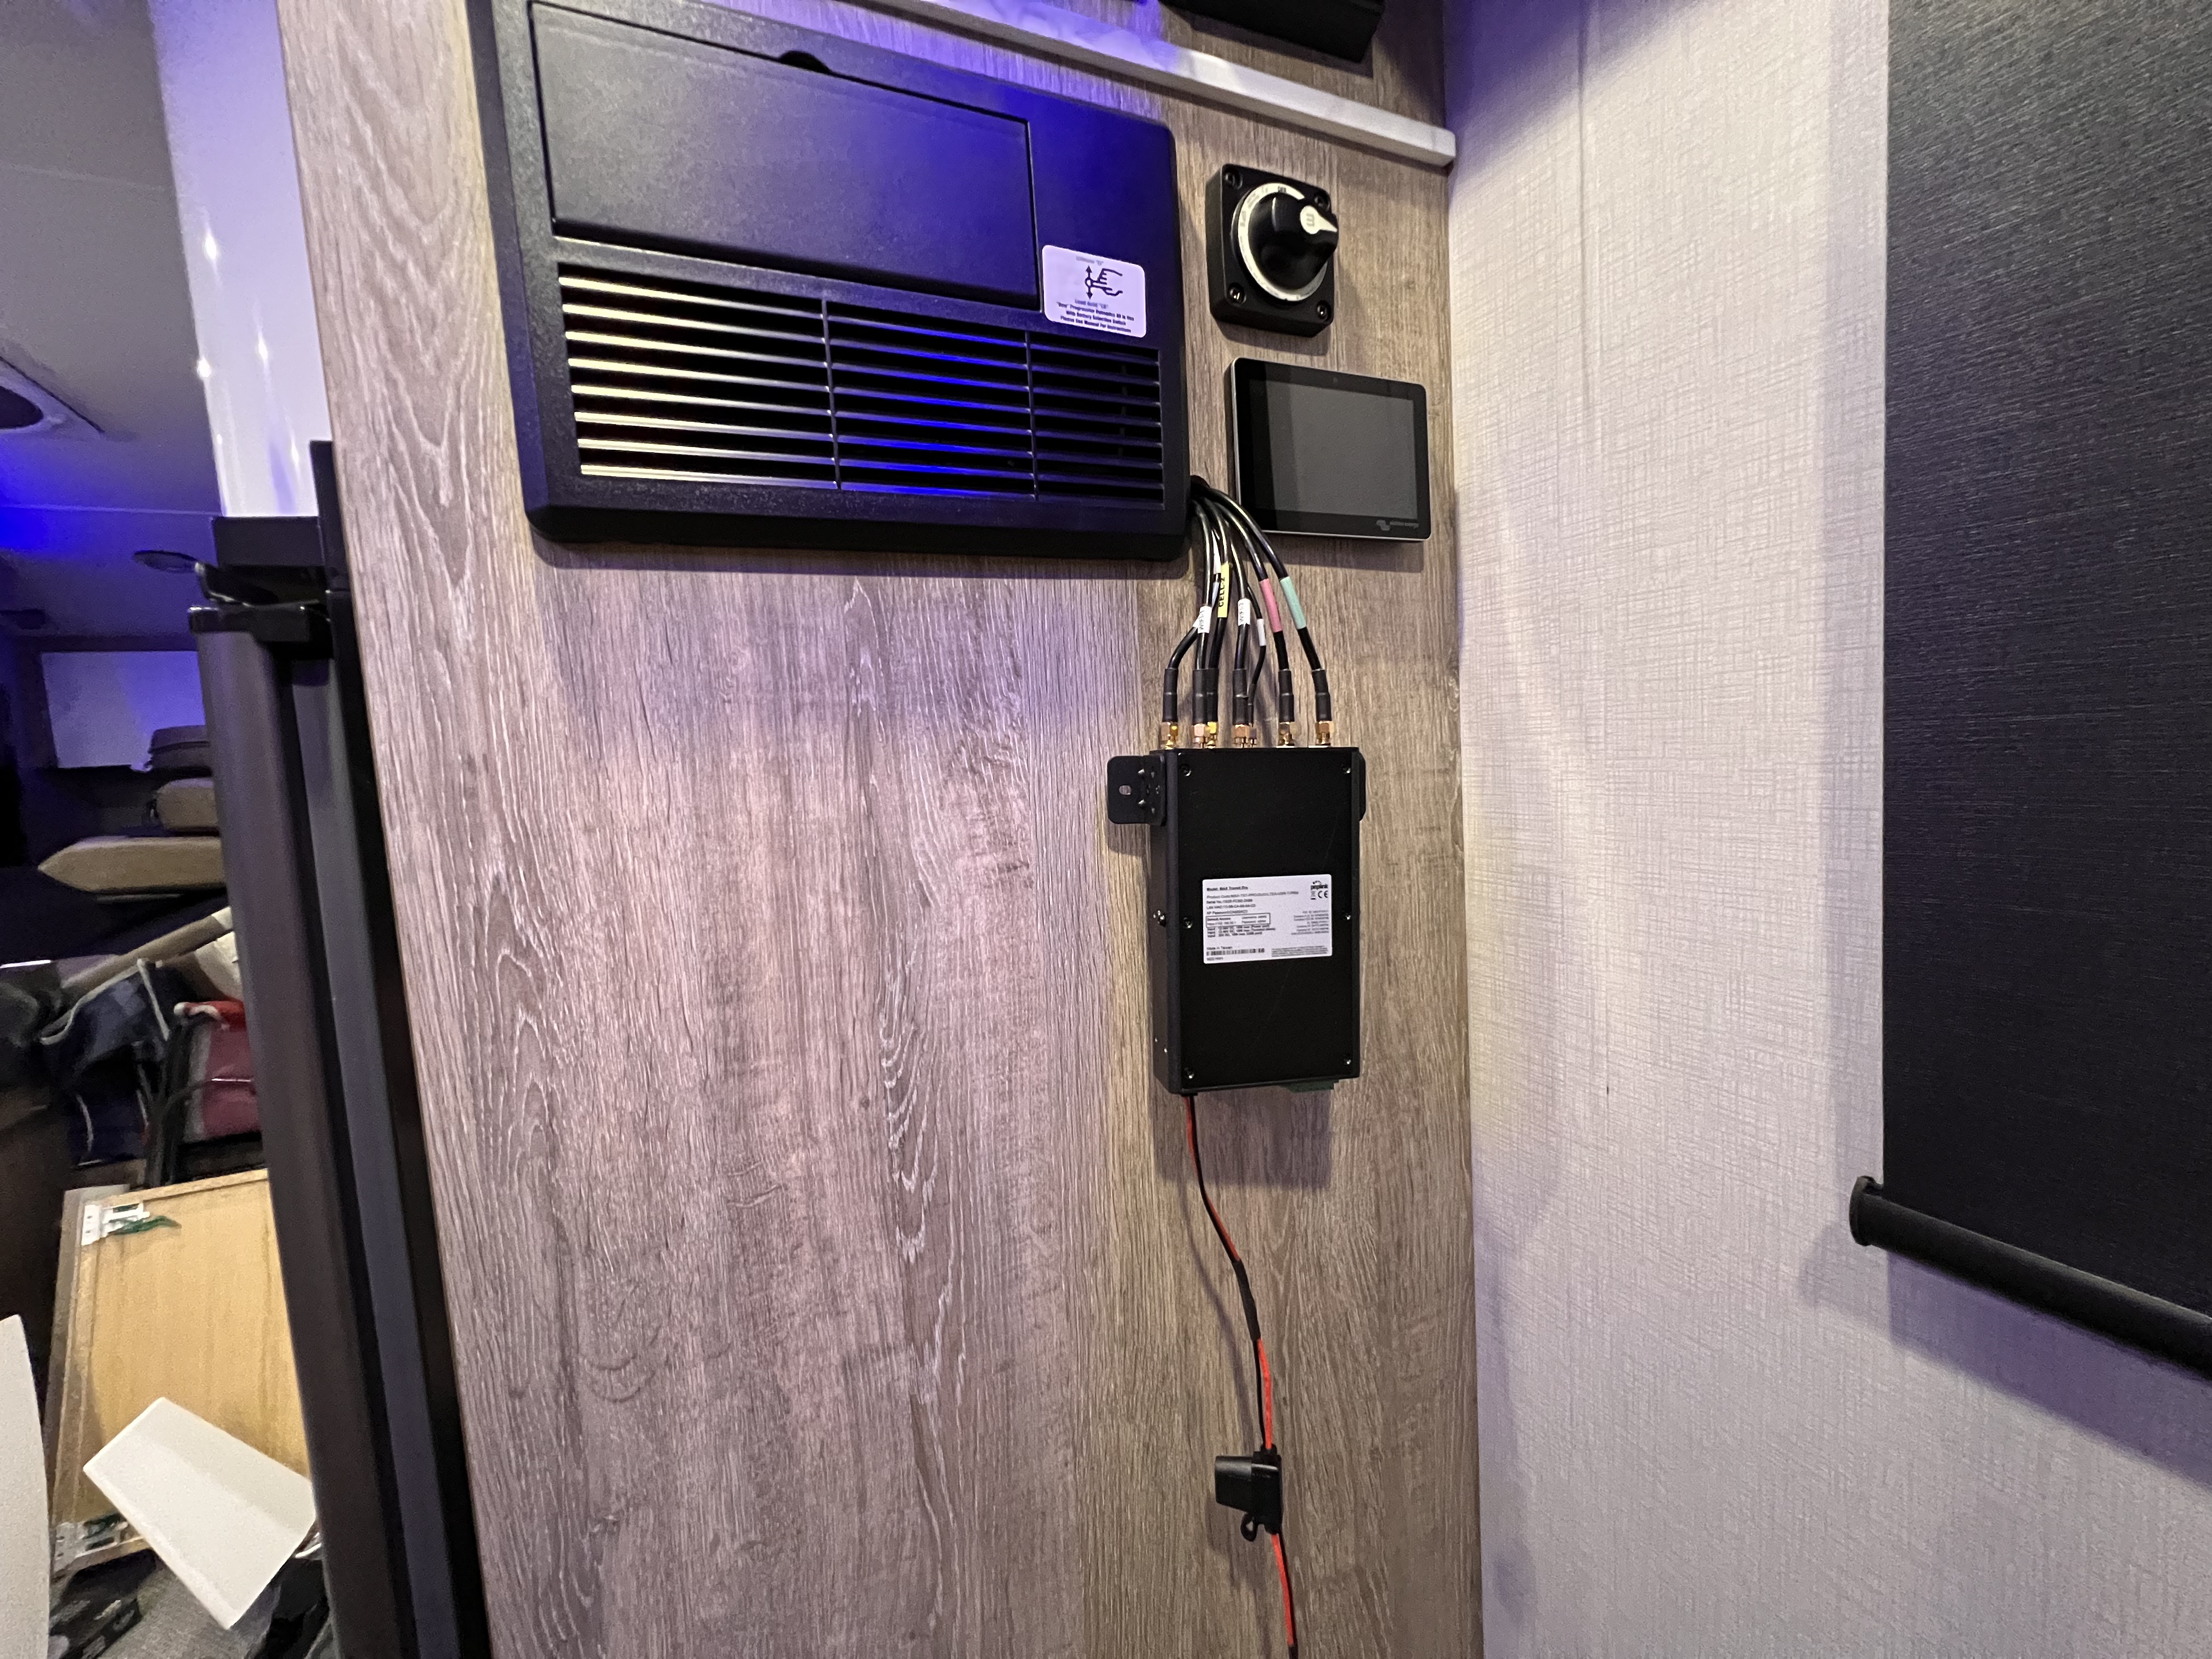
The Peplink router comes with a DC connection or you can plug it into the AC outlet. It's generally not recommended to use the AC outlet for electronics if it can be avoided because you incur a huge efficiency penalty when you invert the battery's DC into AC, just to convert it back to DC again at the wall outlet. Using a simple crimping tool and a ring connector, I attached the DC cable directly to the battery hubs.
Note
The better solution for the DC connection is to attach it to the power cut off switch instead of directly to the battery. The Peplink router consumes energy even when not in use, so having the ability to quickly shut it off along with all the other electronics in your camper will save your battery.
After drilling the router into the wall, plug in your SIM cards and the DC power connection. Now the phyiscal installation is finally done! Whew, that was a lot! 

Configuration
Now that the router is connected to the external antenna and powered up, it's time to log in! The default credentials are posted on the back of the router. Connect your computer to the WiFi access point created by the Peplink router. Go to https://192.168.50.1 (or whatever IP address the router lists) to log into the management console. The default username and password is admin. You'll be taken to page that roughly looks like this:
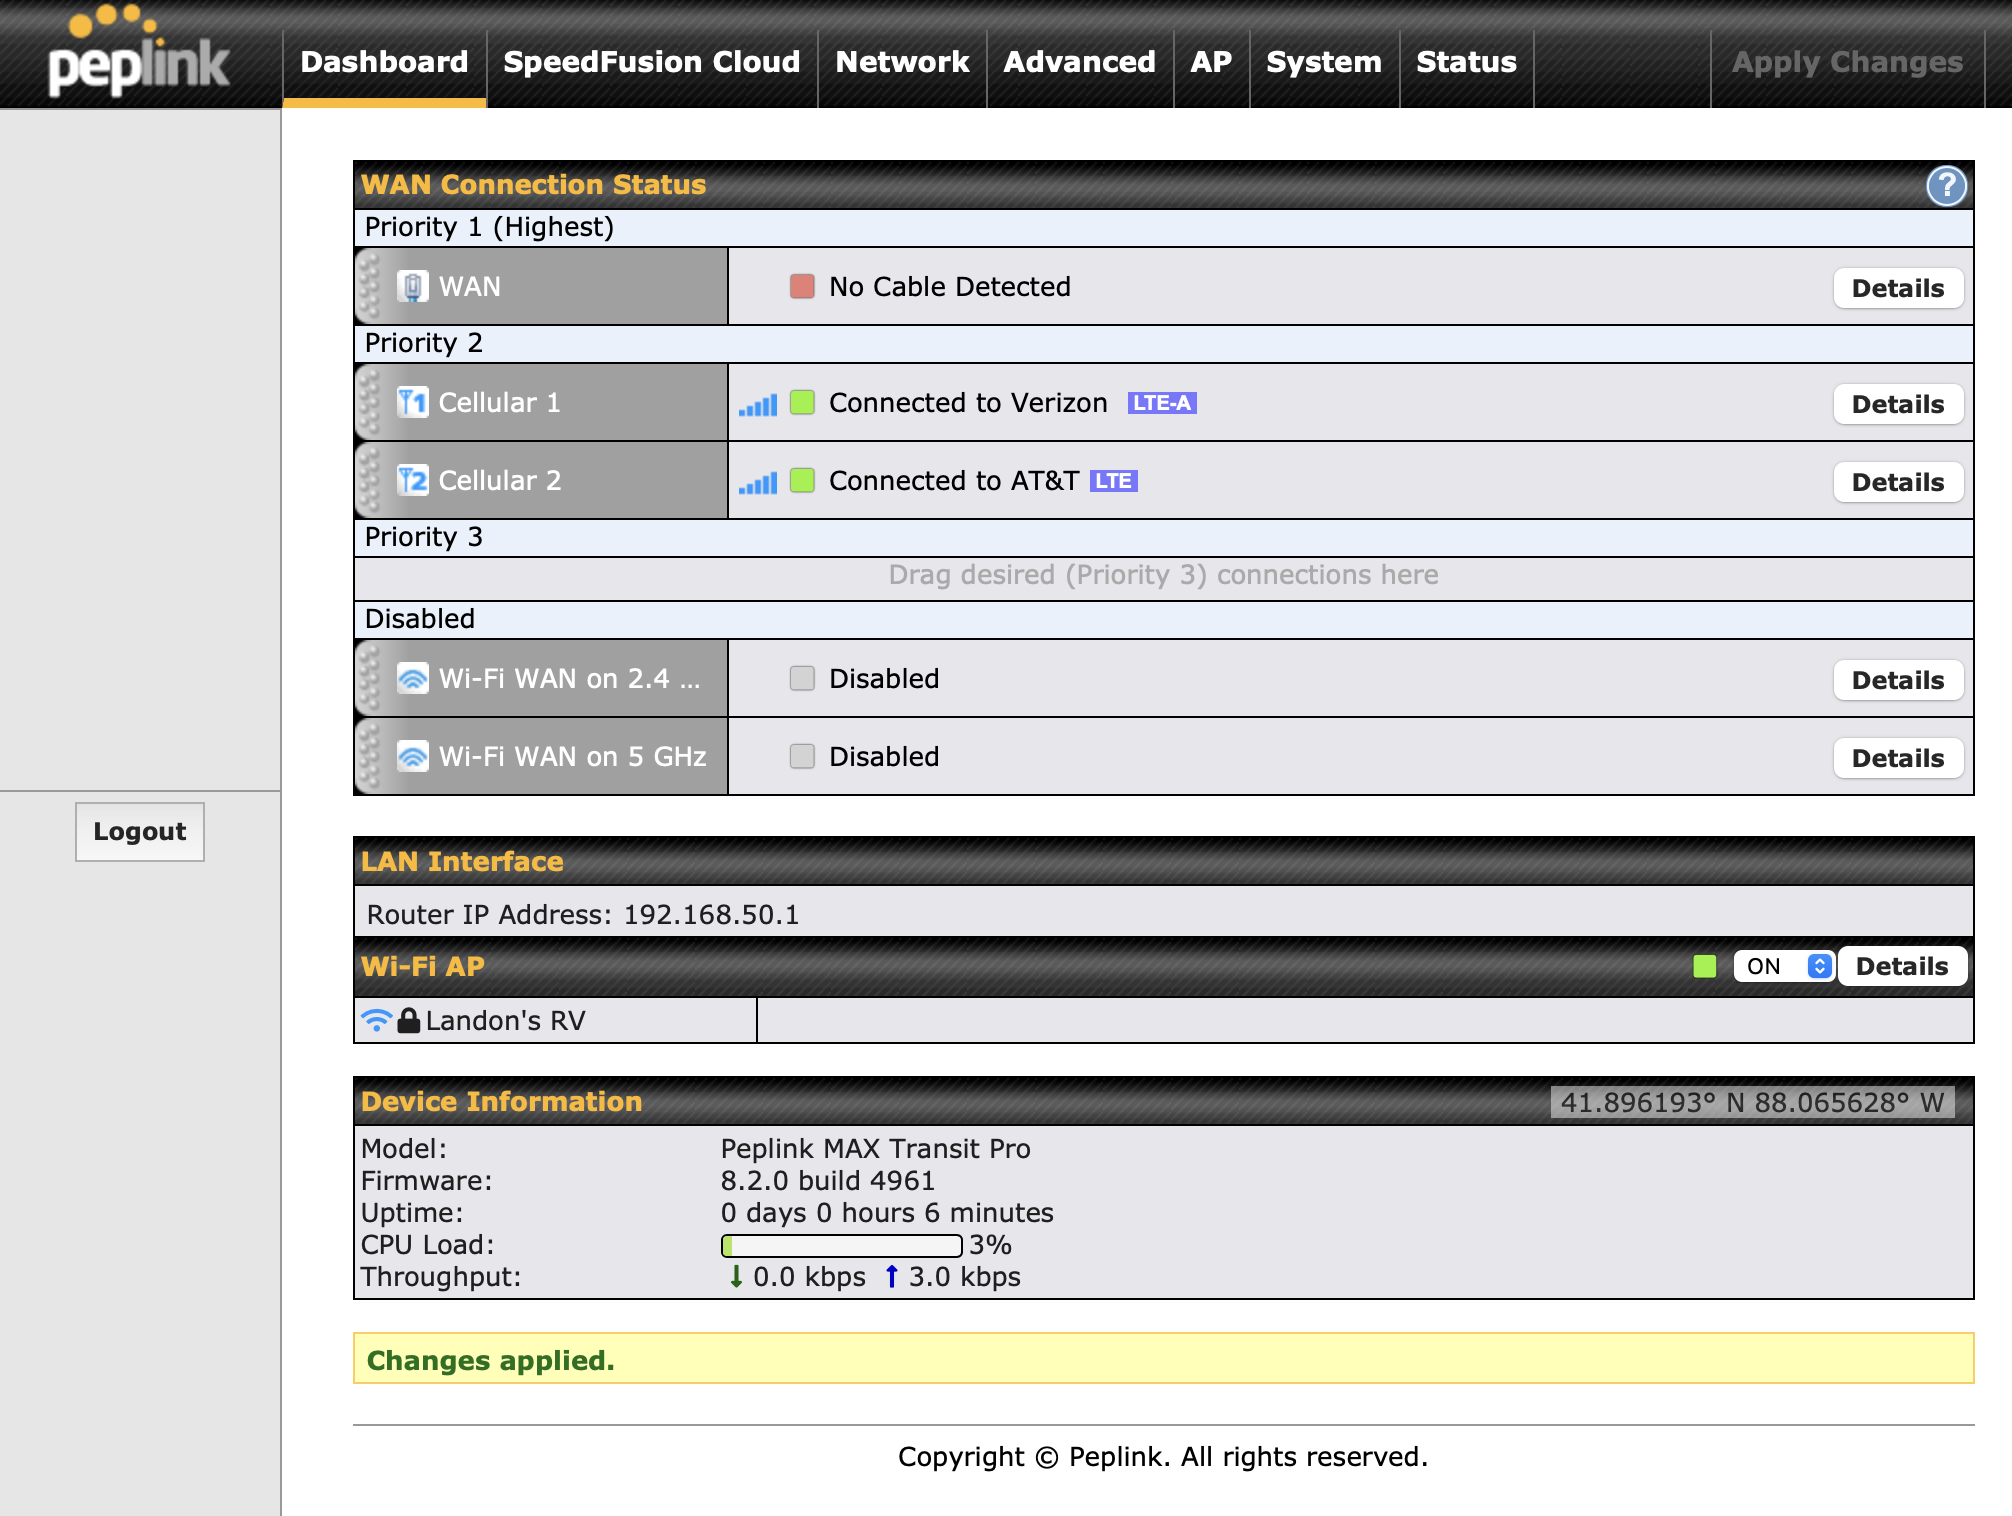
The Cellular 1/Cellular 2 status may take a couple minutes to update. If you're using a Verizon SIM card, you need to configure it. Click on Details to bring up its configuration page. There are a few settings I like to set manually. First, change the Network Mode from auto to Verizon Wireless (or your respsective carrier).
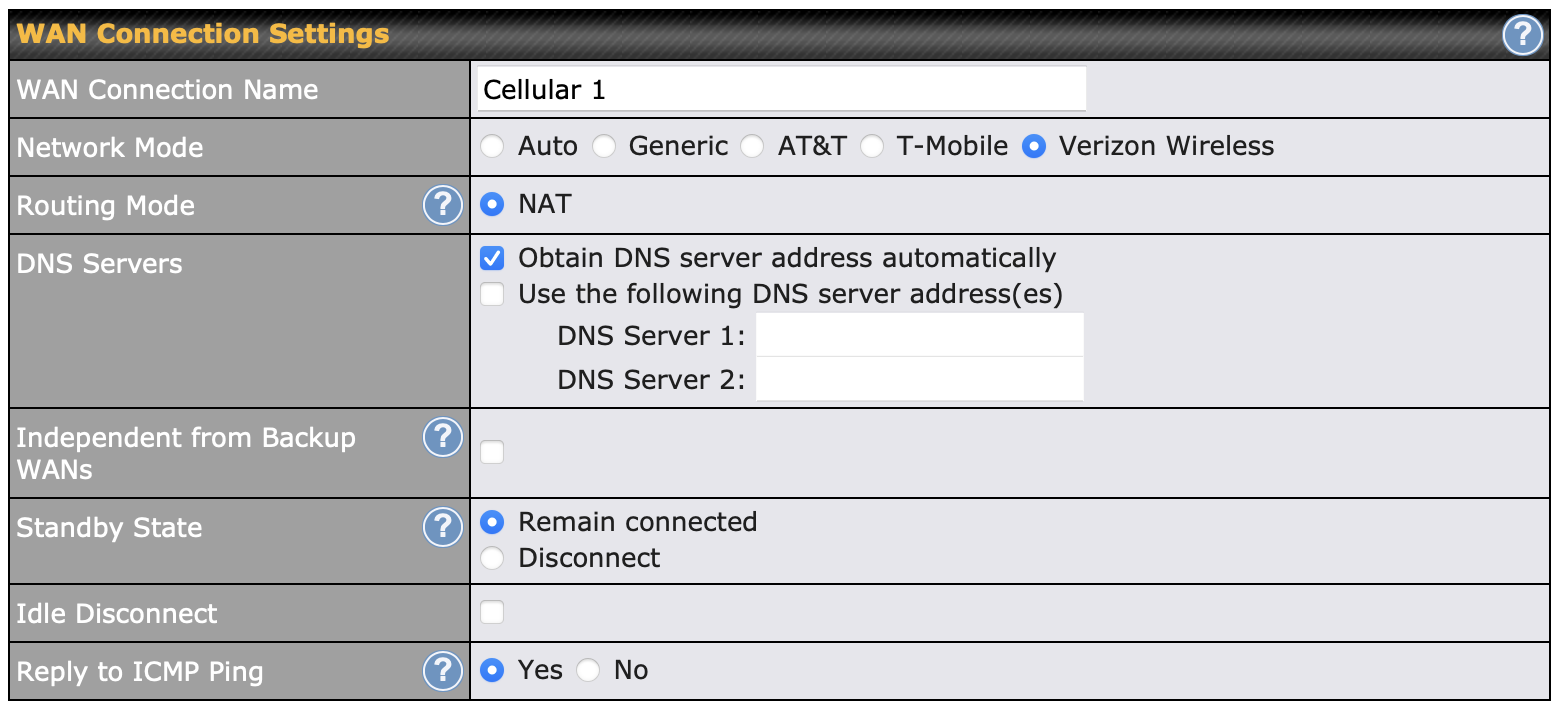
Verizon-specific steps
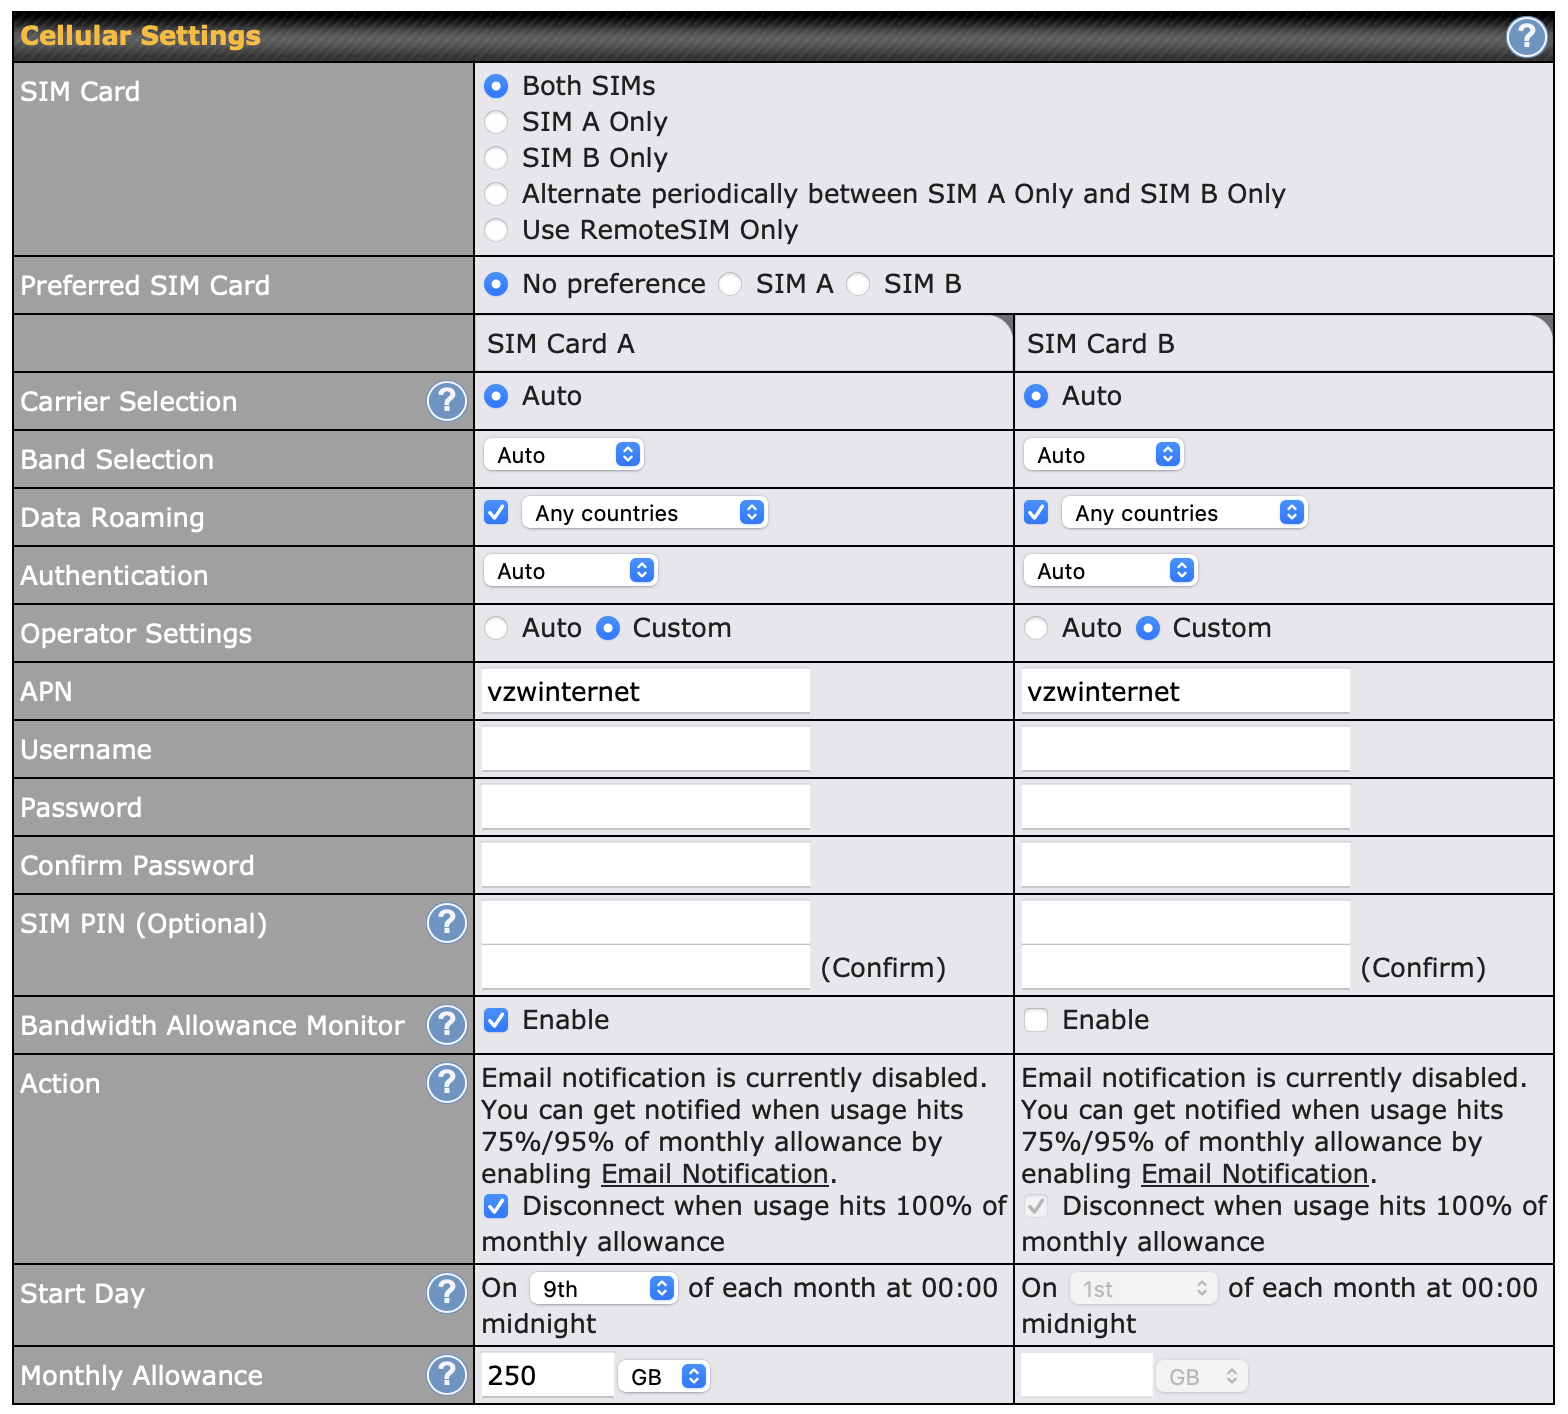
The following steps should only be done for Verizon Wireless. Go to the Cellular Settings section:
- Set
SIM CardtoBoth SIMs. NOTE: each individual SIM card slot appears as TWO SIM cards to the Peplink software. This section here is not referring to both physical SIM cards. Even though this appears to be configuring both SIM cards, you're only configuring one at a time. - Set
Preferred SIM cardtoNo preference. - Check
Data Roaming. - In
Operator SettingsclickCustom. - Set the
APNfield tovzwinternet. - Optional: set a bandwidth monitor on both columns.
Warning
This device has two SIM cards. When you go to the Details page of Cellular 1/Cellular 2, it gives you two columns for SIM A/SIM B. These are not referring to the two physical SIM card slots. Confusingly, the configuration for each physical slot allows you to define settings for TWO SIM cards. One of these columns will refer to a SIM card that simply doesn't exist. To reduce the risk of misconfigurations, please ensure both columns are identical.
SpeedFusion Cloud
We're about to get into a bunch of networking jargon so feel free to skip this step if you are not super technical. Here's their official video explaining the technology. It's worth a watch.
SpeedFusion Cloud is a service that Peplink provides that allows you to multiplex your data connection between all of the ISPs your router is connected to. In my setup, I have Verizon and AT&T as my two ISPs. The idea of SpeedFusion is that it acts somewhat as a VPN where the connection from each ISP is tunnelled into one of SpeedFusion's cloud datacenters. Their cloud infrastructure will combine these two connections into a single connection that is ultimately used to communicate with the end services you're using. The idea is that their cloud system is able to detect if one of your WAN connections is suffering and will automatically reroute traffic through the other connection. This allows for automatic failover behavior.
WAN Smoothing
Their WAN smoothing technology works by duplicating your upload traffic through two or more WAN connections. Their cloud service will arbitrate these two connections and if a particular sequence number from the UDP connection is dropped from one stream, it will attempt to find the missing sequence from the other stream. This allows double redundancy over lossy and unreliable cellular connections that are often traversing microwave links (especially when you are at a remote location where your local cell tower does not have access to a wired internet connection).
The drawback of this scheme is that it increases both your latency (due to the fact that an intermediary service has to multiplex two WAN streams into one) and your overall data consumption (due to the packets having to be sent twice). It may be worth the investment if video conferencing is critical to your job.
Results
The results were simultaneously phenomenal and underwhelming. The first speed test I ran was under my Verizon plan which I expected would do very well, but it simply  'ed the bed:
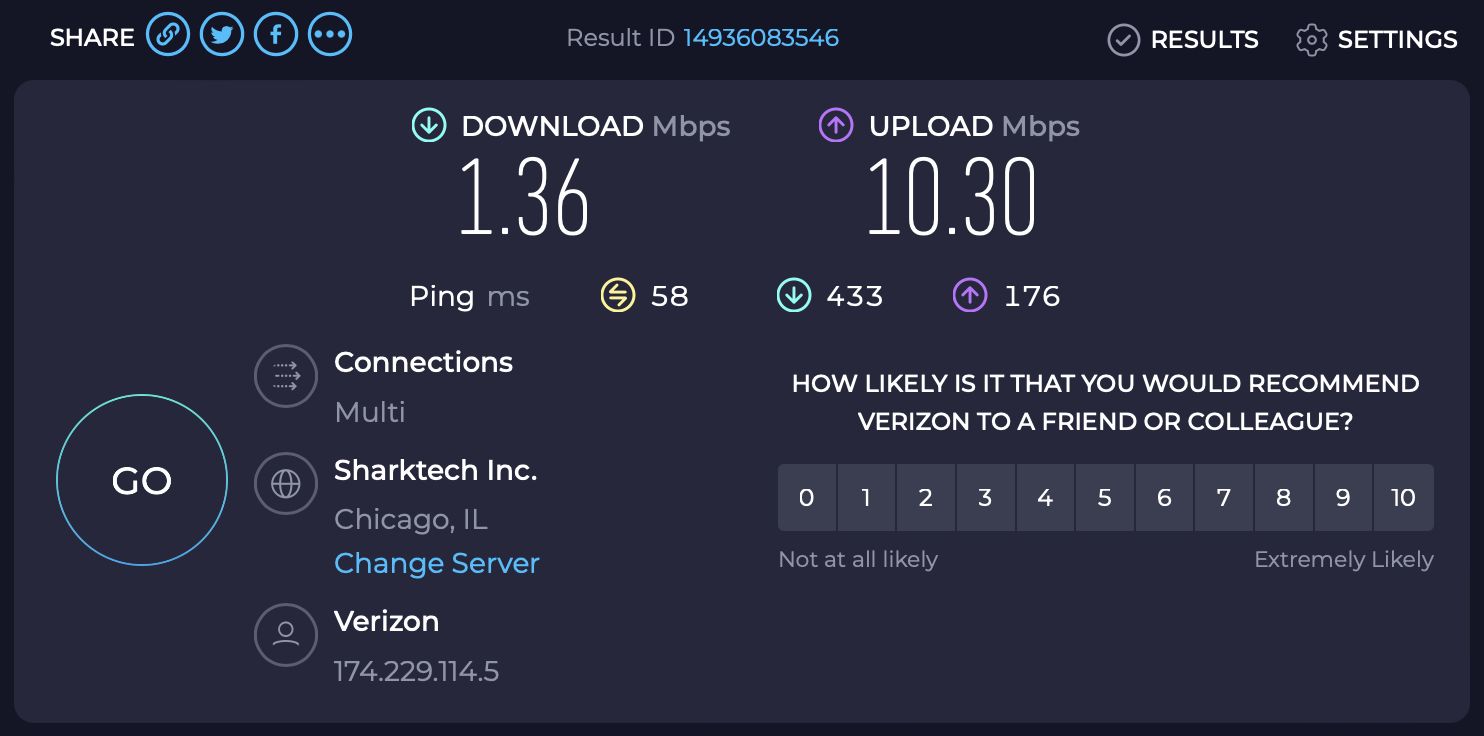
The download speed is so bad that I was half convinced that I had installed something wrong. The AT&T results on the other hand faired much better:
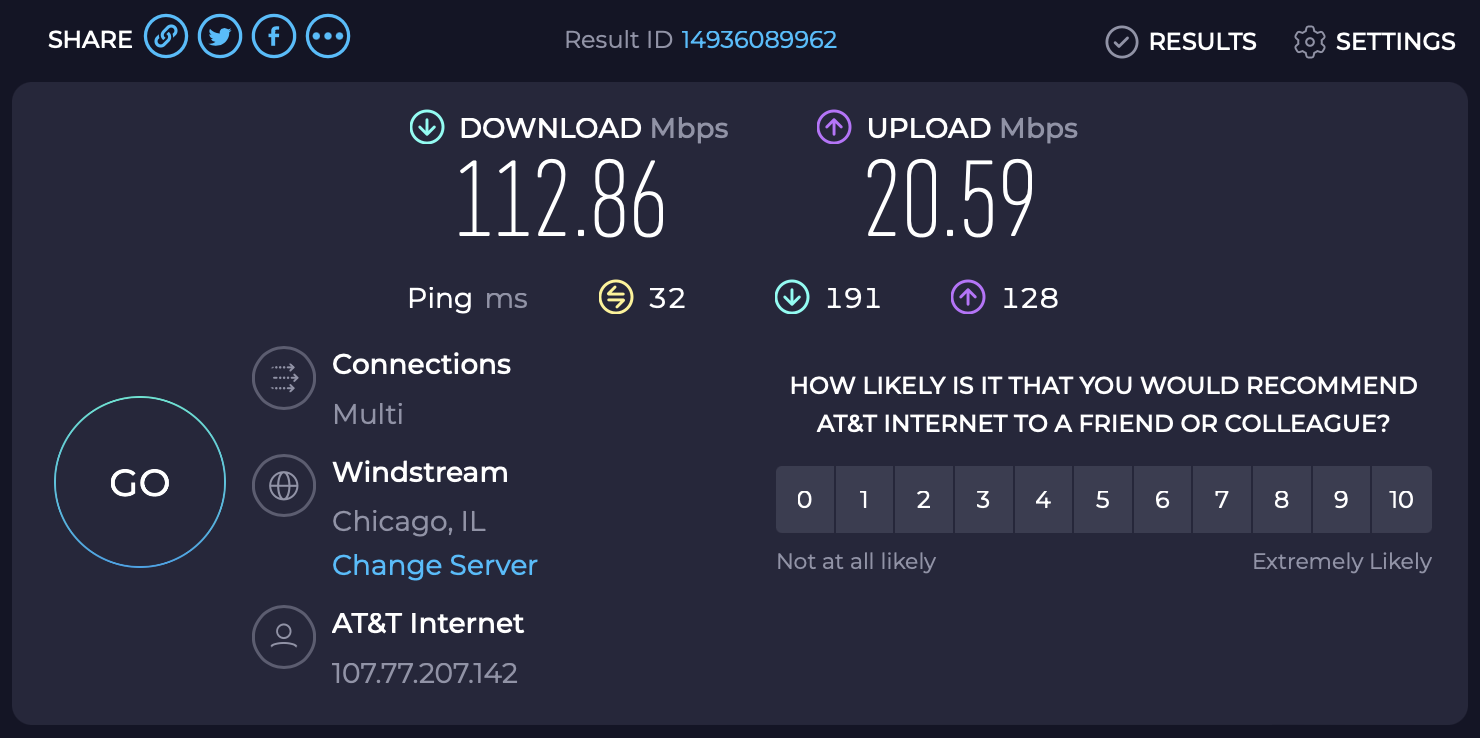
Throughout my tests on the road, the same story tends to play out where Verizon performs "okay-ish" and AT&T performs well. This isn't entirely unexpected as my Verizon plan is rate limited to 25Mbps and the AT&T plan is truly unlimited. The Peplink router provides WAN signal quality graphs and I've found that in general, AT&T is capable of better Signal-to-Noise Ratios (SNR) in remote areas out west. Even so, a good SNR number is not indicative of a more reliable connection as it also depends on the provider's access to wired internet (meaning the quality of their microwave relays matters a lot), how congested the local tower is, what path the microwave relays take, the weather, and what bands your local tower supports.
Conclusion
Hopefully this post was useful to other Sol Horizon owners that are looking to add a more robust cellular installation to their rig. My current goal in life is to be able to travel the US in my rig while working in remote areas, and this project was the last piece I needed to make that dream a reality.
Let me know your thoughts below (you'll have to create a GitHub account to comment), thanks!